“Wait-no-more” organizing challenge

This is the post you were supposed to get on Friday. So much for “wait-no-more.”

My office is the least set-up room in our house. As such it’s a constant challenge to stay organized. I’ve shared my shame before more than a year ago, and, apparently, I’m going to do so again.

This time it’s mostly just a build up of paper. I have a hard time staying on top of my paper always. Despite a rainy Sunday two weeks ago, I just couldn’t motivate myself to tackle it.

Piles of paper on top of the filing cabinet

Then, Jen at IHeart Organizing posted a “Wait-no-more” organizing challenge. She’s tackling four trouble areas in her home. I may not do four, but I was going to get my butt in gear and do at least this one.

Jen shared a cute printable to help get the organizing started, so the first step was filling that out. She asked what’s working and what’s not working. It was really good to consider that before I just dove into cleaning up the paper.

IHeart Organizing printable

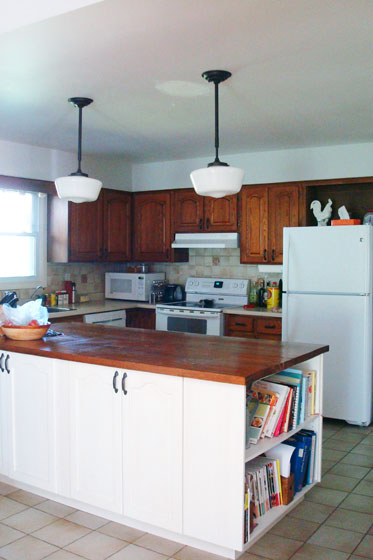
The wood plate that my Dad made for us works very well on the hall table for mail. Unfortunately, mail and papers also find their way to the kitchen island, which doesn’t work so well. I still love the little nook in my office. The bulletin board, calendar and dresser drawers all work to help keep us organized. I love the drop zone for my keys, sunglasses, wallet. Unfortunately, I’ve dropped a few too many things in the drop zone–the curse of a flat surface.

Paper storage options

On the other side of my office, the wire caddies on the wall could work to store paper until I’m ready to file it. Unfortunately, I forget which bin is which and end up stuffing everything in together. Some labels would help me stay organized. The filing cabinet may be ugly, but it also works. We are a paper household, so we need a place to stash it all. What doesn’t work so well is the top of the filing cabinet–another flat surface that is just a magnet for piles of paper.

Paper storage options

The plan for the week was to sort, reconcile, file and label.

Matt was out with friends on Friday night, so I finally got started. (Do I know how to have fun or what?) Another rainy day on Sunday allowed me to finish the job.

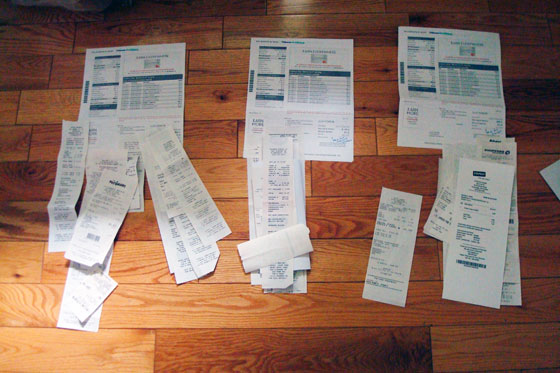
I only do the filing and reconciling every few months (I’ve tried monthly, and I just don’t stick with it). I’ve learned that I need various systems to control the paperwork between reconciliations. (My problem this time around was that everything got a little out of control).

The first part of my system is a receipts bin. This is just a cereal box covered in wrapping paper (a tip I picked up from IHeart Organizing) and tucked into a drawer in my office. Receipts come out of my wallet and into the bin. (Other bins hold gift cards, takeout menus and coupons).

Receipts

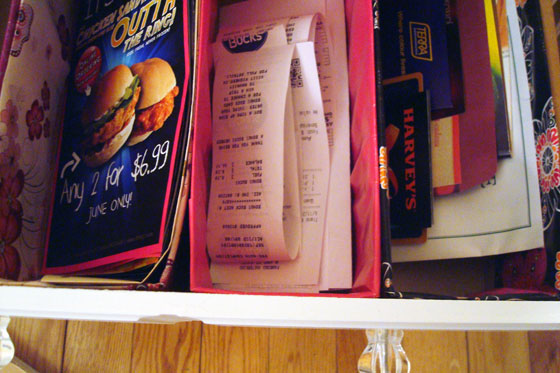
The statements and other mail go into the wall caddy. I don’t think I’ve shared this project before. The organizer was one of those white wire things. It had been left behind by past owners, and I’d tossed it in a closet. When I was first organizing my office a year ago, I realized it might work to sort the mail. Remember the first tip of storage and organizing–use the vertical space.

I hit the organizer with some ORB spray paint and screwed it to the wall. It looked good and could have worked well, but for some reason it was hard for me to remember what papers went in what bin. The labels that I added last weekend make it much more functional. I just chopped up a paint stick, drilled a hole in the end, wrote my categories on them with a marker and then tied them with twine to the bins.

Mail organizer

Then it was time to get sorting. There were lots of piles of statements and receipts spread out across the office floor at various points on the weekend.

Reconciling credit card bills

I made a few new files and tucked everything into the filing cabinet. And here’s the before and after to show how far the office–or at least this corner–has come.

Paper work before and after

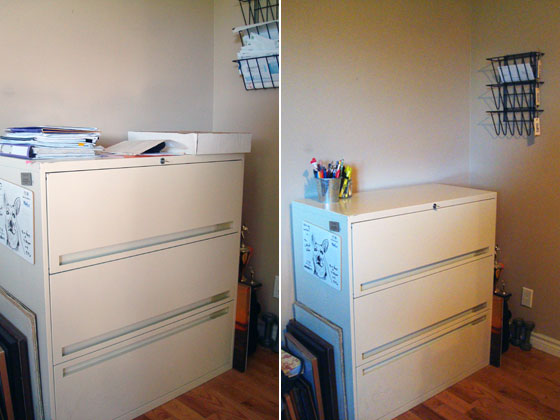
There’s obviously still some more organization to go (pictures tucked on the floor around the cabinet) and some decorating that’s needed (very, very boring blank wall above the cabinet). There’s also still my nemesis–a big flat surface with the top of the filing cabinet. Even worse, it’s now completely clear and just waiting for clutter.

I need to come up with something to decorate or use the top of the cabinet so that it doesn’t become another drop zone. Any suggestions?

I’m sure paper will gang up on me again, but I feel better for having it under control at this moment.

Thanks Jen for organizing the “wait-no-more” challenge.

How do you tackle paper organizing at your house? Or are you paperless? Does anyone else reconcile like I do? I always feel a little neurotic matching up every receipt. What’s your biggest organizing challenge?

Back up power for an electric sump pump

Since the first rainfall two weeks ago, we’ve now had rain steadily for nearly two weeks. Often, it’s not gentle rain. Deluges and thunder storms have been the name of the game.

Our sump pump kicks in often, especially with a heavy rain.

Sump pump pit

The big worry is that thunder storms bring both rain and power outages. Without power, our sump pump doesn’t run. We’ve not lost power yet, but it’s Matt’s biggest worry.

Does anyone know if there’s a battery back up system you can add to a sump pump?

There are benefits to having a generator, and we may go that route someday. For now, I’d love to hear if anyone knows about sump pump solutions.

Wonky wiring and a pair of pendant lights

At some point today, an electrical inspector will knock on my door. (Hopefully. It’s one of those “sometime between 8 and 5 things”). It’s been awhile since our electrician was here, but I’ve been putting off the inspection because my day job was requiring me to be in the office. I finally got a break at work and am working at home today, so the inspection can happen. I also finally got my fingers in gear to tell you about this update.

Matt and I had upgraded from the boob light in the kitchen to a school-house pendant some time ago. The fixture wasn’t in the right spot, though. It was off centre with the island and a single pendant didn’t look quite right.

Single school-house pendant over the kitchen island

I had ordered a second pendant back when we installed the first one (February 2014), but I didn’t want to tackle adding it on my own.

When we had the electrician here to move the light switch in the master bedroom, I had him relocate the existing kitchen light and add the second.

The wiring in this house is wonky. When the electrician took down the first pendant, I remembered exactly how wonky. There was no box to house the wiring. Instead, the fixture was attached to a couple of plates that were screwed to the drywall, and the wires–which wasn’t the right type either–just stuck out from a hole in the ceiling.

How not to wire a light

Obviously, it wasn’t right, but Matt and I had installed our new light anyways, knowing that we’d hire a professional to fix it soon. Well, soon turned out to be more than a year, but better late than never, right?

I was surprised when the electrician hypothesized that there was another light somewhere else in the ceiling. A close look at the drywall showed us a patch that I had never noticed. When he climbed up into the attic, he discovered the light (disconnected, thank goodness). This one had a junction box. It also still had the socket lamp holder attached to it. The light had just been turned so it pointed into the attic and not through the ceiling. What were they thinking???

Light fixture in the attic

The electrician drilled two new holes, inserted two new boxes and ran the new wires–and did all of it properly.

Wiring pendant lights over the island

I was happy to have a professional electrician fixing all of the mistakes. I was also happy that he was the one crawling around in the attic, not me. I like my DIY, but I’ve learned where to draw the line. Things that are beyond my skills or just plain unpleasant (and this hit both of them) are a clear time to call in professional help.

If you’re in the Guelph, Hamilton or tri-city area, I highly recommend Agentis Electric.

Electrician going into the attic

I did patch the hole in the ceiling on my own though (but I haven’t painted it yet). And here’s the finished product: pair of pendants, properly positioned–and properly wired–over the island.

School house pendant lights over the kitchen island

How do you decide when to bring in professional help? What’s the wiring like at your house? Do you have any light fixtures lying around just waiting to be installed? How do you handle lighting in your kitchen?

Fairfield goes to work

Ladies and gentlemen, meet the newest member of our family, Fairfield.

Rototiller

Perhaps I shouldn’t say newest. When Matt heard that we were getting a rototiller from my cousins, he said, “Knowing your family, it’s going to be ancient.” I scoffed. Then I had to eat my words when we picked up the tiller from my cousins.

Turns out, they got the tiller from one of my aunt’s friends. This friend was my grade 4 teacher, Mrs. Fairfield.

Matt usually takes responsibility for naming, but he’s still hung up on the tiller’s advanced age, so his only suggestion was Grandpa Joe. I think Fairfield is more appropriate given the tiller’s history and its usual work site. Although I’m not sure Mrs. Fairfield will be flattered. (Auntie Anne, perhaps don’t mention this to her).

If you’ve been following along, you’ll know that I was a bit anxious about tilling the weedy soil. Would any tiller make it through? Let alone our senior model with its small tines?

We pulled off the tarp that has covered a large section of the garden for more than a month. It looked pretty weed free.

Garden covered with tarps

We had covered another section with a piece of carpet that I’d unearthed. I was surprised to discover that the tarp did a better job of killing the weeds than the carpet did. The carpet just made them flat and pale.

Weeds

We haven’t given up on the carpet, though. We’ve moved it and the tarp over to the other half of the garden. Our supervisor needed an appropriate monitoring post, obviously.

Baxter laying in the garden

The rest of the family was hard at work. Matt and Wiley mowed the weeds that hadn’t been under cover.

Mowing weeds in the garden

Then Matt and Fairfield went to work.

And they kicked butt.

The rototiller totally worked. Even when they got into the grassy bits, Fairfield powered through.

Matt tilling the garden

There was still some manual labour required. Fairfield broke up the soil and the weeds pretty well. But Matt and I did have to go through with the hand cultivator and the pitchfork and pull out the roots. It was much easier though, thanks to Fairfield.

Matt and I tilling the garden

Wheelbarrow full of weed roots

It’s looking like a garden. We actually have space to plant a few things this year (we’re going to leave the other half covered with the tarp and the carpet for the rest of the season, probably).

Seeded garden

As of the end of the weekend, we had the dozen tomato plants and four red pepper plants that you’ve seen before, plus a row of green onions, zucchini, yellow bush beans, beets, acorn squash, butternut squash, pie pumpkins and rutabagas (Matt threw that suggestion out as a joke, so of course when I saw the package of rutabaga seeds I had to buy it).

Seeded garden

My most important Home Goal for 2015–the vegetable garden–is actually happening.

Thanks to my cousins for passing along their tiller (and thanks to Mrs. Fairfield for passing it along in the first place).

What are you growing in your garden? Any advice for growing rutabaga? How about tips for running a rototiller? How old’s your rototiller? Feel free to introduce it to Fairfield in the comments.

Simple belt storage solution

When we switched bedrooms, we switched closets too. I knew one thing I wanted to improve in the new closet was my belt storage. They’ve been tangled and tossed onto a shelf since we moved in.

belts2

When I still lived with my parents, I came up with a solution that worked very well for belts: cup hooks.

belts23

In the past, I’ve screwed the cup hooks directly into the drywall or plaster of the wall. However, this time I decided to go for something more portable so that I can move it if I ever relocate closets again. Screwing the cup hooks into a length of wood worked. Then I simply screwed the wood into the wall of the closet.

Simple belt storage solution

Super simple DIY. Super simple storage. My happiness is not commensurate with the simplicity of this project.

How do you organize your belts? Who else is a fan of cup hooks? Does organization make you happy?

Irises

This is going to be our third summer on the farm. Our flower gardens are finally looking like gardens, not just random plants stuck in a big expanse of dirt.

Gardening takes work and it takes patience, but oh it pays off. It totally pays off.

The ferns that I transplanted last year have all sprouted, we’re going to have a ton of peonies, and our irises are amazing.

When I was growing up, my parents had some beautiful irises in their gardens: blue, peach and dark purple. When I was setting up the gardens here at the farm my parents were taking out the last of their irises–the purple ones–and they gave me a bunch of plants. The stalks have taken root and they’re blooming prolifically. I love the frilly showy blossoms.

Dark purple iris

Iris from above

Out on the turnaround, one particular plant has given us two-tone blossoms. Light purple on a couple of stalks and dark purple on the rest.

Light purple and dark purple irises

Close up of a purple iris

I especially like the purple veins of the buds.

Iris buds

You might recall that the farm came with a whole bunch of plants still in their nursery pots. Last year, I finally stuck them in the ground. This spring, I’ve discovered that some of them were miniature irises.

They must be happy to be out of their pots because they’re blooming like crazy.

Miniature irises

I’ve been feeling like the gardens are finally established this year. Plants are filling out and blooming. I’m focused more on maintenance rather than actually building the gardens. It’s nice to see the fruits–or the blooms–of my labour.

How is your garden growing? Do you have any irises at your house? What colour are they? Who else is an iris fan? What’s blooming at your place?

It never rains but it pours

For the past few years, it seems we’ve gone from winter to summer. Just skipped over spring completely. This year, we’ve seesawed back into winter a couple of times (brrr). But we’ve definitely missed spring–and its spring showers.

The grass seed that I sprinkled has sprouted–thanks to diligent daily waterings.

Grass seed sprouts

Our fields are going green and our soybeans are growing, but my hose doesn’t help them, and I wasn’t sure how long they’d hang on without rain.

Soybean field

Soybean sprouts

Saturday morning, we watched clouds building to the north of us, wondering if rain was finally going to fall. (If you look closely, you might be able to see the bright green watering can halfway down the driveway, next to a newly planted tree).

Rain clouds at the end of a country driveway

A few hours later, we had our answer. Yes, it was finally raining, but it was pouring. More water than the dry, dry ground could possibly absorb.

It doesn’t seem like we just have rain anymore. It’s either a deluge or nothing. Maybe the gentle rain is hanging out wherever spring has gone.

Pouring rain over a country driveway

Poor Baxter did not appreciate the cooling moisture as much as the plants did. Apparently, melting from the heat is preferable to melting from rain.

Baxter hiding from the rain

The torrential downpour did eventually ease. By the end of the weekend, we had a full day and a half of rain.

So I won’t have to do any watering for a little while.

What season is it where you are? What season should it be? Have you had too much, too little or just enough rain? Are seeds sprouting where you are? Does your dog like the rain?

How to apply preglued veneer on curved edges

More than two years ago, I wrote a tutorial on how to apply preglued veneer edging. Veneer edging covers up the raw edges of plywood and makes your piece of furniture or whatever it is you’ve made look like one solid piece of wood.

When I made the headboard for the master bedroom, I had a scenario that I’ve never dealt with before: applying the veneer to a curved edge. So today I’m posting an addition to my previous tutorial.

The same tools, techniques and principles still apply (mostly):

  1. Cut a piece of veneer slightly longer than the section of plywood that you’re covering.
  2. Line it up along one edge and apply heat and steady pressure to melt the glue.
  3. Firmly press the veneer down with a wood block (it will be too hot to touch with your hands) until the glue sets.
  4. Trim the overhang with a file.

For a convex edge (think the outside of a U), I didn’t have to do anything special. For a concave edge (think the inside of the U), I had to make a few more adjustments. On the more gentle curve, I found the very tip of my iron worked to soften the glue. I just had to work slowly, about an inch at a time.

Applying preglued veneer edging to a curve

Pressing the veneer into place as the glue dries is really, really important. On a curve, it’s particularly easy for the veneer to pull away from the plywood. A narrow pressing block or your fingers (protected with a glove or a rag)–along with patience–are essential.

For the tighter curves, I discovered why I still have a curling iron in my bathroom cupboard. The barrel was just the right size to fit into the curve at the top of the headboard. Once the adhesive was soft, I firmly pressed the veneer onto the plywood and held it in place until the glue set.

Using a curling iron to apply veneer edging

To trim the veneer, I always rely on a file. For the curved edges, I used the curved side of the file.

Curved profile on a file

Triming veneer on a curve with a file

A couple of swipes over the edge with fine sandpaper further smoothed veneer, and then it was ready for staining along with the rest of the headboard.

(And yes, the veneer takes stain and urethane and paint just like real wood).

Here’s the final product–in its impossible to photograph location in front of the window.

Applying preglued veneer edging to a curve

Anyone else have any tips for working with veneer edging? Who else has an old curling iron kicking around? Have you ever used beauty tools for DIY?


Planted!

It may not look like much–especially considering that there’s still carpet lying over the weeds–but the first plants are in the garden.

First plants in the garden

We’re still waiting on our hand-me-down tiller to arrive, but that didn’t stop Matt from coming home with a dozen tomato plants and 4 red pepper plants. So that meant I got out the pitchfork and went to work to dig out the weeds in a corner of the garden by hand.

It was just a small corner, but it was home to two heaping wheelbarrows-full of weeds. The roots didn’t go deep, but they snaked along just under the surface making a thick dense mat. I really hope the rototiller is able to break up the ground. It didn’t take me as long as I thought to pull out the weeds by hand, but doing the whole garden by hand will not be fun.

So you’re still seeing a few weeds and grasses and roots strewn through the dirt. But you’re also seeing tomatoes and peppers.

First plants in the garden

The garden has begun!

How is your garden growing?