Fun oversize Scrabble art for the basement

Oversize scrabble tiles as art in the game room

Anyone want to play Scrabble? I’ll bring some letters if you bring the very, very large board.

When it comes to art in this house, I follow two principles: keep it personal and keep it inexpensive. For the basement, I have one more factor: keep it fun.

A wall full of really big Scrabble tiles ticks all the boxes.

Oversize scrabble tiles as art in the game room

Personal: The letters are the initials for us and everyone in our immediate family. Moms, Dads, brothers, sisters, in-laws, nephews, niece, pets.

A message from Auntie JuJu to the two babies joining our family in the next few months: your names must start with one of these 16 letters. More than half the alphabet is in play. That’s lots of options for you.

Inexpensive: Sanding all of these tiles took a bit of time, but since I’m not paying myself an hourly rate, my only costs were a few 2x10s, some sandpaper, printer paper, Mod Podge and a paint pen.

Fun: We have giant Scrabble tiles hanging on our wall. That’s not typical artwork.

Oversize scrabble tiles as art in the game room

When I was making these, I wanted the letters to hang perfectly flush to the wall. Even the thinnest hanger didn’t appeal to me.

Oversize scrabble tiles as art in the game room

I came up with a simple solution that was also–you guessed it–cheap.

I routed a channel in the back of each tile, which slips over a nail that I hammered into the wall.

Oversize scrabble tiles as art in the game room

Adding art to the basement was one of my Home Goals for 2016. We call this room the long room, so I wanted some substantial art that could fill the wall. Sixteen large wood slabs work very well.

Oversize scrabble tiles as art in the game room

Do you play Scrabble? Would you ever hang boardgame art on your walls? How do you handle art when you have a big wall?

Save

Save

Save

Save

How to grow squash vertically

Last year, our squash took over the garden. Fully half of our nearly 2,500 square foot garden was completely covered in squash vines.

We loved the squash that we harvested, and we knew we were definitely growing squash again. However, we knew that we weren’t willing to give up that much of the garden this year.

My plan to corral the squash was first to plant less. No matter how much we like squash, we cannot eat nearly 40 butternuts and about 70 acorns (last year’s harvest).

Wheelbarrow full of acorn squash, butternut squash and pumpkins

The second part of the plan was to coax it up, rather than across. Up was a theme of our garden all this season. I’ve already shared how our raspberries and tomatoes are growing vertically. Now it’s time for the report on our final vertical experiment.

And this truly was an experiment. We were growing acorn and butternut squash. They weren’t small and lightweight. I wasn’t sure whether the vines would be strong enough to support the hanging fruit.

Back in the spring, I built a large A-frame. It was about 8 feet tall and 16 feet long.

A-frame squash trellis

We used 2x3s for the As with plywood at the peaks for extra stability. The top ridge is two 2x2s. Each A is screwed into stakes that are hammered into the ground. We spread wire fencing across each side and attached it to the wood with big staples. Just for extra stability, we tied each end of the trellis to the fence so that it couldn’t fall over.

How to grow squash vertically

With the A frame in place, I planted (half) our squash seeds under the trellis.

Squash seedlings

As the plants grew, I tucked the vines into the mesh. The vines were a bit fragile and bruised or even snapped easily. I learned it was important to not let the plants get away from me. I had to be diligent about training them up the trellis before they grew too big. Fortunately, the squash seemed to recover quickly from any of the damage I inflicted.

Squash growing up an A-frame trellis

Just like last year, though, the squash took over. Thankfully, this year it took over in the right direction–up. Soon, the whole A frame was completely covered.

squashtrellis7

The plants blossomed and set fruit. And I crossed my fingers that the fruit would stay on the vines long enough to ripen.

We’re nearing the end of the season now, and I’m happy to report that things are looking really good. The leaves are starting to die off, so you can see just how good for yourself. Behold, the squash.

How to grow squash vertically

Yup. Once again, we have a whole lotta squash. And they’re big ‘uns. Oy vey.

How to grow squash vertically

The butternuts are phenomenal. The acorns are more iffy. But I’m not sure that I can blame the trellis.

First, we don’t have quite as many acorns as I was expecting. The butternuts definitely have them beat for quantity.

Second, the acorns aren’t exactly all acorns. They come in a few different shapes. Any ideas what would make them grow so differently?

Elongated acorn squash

Mishapen acron squash

Despite some mutants, I’m calling the vertical squash growing experiment a success. It’s definitely a method we’ll be using again.

Have you done any experiments in your garden this year? Have you tried vertical gardening? What’s your favourite type of squash? Any tips for storing the squash or recipes to share?

Save

Save

Save

Save

Save

How to make a DIY carpet kick – Free plans

Early in your life as a DIYer, you learn that having the right tool can make the job much easier. However, sometimes you don’t want to go buy a new tool for a project that you’re only going to do once, maybe twice.

Laying carpet is one such job in my opinion. Likely–hopefully–you’re not laying carpet every year. However, if you do want to tackle installing carpet yourself, there are a few things that can help you get a nice finish on your floor and make the end product look more professional. One of those things is a carpet kick.

How to make a DIY carpet kick

Unless you’re a professional carpet installer, a carpet kick is not likely a tool that you’ll use very often. If you’re a professional carpet installer, I expect that you will go buy your own professionally made kick. However, for a DIYer you can easily make your own carpet kick out of scrap wood.

How to make a DIY carpet kick

Download the plans to make your own carpet kick

Materials:

  • 2×4 approximately 14 inches long
  • 2×6 5 inches long (you’ll cut it to a 5×5-inch square)
  • 3/4-inch plywood (also cut to a 5×5-inch square)
  • Two 3-inch screws
  • Two 1 1/2-inch screws
  • Eighteen 1 5/8-inch drywall screws (or other screws with a coarse thread)
  • Scrap piece of carpet (about 12×12 inches)

Cut each piece of wood according to the plan. Screw the wood together using the 3 inch and 1 1/2 inch screws.

If desired, paint your kick–I recommend a stylish baby blue.

How to make a DIY carpet kick

Once paint is dry, wrap the butt end of the kick in the scrap carpet and staple in place. You’ll likely have to trim the carpet to make it fit. This is like wrapping a really awkward present.

How to make a DIY carpet kick

Screw the drywall screws part-way through the kick plate so that they poke out the bottom. These “teeth” are what will grip the carpet and stretch it over the tackstrip.

How to make a DIY carpet kick

And that’s all there is to it. Now you’re ready to install your carpet.

How to reuse old carpet

Save

Save

Save

Save

How to reuse old carpet

A few weeks ago you caught a glimpse of our redone basement. We put it back together after our waterproofing contractors finished their work.

Wall repaired after waterproofing

Fortunately, the carpet and underpad were not damaged  by the leaks, so we were able to reuse them. (Although they could use a good cleaning).

Our contractors had folded the carpet back out of the way while they were doing their work.

carpetrep4

After giving everything–the carpet, the underpad, the concrete–a really good vacuum we were able to unfold the underpad and lay it back down over the concrete. The vacuum is critical. You don’t want to discover any bumps under your carpet once you’re finished installing it, so make sure everything is really clean and smooth.

How to reuse old carpet

The next step was to install new tackstrips, also known as smoothedge. The tackstrips are what hold the carpet in place. The underpad provides the guide of where to install the strip. Tackstrips come in two different versions–one for wood subfloor and one for concrete. Make sure you buy the right type for your floor.

Line the tackstrip up with the edge of the underpad with the little spikes pointing in towards the wall. Hammer the small nails in the tack strip into your floor. With our new concrete from the waterproofing, we found the nails did not want to go in. We ended up gluing the tackstrips to the concrete with construction adhesive.

Installing carpet tack strip

Once the glue was set, we unfolded the carpet and laid it over the tack strips. It’s important to stretch your carpet tightly. For this, you need a carpet kicker. I’ll share how you can make your own kicker in an upcoming post.

The idea is you lay your kicker on the carpet and using your knee you kick the carpet towards the wall. While the carpet is stretched tight, run your hands over the edge to press it onto the tack strip. You should feel the carpet catch on the spikes. As you get towards the corner, kick on a bit of a diagonal to push the carpet towards both walls.

How to reuse old carpet

You’ll notice that we installed the carpet before we put the baseboard back on. Usually you will have baseboard or trim in place already. In those spots, use a chisel to tuck the carpet in under the trim. (You can see some of the water damage we have on the base of the door trim. It has since been covered with fresh paint.)

How to reuse old carpet

And that’s all there is to it. I’m so grateful that we were able to reuse the carpet. This carpet goes through the whole basement, so redoing this one area would not have been an option. Plus installing it ourselves was a quick and easy DIY.

Have you ever installed carpet yourself?

Save

Save

Save

How we installed a waterline for the vegetable garden

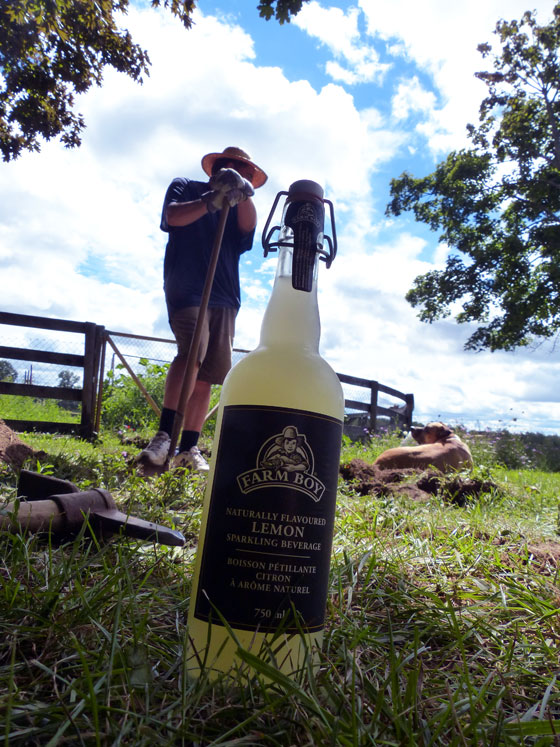
A big to-do on the garden task list is now done. We finally have a hose at the garden… and I’m so happy to cross this one off the list.

Hose in the vegetable garden

With the lack of rain we had this summer, we watered the garden a lot. However, the closest hose was at the driveshed. That was three hose-lengths away. I had screwed the hoses together back in the spring, and most of the time we kept them laid out across the yard. But any time I had to wind them up (like every time we cut the grass) it was a heavy haul.

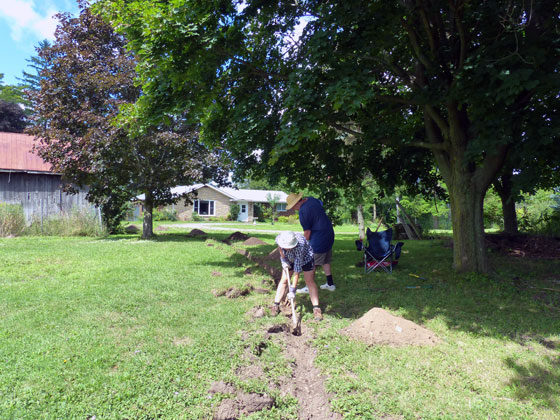
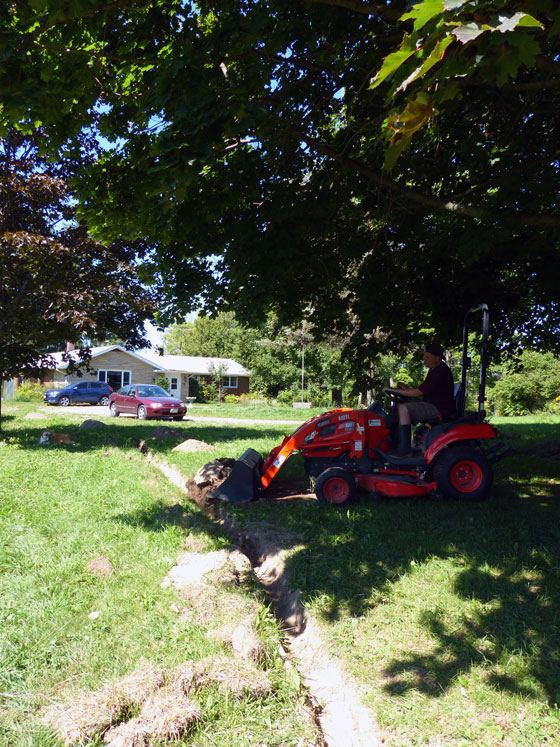
Adding a tap at the garden was one of my Home Goals 2016. I already shared a bit of the misery that was digging the trench from the driveshed to the garden (ground so hard, summer so hot, rocks and roots so many, garden so, so, so far away).

Trenching a waterline to the garden

When I measured the trench, it came out a bit more than 100 feet. I spent a week visiting various home improvement stores and then specialty plumbing suppliers trying to find someone who would sell me 110 feet of irrigation pipe. All I could find was 100-foot or 400-foot coils. Ugh.

I bought 100 feet and crossed my fingers that we could splice on a small extra piece we had at the farm already and still make it to the garden.

But it turned out I was worried for nothing. When Matt and I unrolled the pipe and laid it in the trench, it easily reached the garden. Thank goodness for small wins.

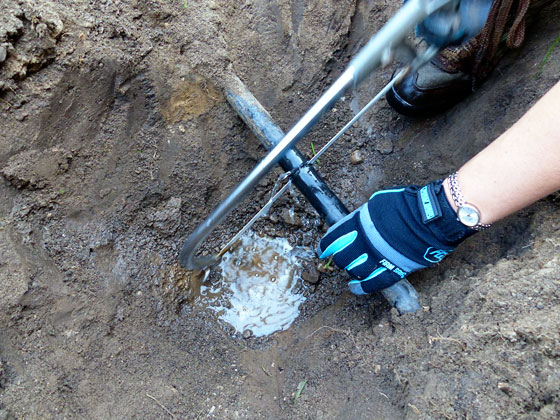
The other thing I was worried about was our plumbing abilities. I had a plan, but I wasn’t sure if it was actually going to work.

We dug down to the waterline that ran to the hose at the driveshed. After turning off the water, I took a deep breath and cut through the waterline with the hacksaw. So much for my brand new work gloves.

Cutting a waterline with a hacksaw

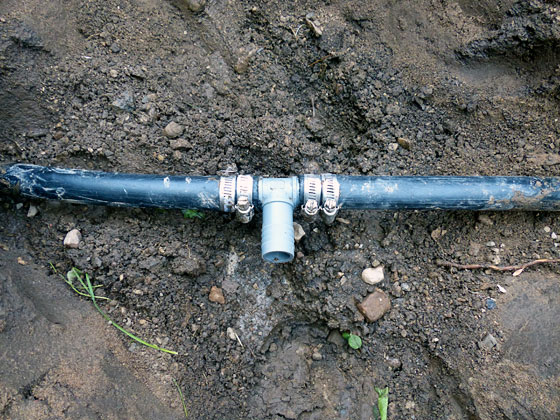
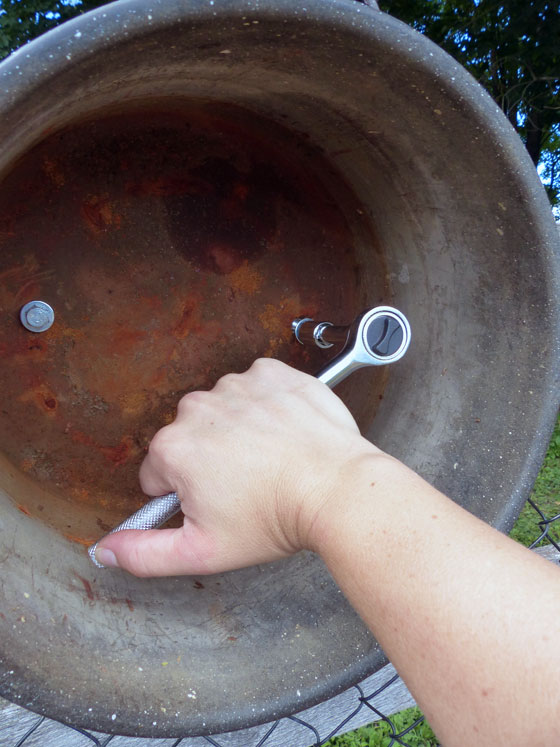
Then we inserted a T. A note about these connections. They fit super, super tightly. We boiled the kettle and then Matt poured the hot water over the pipe and that softened the plastic enough that I was able to wedge the fitting into place. The clamps on either side provide extra insurance to hold everything together and prevent leaks

Adding a T connection on a waterline

From there, it was easy to connect our new 100 feet of pipe.

Running a waterline for a garden hose

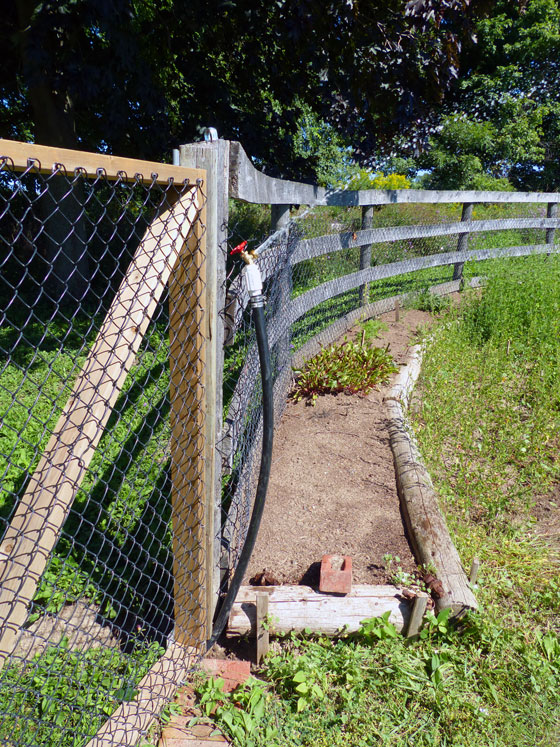
At the garden, the pipe sneaks under the brick threshold at the gate and up the post. Look how much pipe we had. Exactly the perfect length. And look at the water flowing. We did it! And there are no leaks! Big wins all around!

Adding a hose at the vegetable garden

Backfilling the trench was much easier than digging it out. Wiley helped which was huge.

Backfilling the trench with the tractor

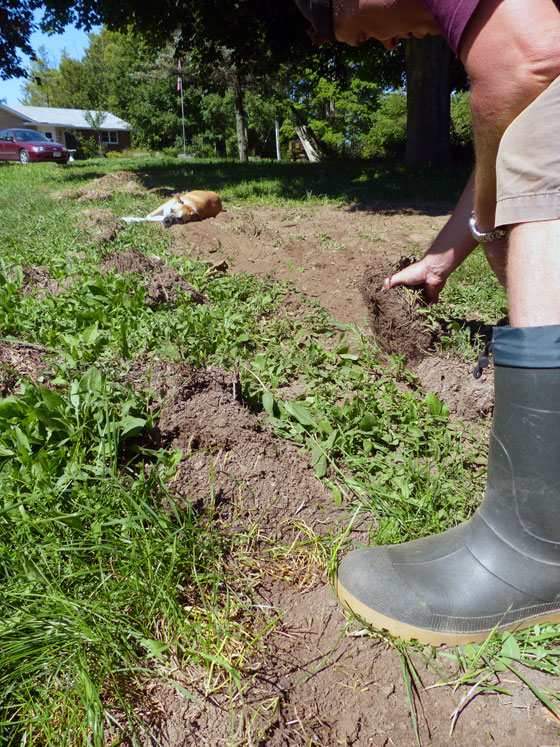
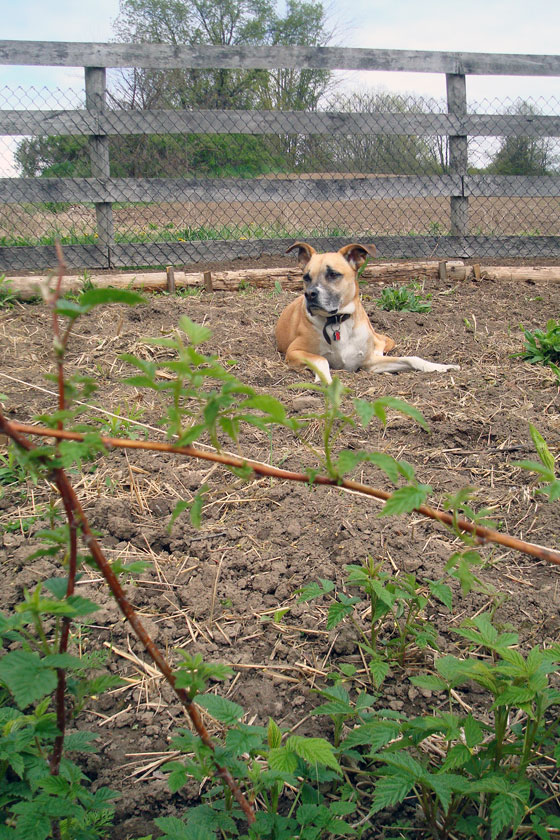
Baxter did not help. In fact he staged a sit-in (lie-in) to protest when Matt started to put the sod back down. “Dirt is good, dude.”

Baxter lying in the dirt

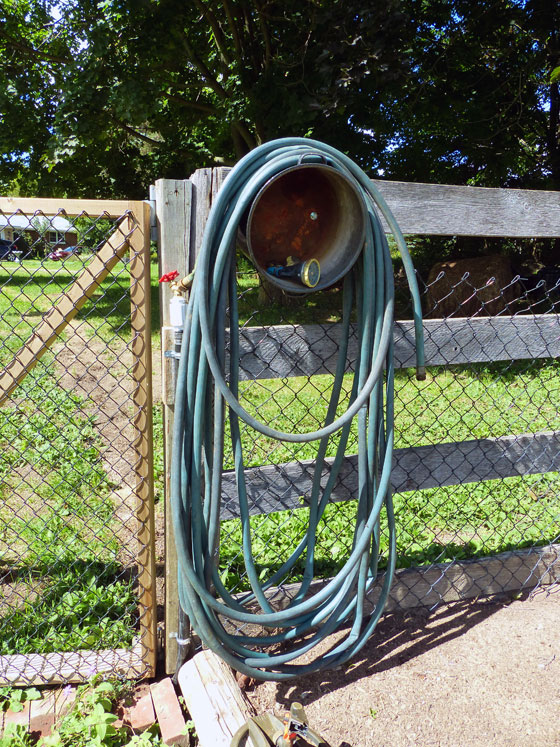
The finishing touches were clamping the waterline to the fence post and then installing a hose hanger.

Rather than a typical hanger, I wanted to try a metal bucket. I’ve seen a few other people do this, and I figured it would give us a place to stash nozzles or maybe even some garden tools.

Again, I spent some time running around to various stores trying to find the perfect bucket. Then I remembered a rusty old canning pot–one of our many gifts from previous owners. I knew there was a reason I didn’t throw that out.

I drilled a couple of holes in the bottom and then bolted it to the fence.

Using a pot as a hose hanger

Then I dragged the hose out to the garden one final time (except for seasonal shutdown, but don’t burst my bubble, okay?) and coiled it up.

Hose in the vegetable garden

Such a great addition to the garden. And this is actually our final to-do on our garden to-do list. This year has been all about adding the structure (raised beds, trellises, perennials) and functionality (gate, trellises, hose) to the garden. I think all of this is going to make a huuuuge difference next year.

The other thing that is going to make a huge difference–and that we have yet to do–is clean up. We have a whooooole bunch of weeds that I want out of there before winter sets in. That’s still a few weeks away though, as harvest is still going strong.


How is your garden growing? Does plumbing make anyone else anxious? How do you handle irrigation in your garden?

Save

Save

Save

Save

Save

Save

Getting in the mood

I had planned to share the final post in our waterproofing project today, but some of the finishing touches have been delayed. So instead, inspired by the project that took us away from the basement, I’m going to be sharing some thoughts on DIYing.

As I sat down to start writing this post, the announcers who are calling the baseball game on TV were talking about one of the players taking some time off for family problems.

Matt added his own commentary. “Family problems? What, did his wife make him dig a trench too? And complain all afternoon about not having a backhoe?”

Now, in my defense, I did not make Matt dig a trench. I came up with the brainwave to add a hose connection out at the garden this spring. I also advocated for renting a small backhoe or hiring out the trench (I even got a quote). Matt’s the one who came up with the brainwave to hand dig the trench for the new waterline and to do it on a humid 30+ degree afternoon in August.

As much as it might sound from my description that we’re sniping at each other, really we’re just teasing each other. This is part of our rhythm. When it comes to working around the farm, we are very much a team.

Trenching a waterline to the garden

But the thing about DIYing as a couple is sometimes we’re not both in the DIY mood at the same time. And that was definitely the case for me when we were digging the trench.

It was hot, between a cold (I hate a summer cold) and a lurking migraine (thank you, humidity) I wasn’t feeling great, our clay soil is super hard and full of roots and rocks, and the distance from the hose hook up at the driveshed (where we’re tying in) and the garden is loooooong.

But because of all of the things I listed above (except for how I was feeling), I didn’t want Matt to have to do the whole trench all by himself.

Plus, I really want a hose out at the garden, so if Matt’s in the mood to trench the waterline, I’m going to take advantage of that, no matter what mood I’m in.

So I grumbled about a backhoe, how hard our soil is and my bad mood. I took breaks to sit and lie down in the shade. I kept refilling our water bottles and planned how we’d reward ourselves with a post-trench refreshment. And I also kept swinging the pick while Matt wielded the shovel.

And Matt was understanding. He didn’t begrudge me slacking off. He got extra drinks for us, posed for pictures and encouraged snuggle breaks with the dog.

Farmboy lemonade reward for a hard day's work

He also recognized that even though he said at various points, “Why don’t you go in and watch the Olympics,” there was no way I was going to leave.

Relationships are about give and take. Add in a farm and a heap of DIY, and we need to be even more flexible. For Matt and me, recognizing where we each are at and supporting each other–no matter our moods–allows us to accomplish everything we do around the farm.

How do you get in the DIY mood? What’s your secret to DIY success? Are you part of a DIY duo? How do you make a partnership work?

Save

Save

Save

Beating the heat

I don’t know what the weather’s like where you are, but here in Southern Ontario we are having a serious heatwave.

So what do you do if it’s mid-July and the forecast is showing hot and sunny all weekend? For many Ontarians, the answer is head to cottage country where you can be by a lake. In fact, that’s just what my husband did.

However, if you’re me, the answer is, “Why don’t you go by yourself? I’ll stay here and tape the drywall.”

What?

Yeah. I dunno what’s wrong with me.

Drywalling the laundry room

Thanks to our basement waterproofing (I promise I’ll share more details on this project), we have some drywall to repair. We also are building an extra closet in our laundry room, so we decided to do all the drywall at the same time.

We spent last week on framing, insulating and drywalling. Matt and I hung the last few sheets on Friday before he left. We’re a little rusty at drywall. Measurements were off and gaps between sheets were large. Fortunately, paste covers a lot.

By the time Matt got home, I had finished the first two coats, and things were looking much better.

Plus, the basement was cool. Not quite lakeside, but not an altogether terrible way to spend a weekend.

What did you get up to this weekend? Do you like the summer heat? I love it, honestly, and would have been quite happy to spend my weekend outside versus in the air conditioning. Would anyone else have prioritized drywall over a weekend away? Did you see the temperatures from Basra? I think that’s a little hot even for me.

Hardboard and six favourite projects

There’s one material that I go to over and over for DIY projects: hardboard.

Hardboard

Hardboard is an engineered wood product also known as high-density fibreboard. Wikipedia says that it’s “made out of exploded wood fibers that have been highly compressed.” I’m not sure what exploded wood fibres are. By the time hardboard gets to the store, it has little resemblance to wood. It’s more like a super heavy-duty, super smooth cardboard. The main resemblance to typical construction materials is that hardboard comes in 4×8-foot sheets.

It’s less than a quarter inch thick, fairly light-weight, and cuts and bends easily. Sometimes it’s cut to other sizes than 4×8, finished with white on one side, or it’s also the material for pegboards.

Pegboard

Here are some of my favourite projects with hardboard:

Living room bookshelves – Hardboard makes a very sturdy back for shelves and bookcases. But it’s thin and fairly lightweight, so it doesn’t add bulk to furniture.

Monograms – Letters and words are popular decor trends. Hardboard is easy to cut with a jigsaw, won’t break or crack like solid wood, and is light enough to hang on a wall or sit on a shelf. I’ve found a quick pass of fine sandpaper can be helpful to smooth cut edges.

Ampersand monogram made out of hardboard

Ampersand monogram made out of hardboard

Doors and cabinet makeovers – Faced with boring slab doors in the basement and on the laundry room cabinets, I used strips of hardboard to transform them into barn doors and shaker-style cabinets. I was blown away by how successful the transformation was. I still love these doors. Plus the makeover saved us from spending money on new doors.

Making slab doors into barn doors

Score-keeping chalkboard – Hardboard is super smooth, and with a good primer and a foam roller, it takes paint very well. So I gave a sheet of hardboard a coat of chalkboard paint for a 6-foot tall, but very lightweight and easy to move chalkboard. Much lighter than actual chalkboard.

Cabinet door repair – Our kitchen needs a renovation, but until that day, we’re trying to hold things together however we can. Hardboard to the rescue once again. The cabinet door under the sink was separating from its frame. Backing it with hardboard has seen us through the last three years.

Holding a kitchen cabinet together with hardboard

Nightstand to dresser makeover – This dresser is one of my all-time favourite projects. Combining two nightstands into one dresser worked very well, but the join was very ugly. A panel of hardboard covered the seam and didn’t add much bulk to my narrow dresser.

I continue to find more uses for hardboard. And I’d love to hear if you’ve used it yourself. Any projects to share? What’s your go-to construction material?

Dueling DIY – The Final Update

Six weeks ago when I launched this Dueling DIY adventure, I thought, “I got this. No problem. I’ve got six weeks! Sarah’s going down.”

I had a somewhat ambitious list, but I thought it was entirely doable. Now that we’ve come to the end of the challenge and my final report, I’m stiff, I’m sore, I’m proud of what we accomplished… but I’m also a little bummed that I couldn’t cross everything off.

In that respect, Sarah, whose update you saw earlier this week, is the winner.

Here’s my final list:

  • Hang the gate
  • Edge the garden
  • Build raised beds around the perimeter
  • Build trellises for the raspberries, tomatoes and squashes (I have wood and wire, but nothing’s put together yet)
  • Start a few seeds indoors
  • Till in the ash, straw and manure (still only half the garden is done)

And a couple of maybes:

  • Weather permitting, plant grapes and potatoes
  • Run a waterline out to the garden (this one is Matt’s task, so I’m not really feeling too bad that we didn’t get this done)

So I made it just over halfway through my to-do list (56% if you’re wondering).

The perimeter beds were definitely a much bigger project than I anticipated–both in terms of the amount of work and their literal size. But I’m really happy with how they turned out. In fact, I’ve already started filling them up with onion (seeds), sunflower (seeds) and grapes.

Grape buds

Although filling might be a bit of an exaggeration. According to my original calculations when we started this challenge, the perimeter of the garden is approximately 175 feet. The beds are just over 2 feet deep, which means we have 350 square feet in the perimeter alone. I’m not sure Matt and I eat enough food to keep up with this garden!

Rustic raised beds in a round vegetable garden

The outer beds are obviously where I spent most of my time throughout this challenge, but the interior of the garden–or at least half of it–got some attention too. We’re now up to 5 rows of potatoes (who exactly is going to eat all these?). We have three rows of reds, which we grew for the first time last year, and then we have two new varieties that we’re trying out: Kennebecs (highly recommended by Karen at The Art of Doing Stuff) and Russian Blues (another Karen suggestion that I couldn’t resist adding just for fun).

Potatoes growing in the garden

Our sprouts have overcome their damping off and are growing well. In fact, I’ve moved on to the hardening off stage and they’ve spent a few days outside this week. Matt brought home some tomato plants to supplement our own seedlings. Those can probably go in the garden this weekend, but I’m going to let our sprouts grow a bit more before they move outside permanently.

Sprouts and seedlings

Aside from finishing the raised beds, our biggest accomplishment last weekend was wrestling an abandoned hay bale out of the tree line beside our big field (where it and a friend have lived for years)…

Bales of hay stuck in the trees

onto the trailer (seriously, it took us about 45 minutes to get to this point)…

Straw bale in the trailer

and up to the garden.

Straw bale for mulching the garden

I’m going to try the deep mulch method to deal with weeds, maintain moisture and add nutrients to the garden. This bale is going to be my mulch. Hopefully it’s enough because I do not want to go back to get his friend. What a ridiculous way to spend a holiday Monday morning.

So obviously work does not end on the garden just because Dueling DIY has concluded. Trellising and tilling and gating and waterlining are still going to happen. As is planting and growing and (hopefully) harvesting. And I’ll be sharing more garden updates as we go along–I can’t help myself.

The beauty of taking on a project like this Dueling DIY is that in the end we each win. We’ve each made progress on our gardens, and we’re closer to enjoying the fruits of our labour (literally) than we were six weeks ago.

Thanks for the motivation, Sarah. And congratulations on your victory. I may have to send you a potato as a prize. And thanks to all of you for following along, doing your own challenges at your homes and encouraging us.

How’s your big spring project going? What gardening progress have you made recently?

Dueling DIY Week 5

Five weeks ago Sarah in Illinois and I started a friendly Dueling DIY competition to help us get our gardens in shape. In last week’s update, Sarah was distracted by newborn kittens and falling behind. I gave a fist pump and started to calculate how much farther ahead I could get. But apparently I was counting my kittens before they hatched as the saying goes. With just one week left, I’ve had a setback. Read on to find out what happened and if you want to review the progress we’ve made up to now, you can check out all of the previous posts here.

Let’s start with the bad news first.

#1: In this Dueling DIY challenge, this is all of the cuteness I can offer. Cute absolutely, but perhaps not at the level of Sarah’s kitten cuteness.

Cutie

Bad news #2: Some of our sprouts aren’t doing so hot. I think it might be a case of damping off. Although some things might be turning around. (More on this below).

Wilted watermelon seedling

And the worst news: We lost a full weekend of work because both Matt and I are sick. I ventured outside at one point and spent 45 minutes lying on the lawn when I felt like I couldn’t stand up anymore. Matt is on antibiotics for throat and ear infections. I’m holding on to my belief that this is just a cold. The amount of time we spent horizontal meant that we didn’t spend time working in the garden. So, so, so incredibly frustrating.

But between the time of my last update and being struck down with this plague, we had accomplished a few things. So there is some good news in this Dueling DIY challenge.

We have a new team member: Colonel Briggs. Short for Briggs and Stratton, our new rototiller. Honestly, Matt’s been wanting an upgrade since we inherited Fairfield. When he brought the Colonel home, he declared that the rototiller couldn’t have just a single name, hence the title.

Matt put the Colonel to work right away, and they’ve tilled half the garden.

(A face shield is not normally necessary for tilling. Matt wanted ear protection, and his chainsaw helmet was closest).

Tilling the garden

We’re thisclose on the raised beds. I have about four timbers left to set–less than 1/8 of the perimeter to go. Then I have to spread the cardboard, layer in the mulch and top them up with dirt.

Raised garden bed made of logs

We had four yards of triple mix delivered, and I’ve filled the raised beds more than half of the way around the garden. I feel I have to say the beds would be completely done if we hadn’t been sick. Argh.

Four yards of topsoil

Despite not being finished with the garden set-up, we’ve already moved on to planting. Three (!) rows of potatoes are in, and we’re not done yet. A new shipment of seed potatoes arrived in the mail yesterday.

Potato shoot

I’ve also planted eight grape vines. I’m so excited about these grapes. Although I fully admit that I have no idea what I’m doing with them. I’m trying to read about pruning and planting and trellising and training. Right now, I’m focusing on watering them and keeping my fingers crossed that they take root. Please share any tips you have.

Freshly planted grape vines

In terms of smaller updates, let’s start with the literally small–the sprouts. As you saw at the top, we’ve had a lot of shriveling and dying. We’re down to just one watermelon out of seven. We lost about half the tomatoes too. I think it was a case of damping off, so I’m giving the watering can a rest.

The sprouts continued to die, but I was very surprised that some new sprouts started popping up as things dried out. We have a new watermelon–our first of the Crimson Sweet variety–and a whole bunch of new tomatoes. I know I’m going to have to separate the sprouts that are doubled (or tripled) up. I’m not sure I can bring myself to pinch out the extra sprouts, but I’m not sure I can keep everyone alive if I try to separate and transplant them. Any advice?

Crimson Sweet watermelon sprout

Pepper and tomato seedlings

The other win is that the raspberries–black and red–are weeded. And the raspberries themselves are spreading like weeds. I’m so pleased with how they’ve settled in.

Young raspberry canes

And if we hadn’t spent our whole weekend horizontal, we would have the trellises set up to support them.

Argh.

Let’s move on, shall we? We’ll take a look at the original to-do list. Again, I can cross a little bit more off.

  • Hang the gate
  • Edge the garden
  • Build raised beds around the perimeter (more than half done)
  • Build trellises for the raspberries, tomatoes and squashes
  • Start a few seeds indoors
  • Till in the ash, straw and manure (half done)

Only one week to go in this Dueling DIY challenge. Send vitamins.