The bathroom is slowly approaching the finish line. Another big piece arrived a little while ago. And it is literally big.
Our new storage hutch.
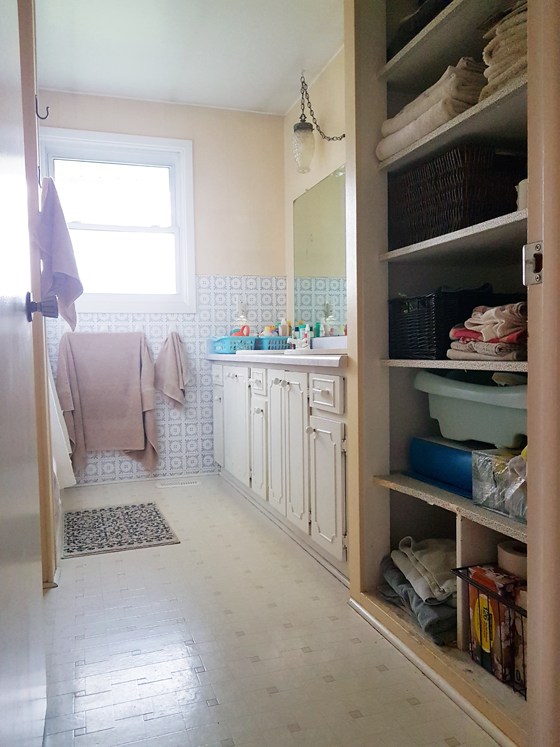
The bathroom is a good size, and it had a large linen closet. But the closet lacked both style and function. I tried to stack things neatly and used baskets to conceal less attractive things. The shelves could store a lot, but they were just one type of storage. With this renovation I was eager for an upgrade.
I decided I wanted a wood cabinet with a mix of drawers and shelves. I was envisioning an antique pine piece, something like might have been in an old farmhouse. I spent some time looking online and in antique shops and didn’t find anything the size I wanted, let alone with the storage configuration I was looking for.
Next I tried cabinet makers, but I struck out there too. Then one day I was driving by a local Mennonite furniture store and I pulled in. Maybe they did custom work?
They did.
They took my drawing and measurements, showed me wood options, and gave me a quote. It was $3,400, including finishing, delivery and set up. For a fully custom piece this size, that felt like a very reasonable price. I paid my deposit and carpentry began.
And finally it’s here.
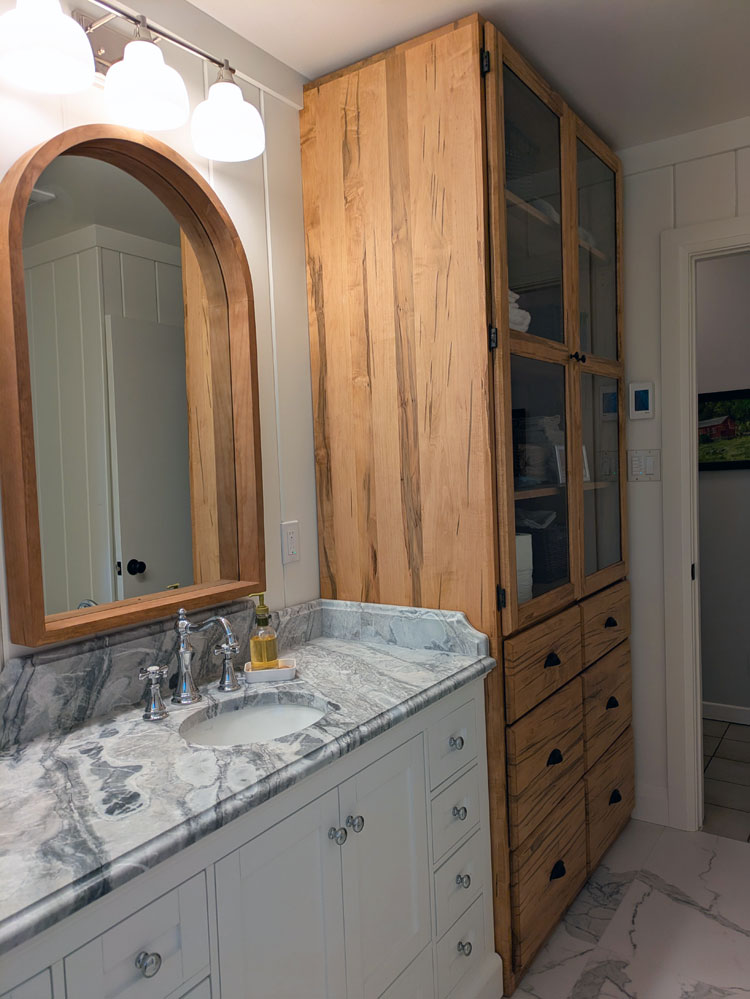
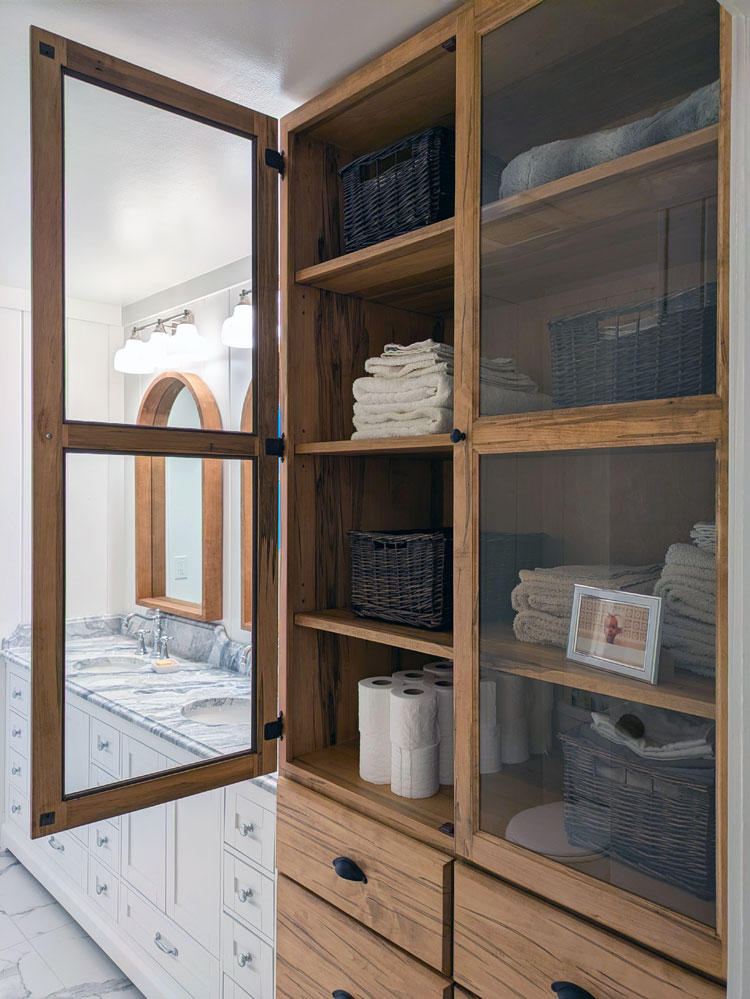
The whole cabinet is 22 inches deep (the same as the vanity counter), 42 inches wide and 8 feet tall. It is huge. It fits perfectly at the end of the vanity. Thank goodness (says she who did all the measurements).
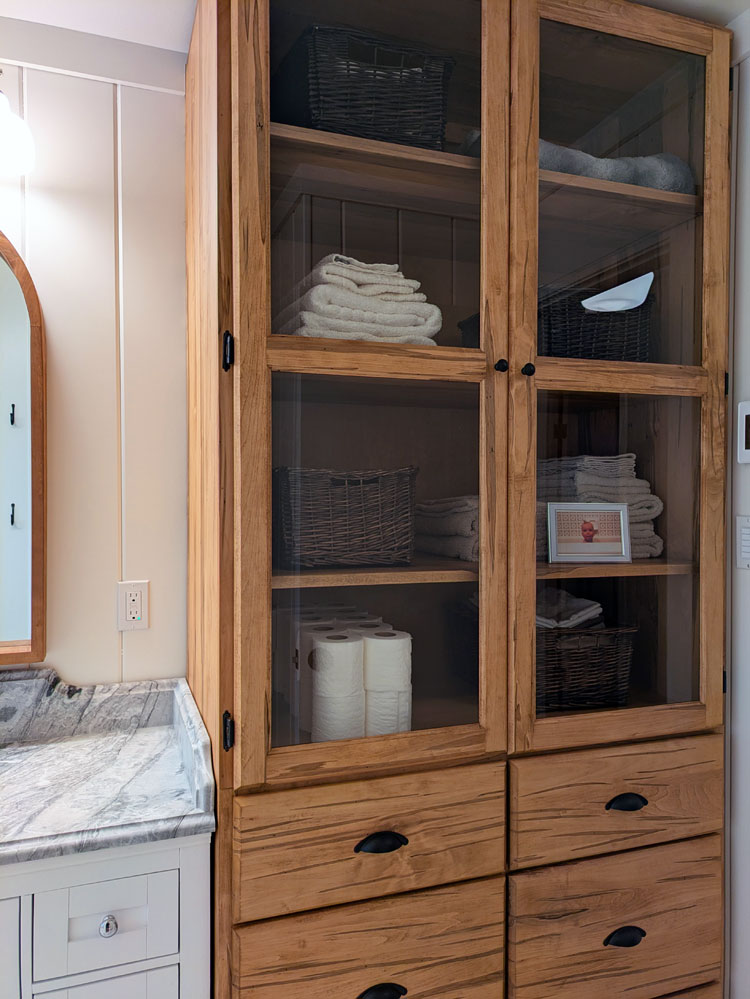
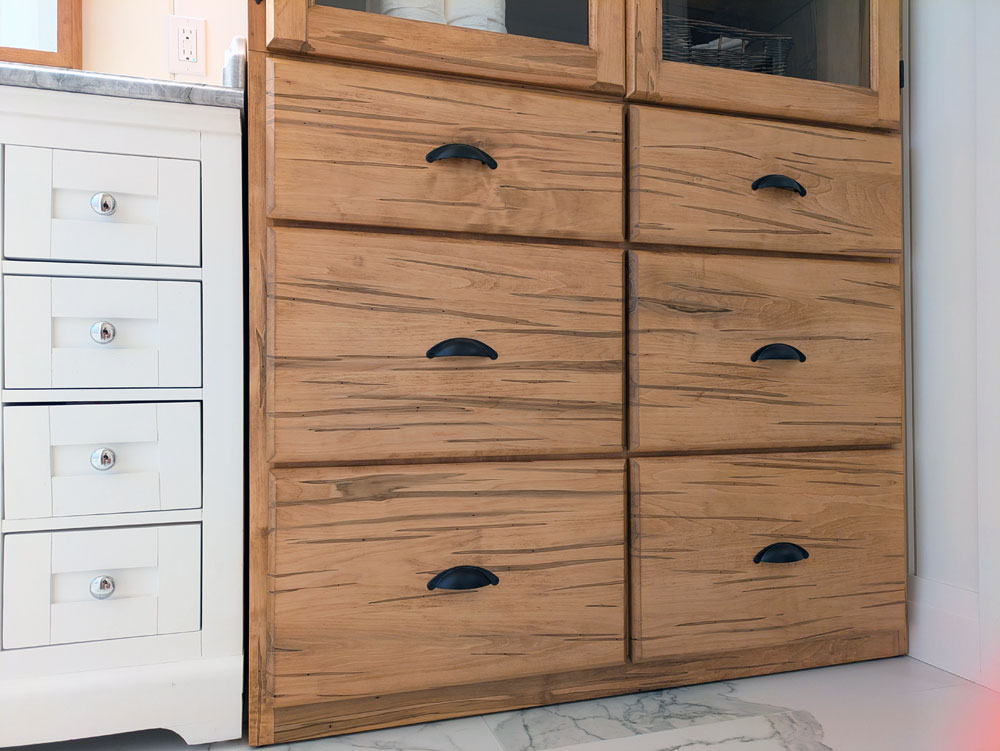
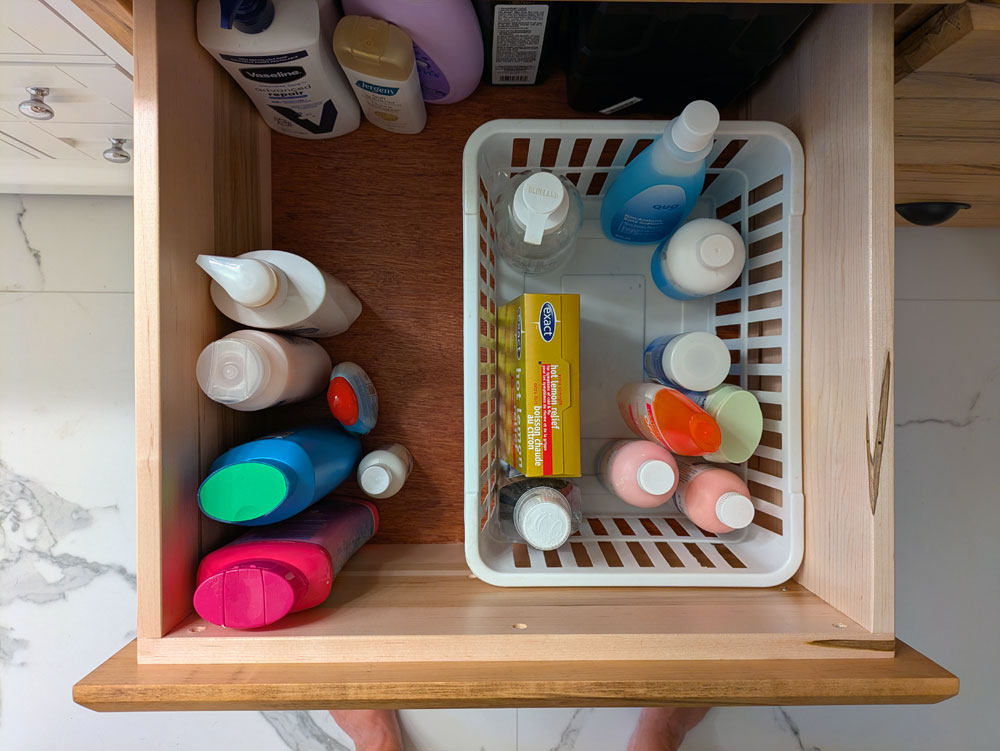
The cabinet has six drawers on the bottom. After living with the open linen closet, I wanted some closed storage. I was very specific about the measurements for the drawers, as I planned to store shampoo and other bottles standing up. So the four bottom drawers are 12 inches high. The top two are 8 inches. They hold so much.
The top of the cabinet has four shelves behind glass doors. I liked the idea of some more open storage, rather than closing off this corner entirely. The shelves are where I’m putting towels and toilet paper (stacked neatly, of course). The baskets from the previous linen closet (which are actually from our previous house) work well here too and hold things like sheets, Christmas towels and other less coordinated items.
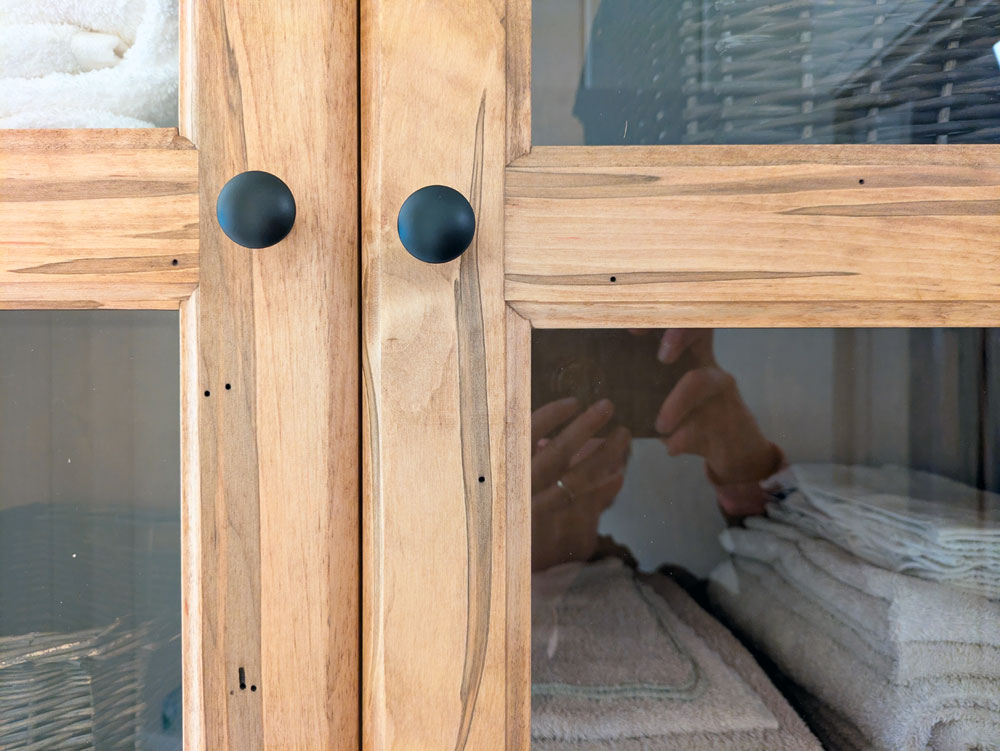
I chose black hardware to contrast with all of the polished chrome we have elsewhere in the bathroom. There are bin pulls on each drawer and small knobs on the doors.
The wood is wormy maple. It has lots of character with darker sections and actual worm holes. For the stain, I chose a finish that matched the wood frames on our mirrors. I feel like it has a bit of the warm antique tones I was going for.
The wormy maple is the one thing I’m questioning on the hutch. The drawer fronts are a little stripey, which I don’t love. I’m wondering about going back to the builder and asking for plain maple fronts.
But overall I love the hutch. It holds so, so much. Plus the beautiful wood tones add so much warmth. The vision that I had for our new bathroom is coming together.
Have you ever had custom furniture made? How do you mix wood tones into your house? What do you think about the wormy maple?
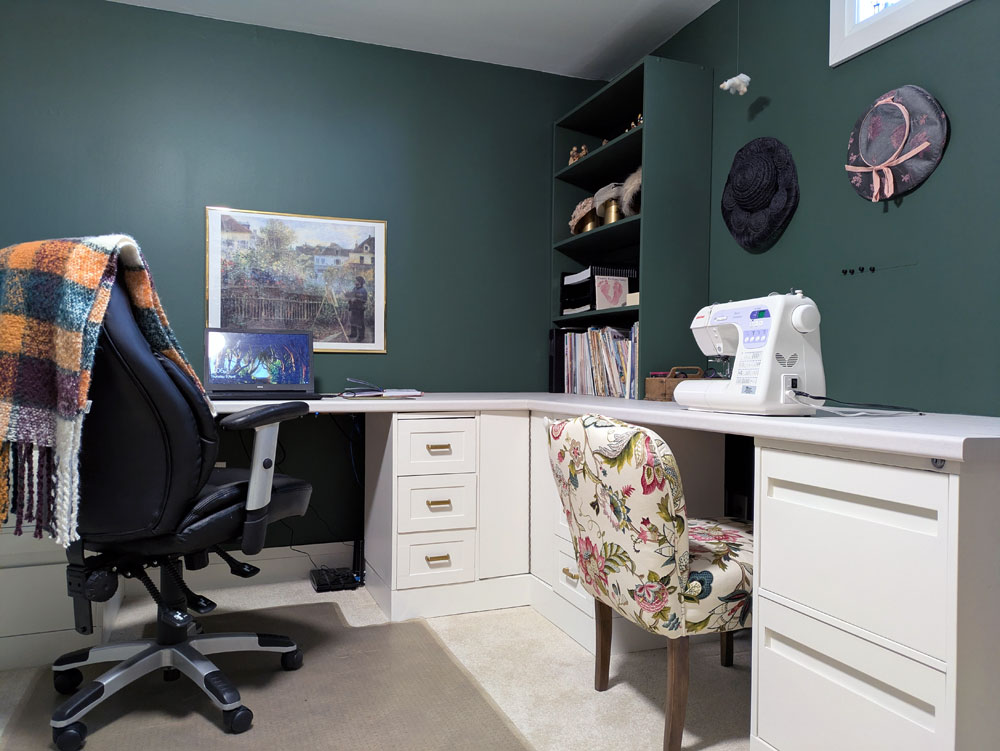
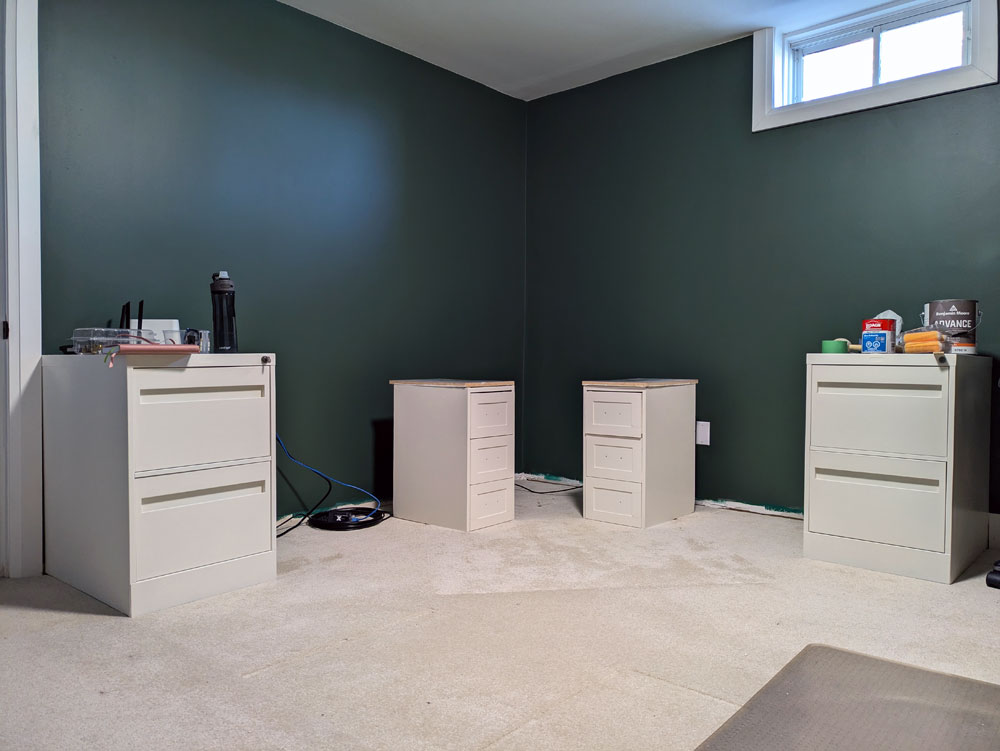
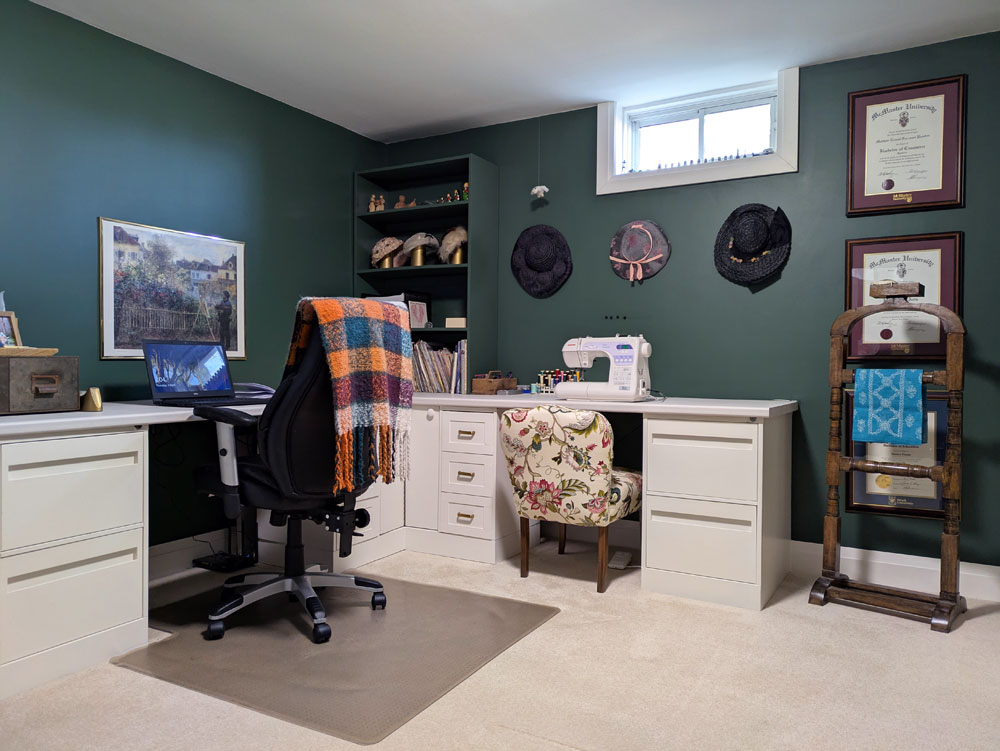
Take one old desk, two file cabinets, a bookshelf, a countertop and a dream and what do you get? The desk in my new office.
My vision for the desk was pretty clear right from the start. I knew I wanted two work stations. I knew I wanted file storage. And I knew I was cheap.
Fortunately, I also knew I was handy.
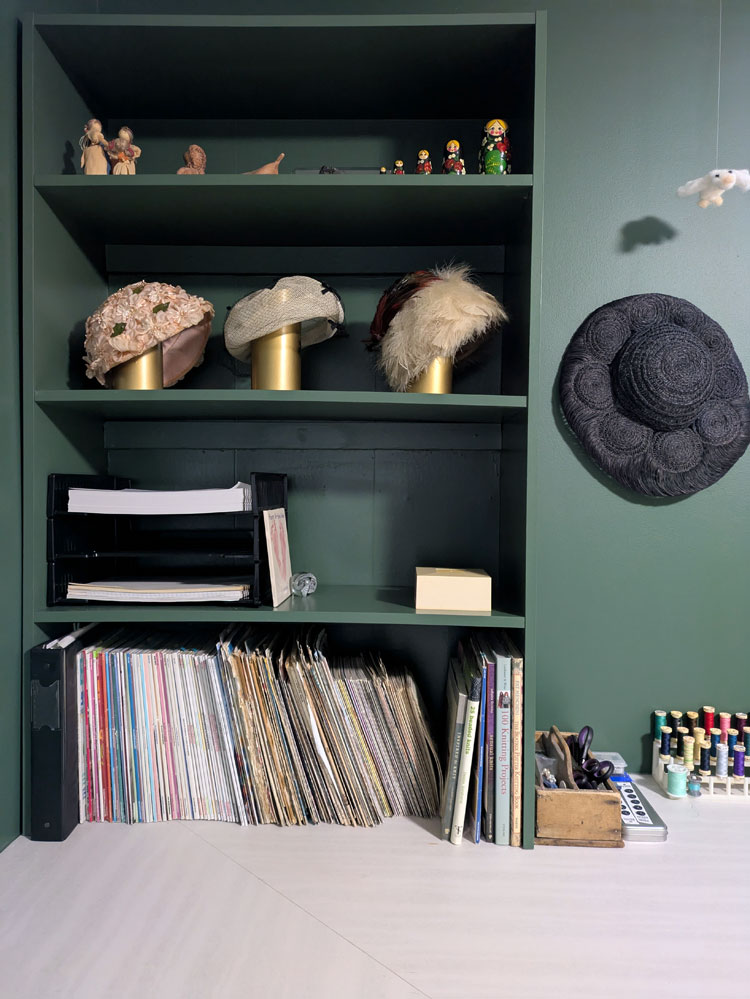
I came up with the idea of a long counter that wrapped around the corner. Underneath there would be regular desk drawers and file drawers. In the corner on top there would be open shelves for storage and display.
I knew what I wanted. Now I had to make it happen.
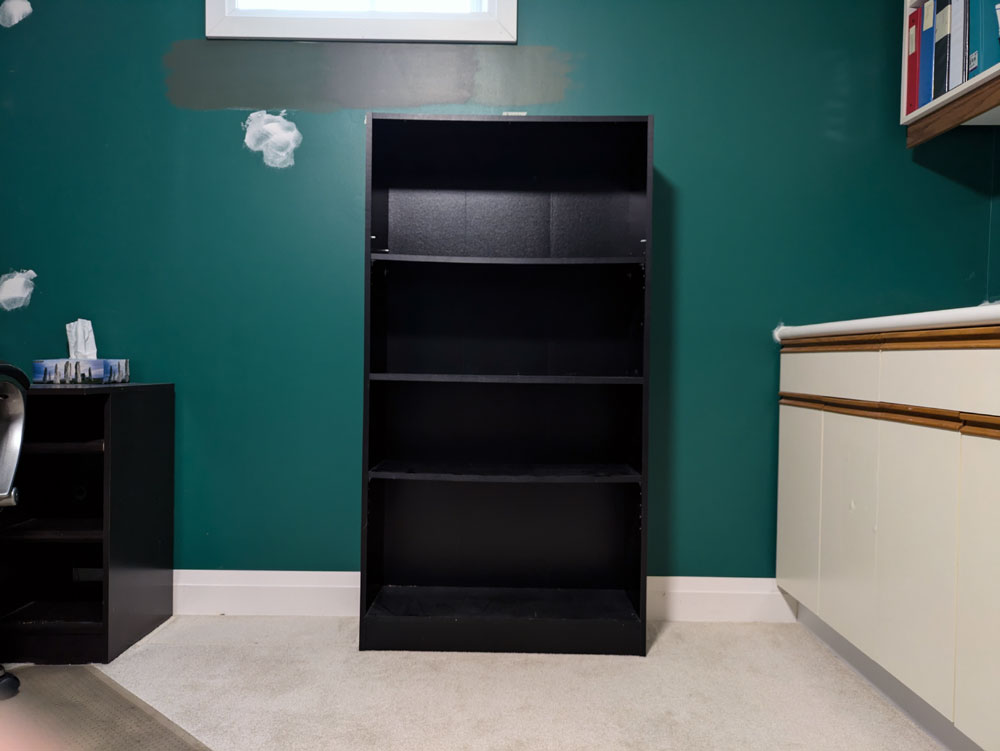
When we cleaned out Matt’s office, I left one bookshelf behind with the plan to use it for the hutch on top of the desk. One component, check.
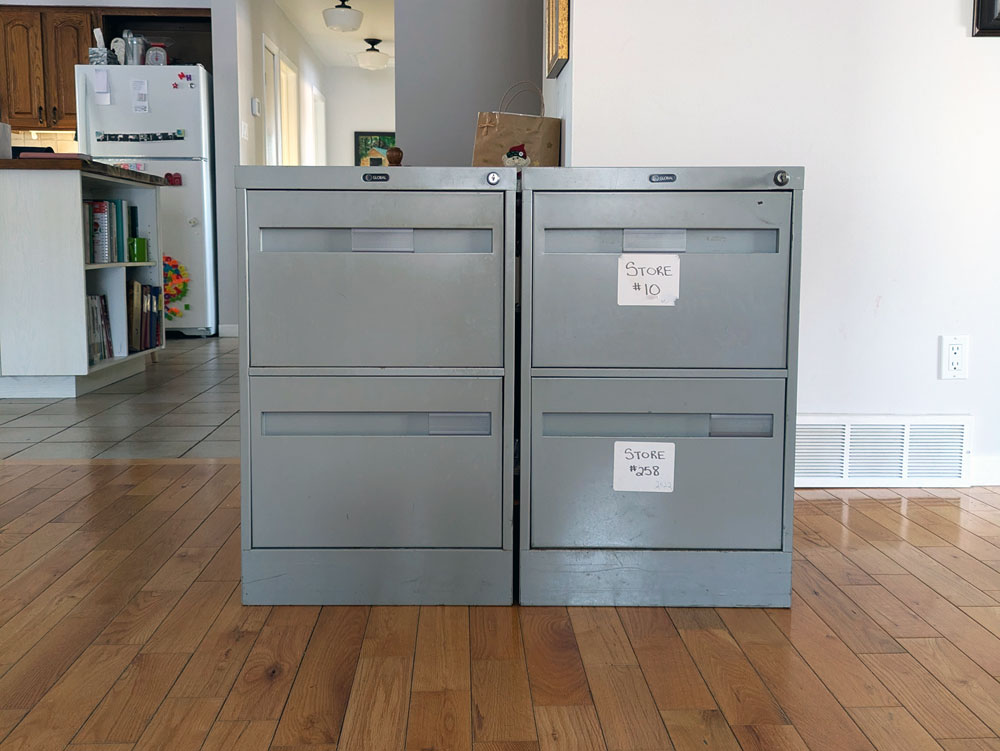
Then I moved on to the file cabinets. I wanted cabinets with a decent amount of storage that were the right height to support a counter. I found a matching pair at a used office supply surplus store.
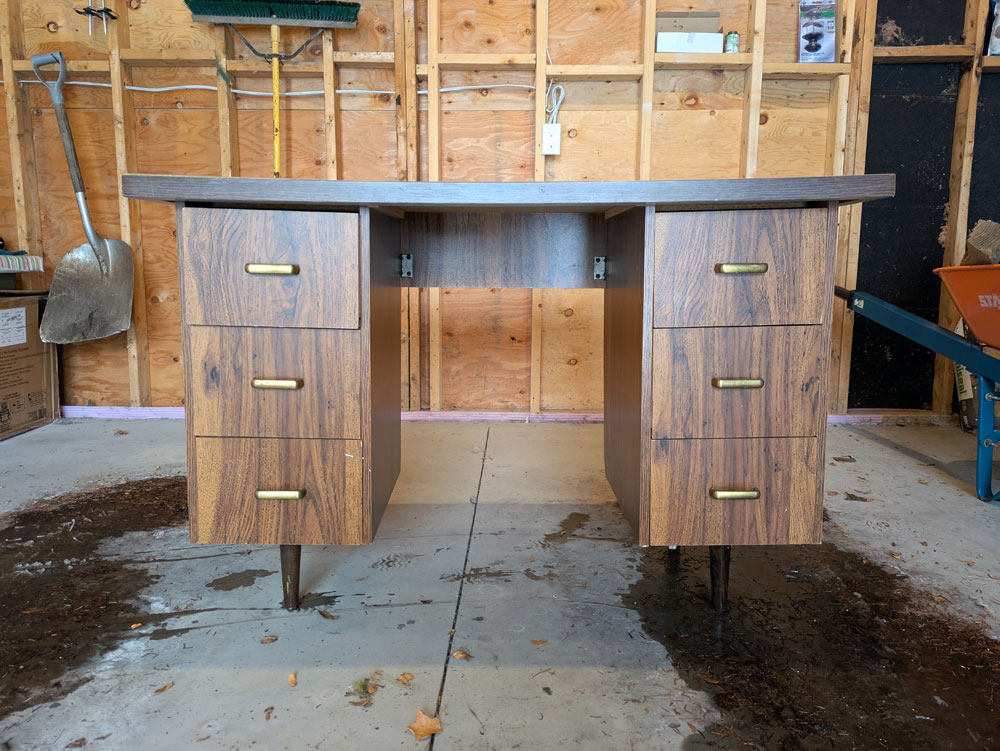
Next came the drawers. I considered building them and really didn’t like that idea. A search on kijiji netted me an old desk with two towers of simple drawers.
When we picked up the desk, the seller asked Ellie, “Is this going to be your desk?”
She said, “No it’s my Mom’s.”
The seller was a bit horrified. (The desk was pretty rough.) He said, “I have a nicer one in the house.”
I said, “No. This is exactly what I’m looking for.” And in my head, “You’ll never recognize it when it’s done.”
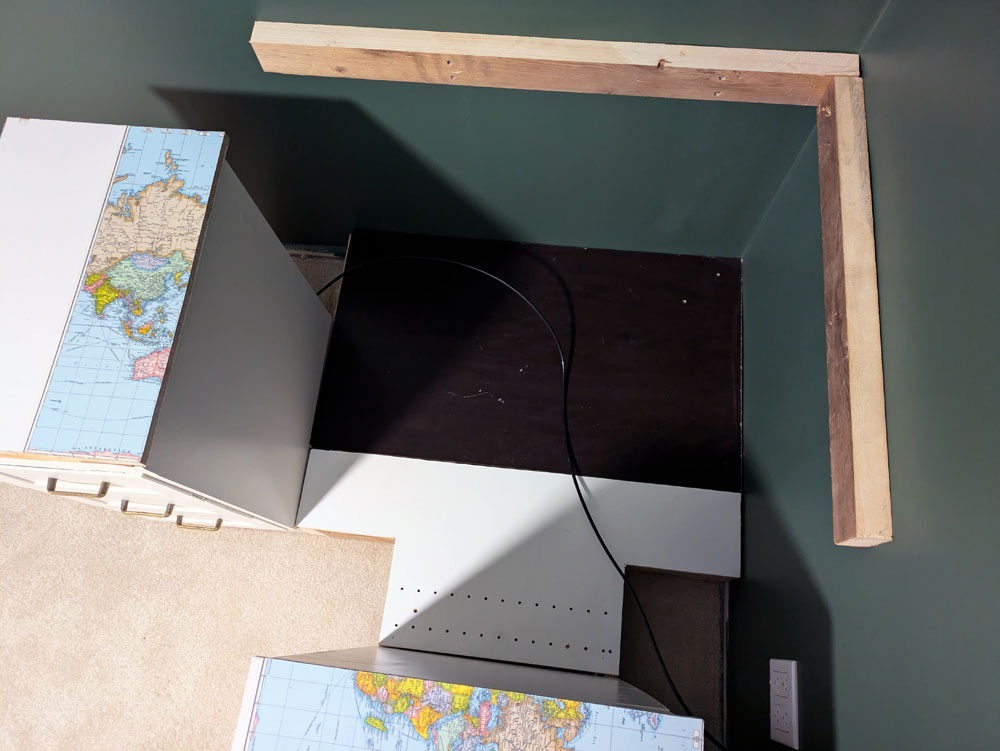
Elements procured, it was time to put them together. Or take them apart and then put them together.
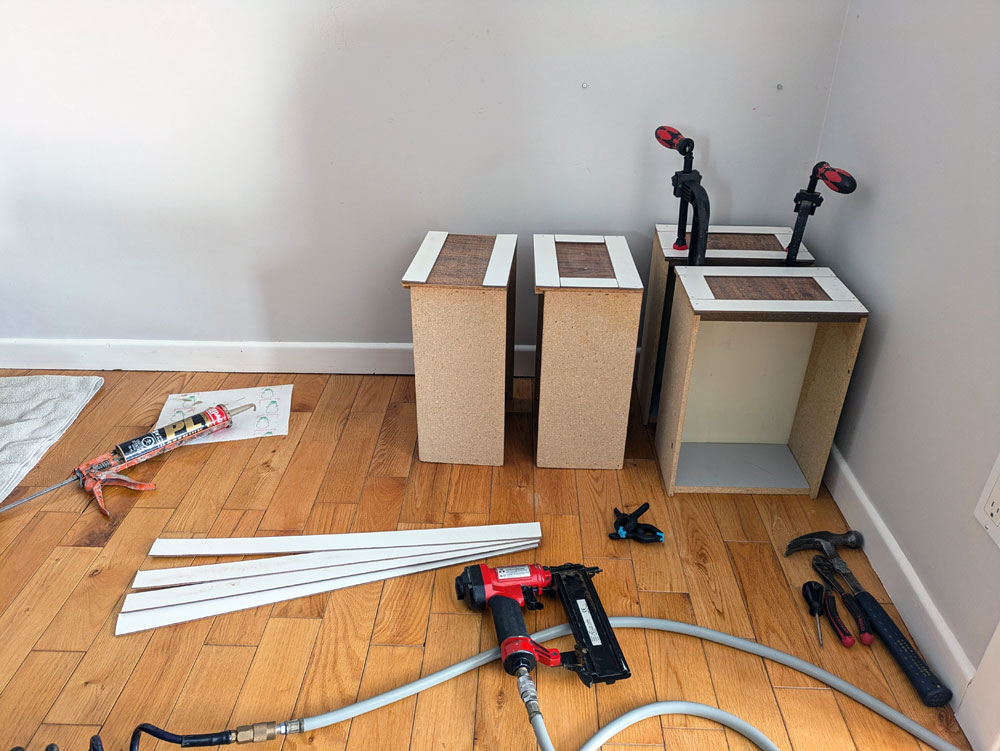
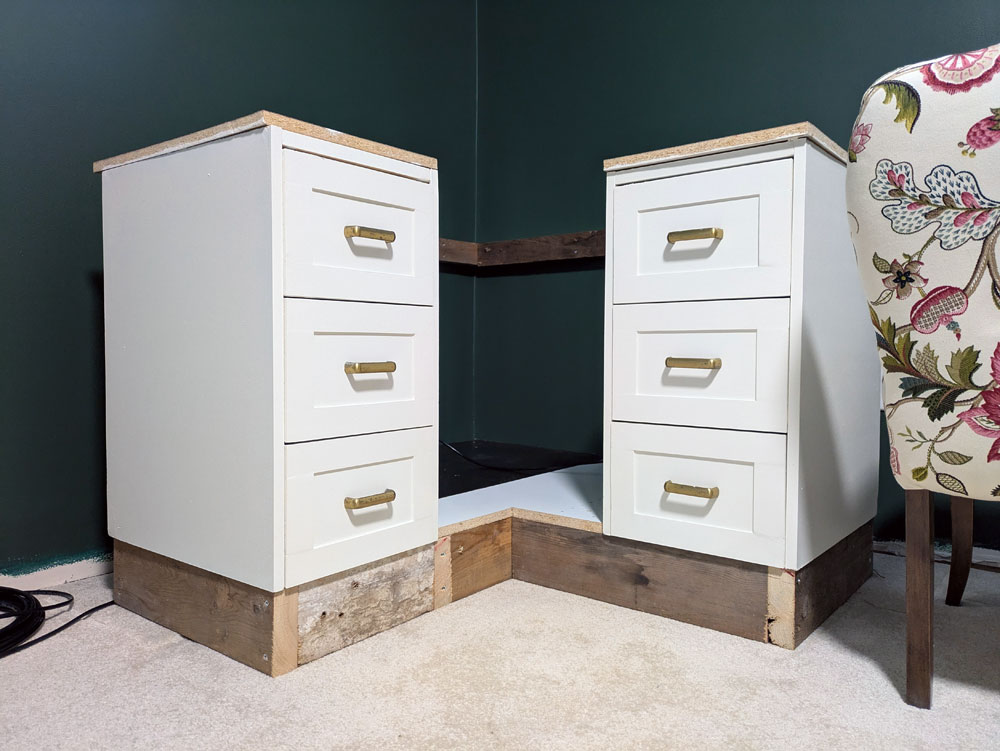
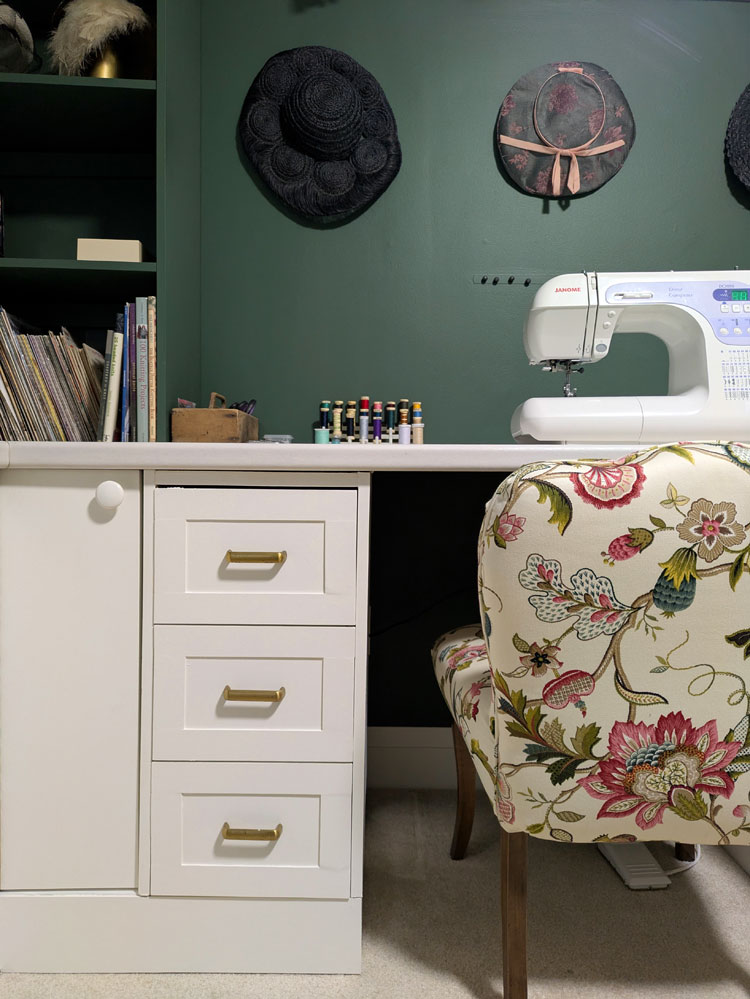
I removed the legs from the desk then cut the top so that I had just the two towers of drawers. Then I revisited the fake shaker technique I used in our laundry room and added strips around the edges of the drawers to give them the recessed panel profile. This is always the stage where I’m questioning my life choices and wondering how this is ever going to look good.
Wood filler, sanding and paint make everything better. I also painted the file cabinets my go-to furniture colour, Benjamin Moore Cloud White.
I was finally at the reconstruction stage. I set the file cabinets at either end of my L-desk. The drawers were going to go in the corner of the L, but they were a bit short.
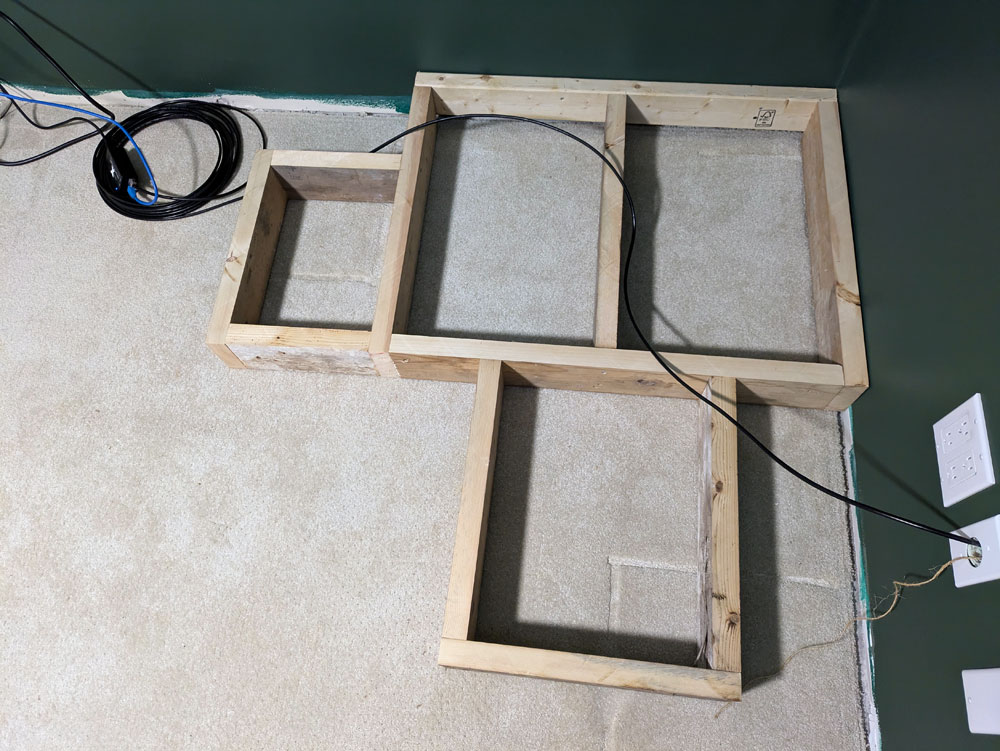
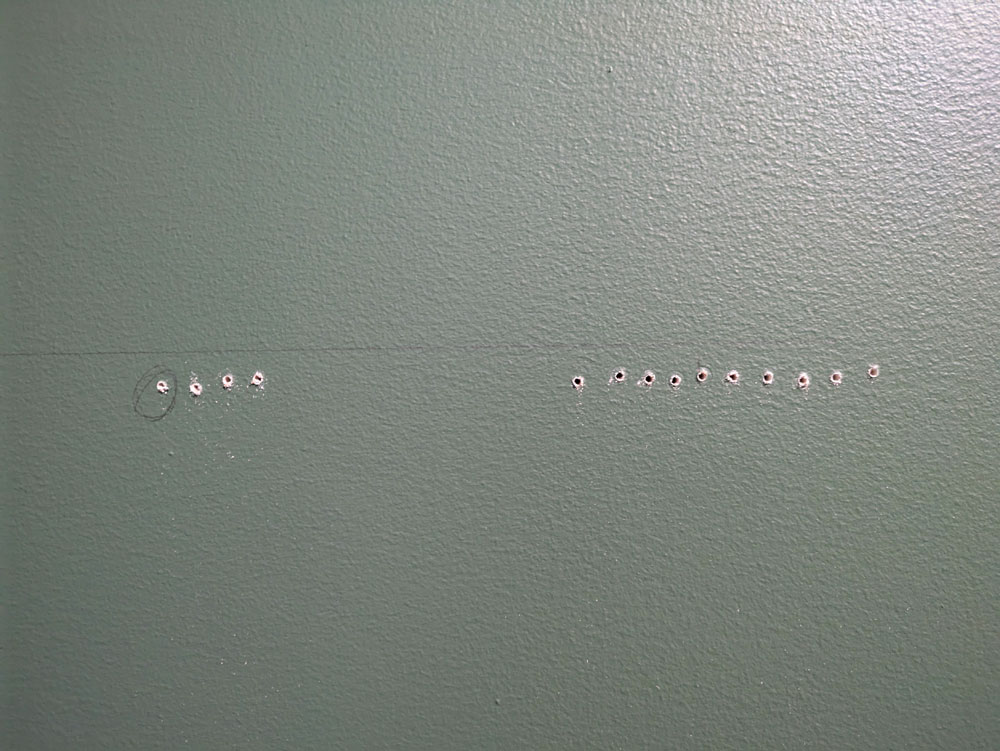
I built a little platform in the corner that raised the drawers up to be even with the file cabinets. The drawers are shallower than the file cabinets and I had to make sure I had access to some electrical outlets, so the platform appears to be oddly shaped.
After debating spacing and dimensions a bit, I decided to make the corner into a functional cupboard, albeit with a very small doorway and a patchwork floor. This is the spot for memorabilia and rarely used things.
With the drawers in place, I threw a piece of plywood on top and took the desk for a test drive.
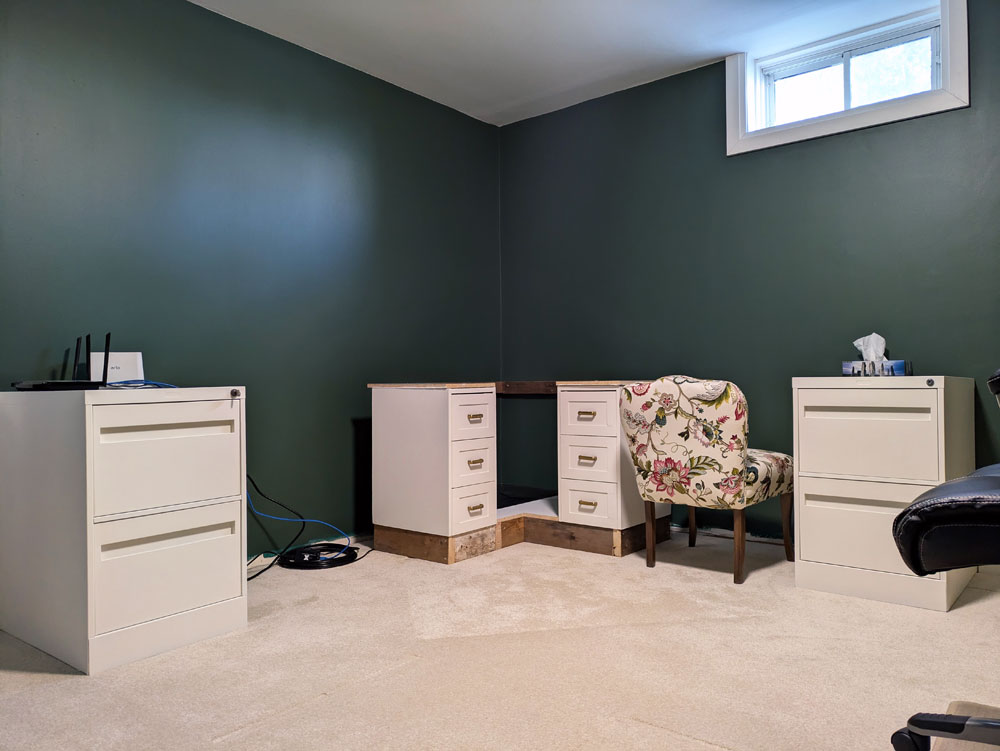
Everything was level and felt good, so I placed my order for a countertop. I went with a simple laminate counter. I added some ledger boards on the walls for additional support (after drilling just a few holes to find a stud).
The counter also rests on all the drawers. Thanks to the size of my file cabinets, the desktop is extremely deep. Lots of space to spread out.
Bottom half done. Onto the hutch.
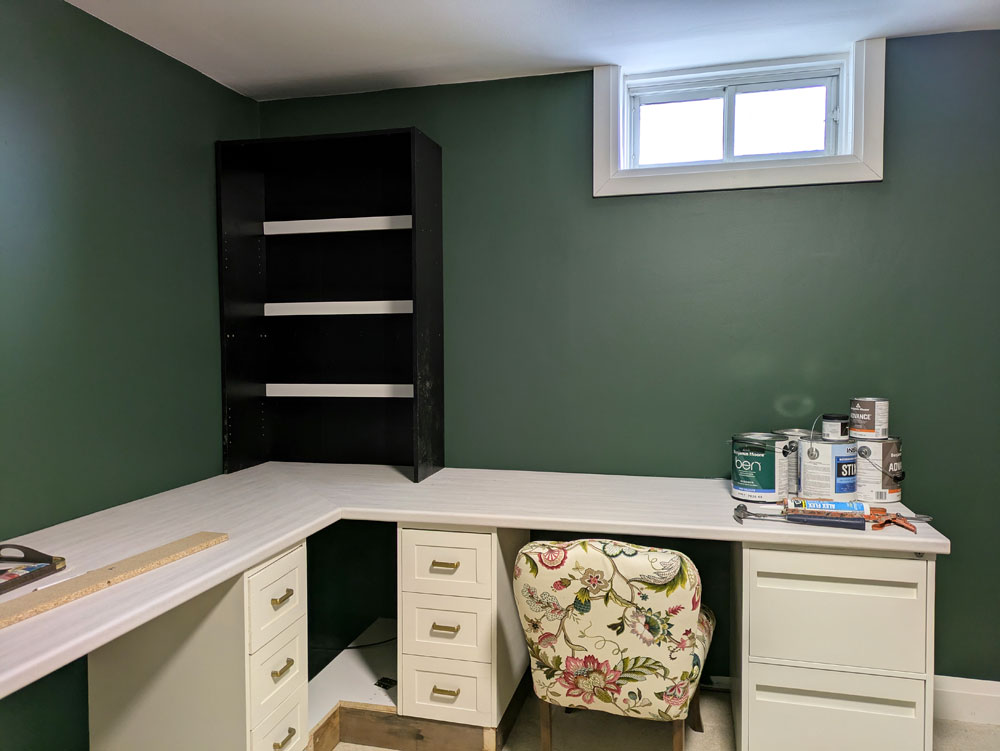
I cut Matt’s bookcase so it was the height I wanted and then I positioned all of the shelves and fastened them in place. I added extra bracing along the back as well.
I debated what colour to paint the shelves and ended up deciding on the same green as the walls, rather than white. After few coats of paint, I lifted it onto the desk, set it in place and screwed it to the wall. Some wood filler and paint touch-ups finished it off.
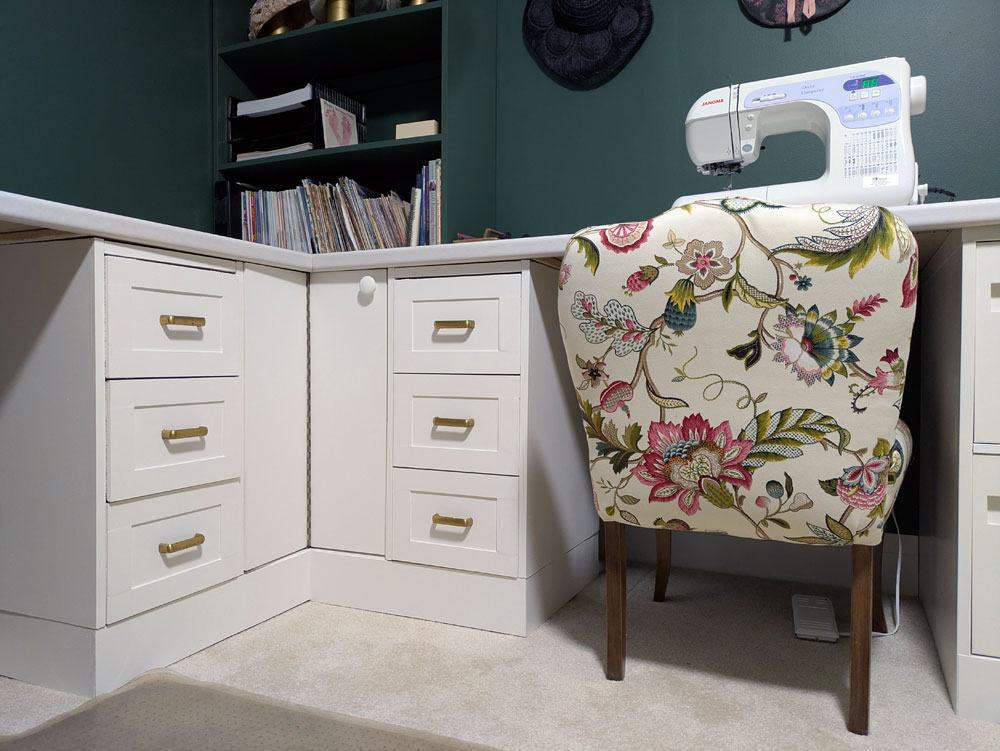
The final step was a door for the corner cupboard–and we just happened to have a corner cabinet in the barn. I removed the door, cut it down to the size I needed (carefully preserving the hinges), gave it a coat of paint and… couldn’t figure out how to fit it in place. Fortunately, I live with a small person who is keen to help, so she climbed into the cupboard with a flashlight and pencil and marked the hinges for me. (Throughout the construction process, she liked the idea that the corner was a hidden fort just for her, so she had no problem climbing in when asked.)
I was then able to drill the holes and screw in the hinges. A wooden knob, some painted hardboard for the toe kick and reinstalling the baseboard were the final touches. The desk was done.
I am not a cabinet builder and fine carpentry is not my strength. I am really proud of how the desk turned out. I was able to take an idea, a bunch of furniture pieces, put them together and create an awesome, functional, attractive result.
Anyone else have any Frankenstein furniture? Have you every remade a piece of furniture? How do you prefer to work? Do you have a dedicated desk? Or do you move around?
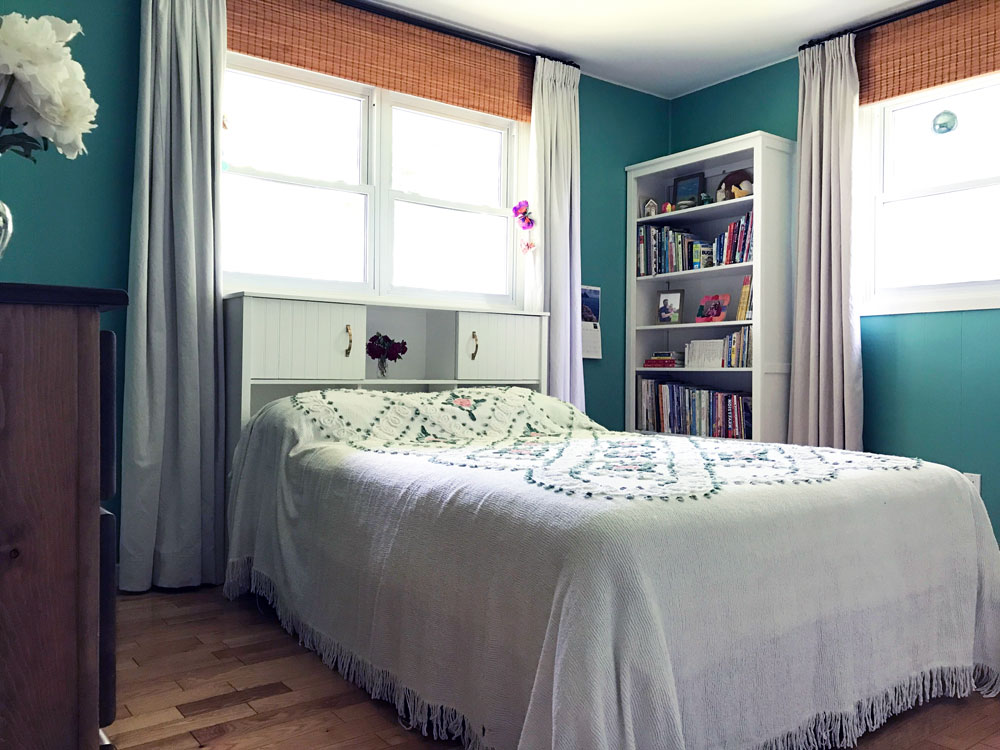
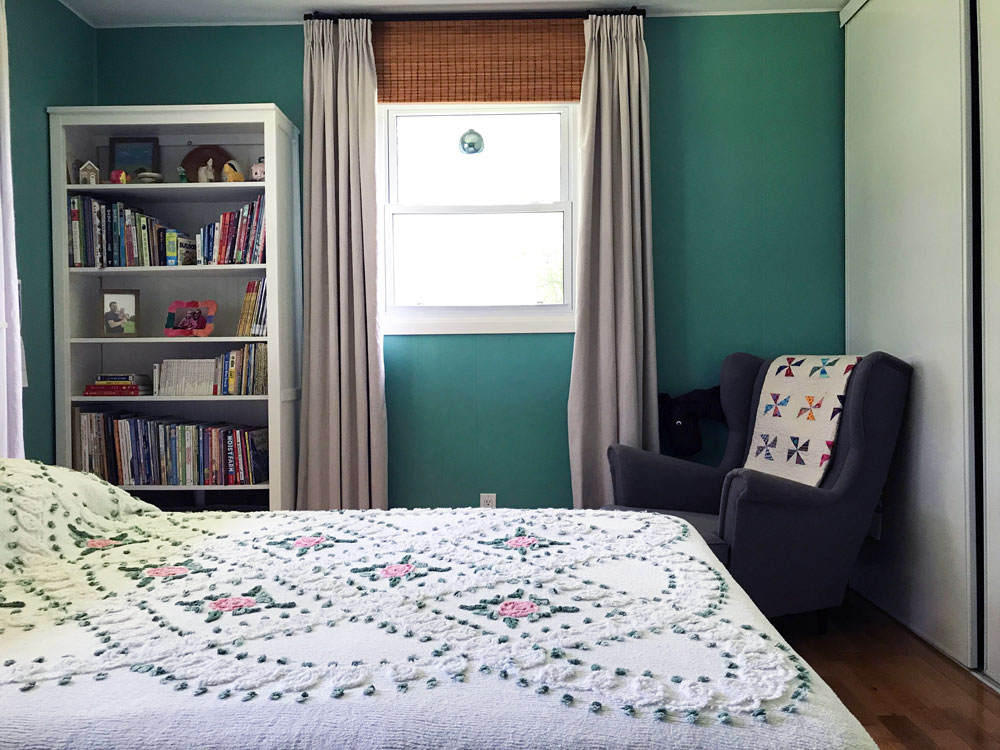
Ellie’s new room is officially done. It’s green, floral, fresh, vintage, thrifty, personal and her.
When I first came up with the plan to have Ellie move rooms, she was not enthused. But as we started planning her new room, she became more and more excited. Finally she was so excited she gave me a deadline. She wanted to sleep in her new room by Tuesday night (this was about a week earlier than I had planned). So I finished off most of the final touches and our girl moved in.
This was over a year ago.
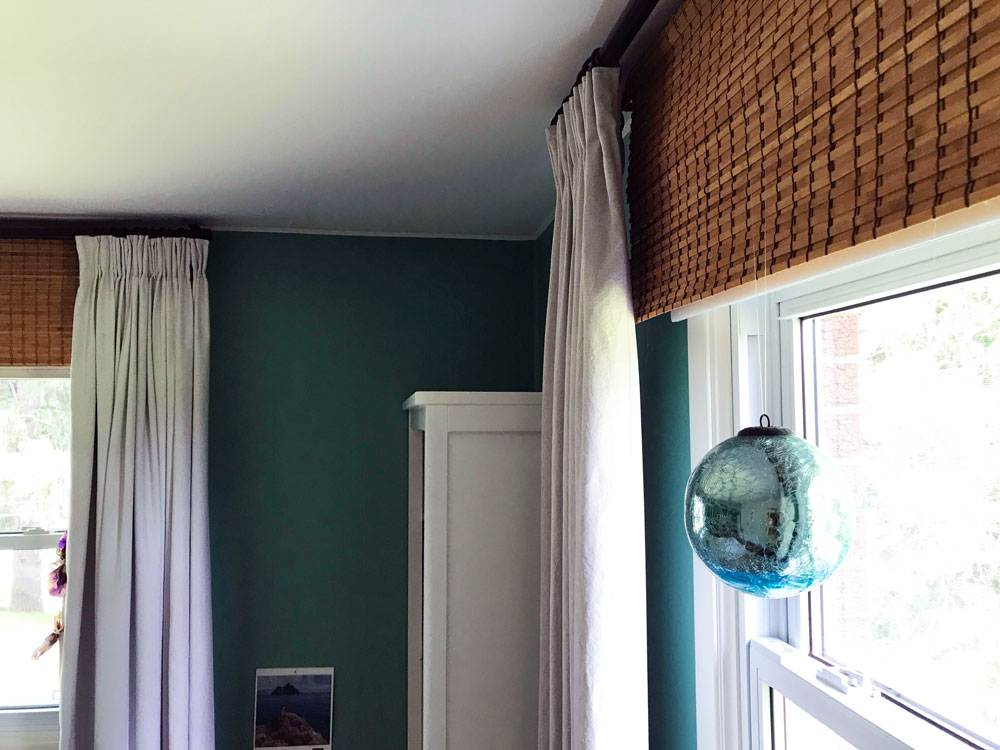
The final, final touch was some bamboo valances to cover the blackout roller blinds. I finally installed these at the end of June, and her room is officially done.
I actually like that the reveal is a year after she moved in, because she’s added some of her own details to the space now–as she should. (And she’s added even more since these photos were taken, as over the weekend we hung a little cuckoo clock Matt’s Dad brought her from Switzerland.)
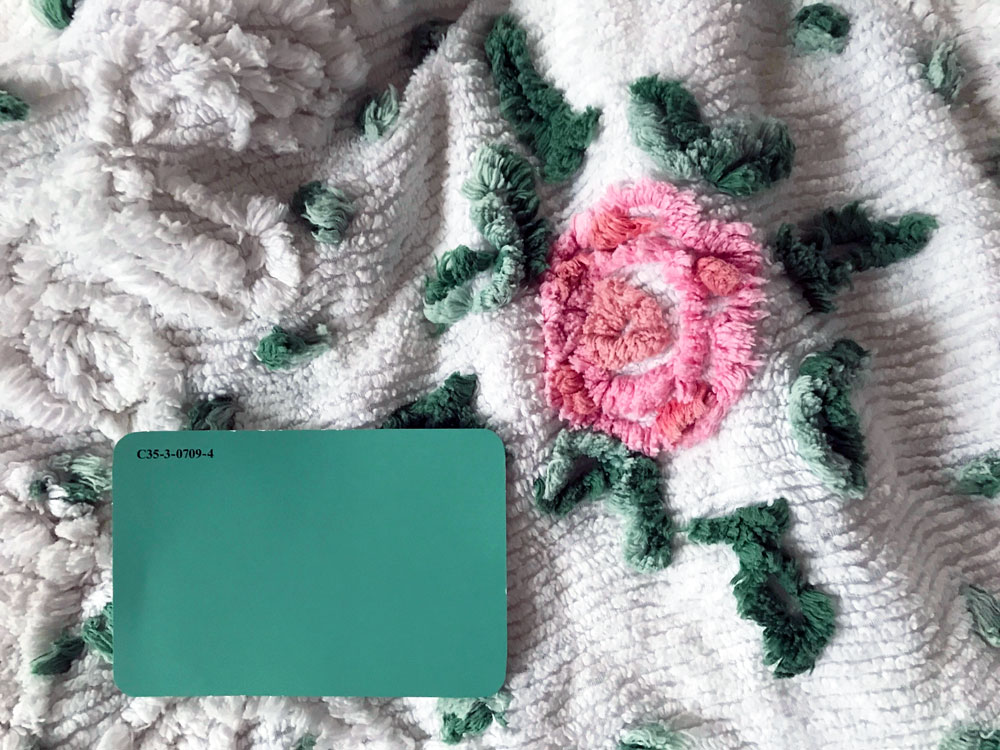
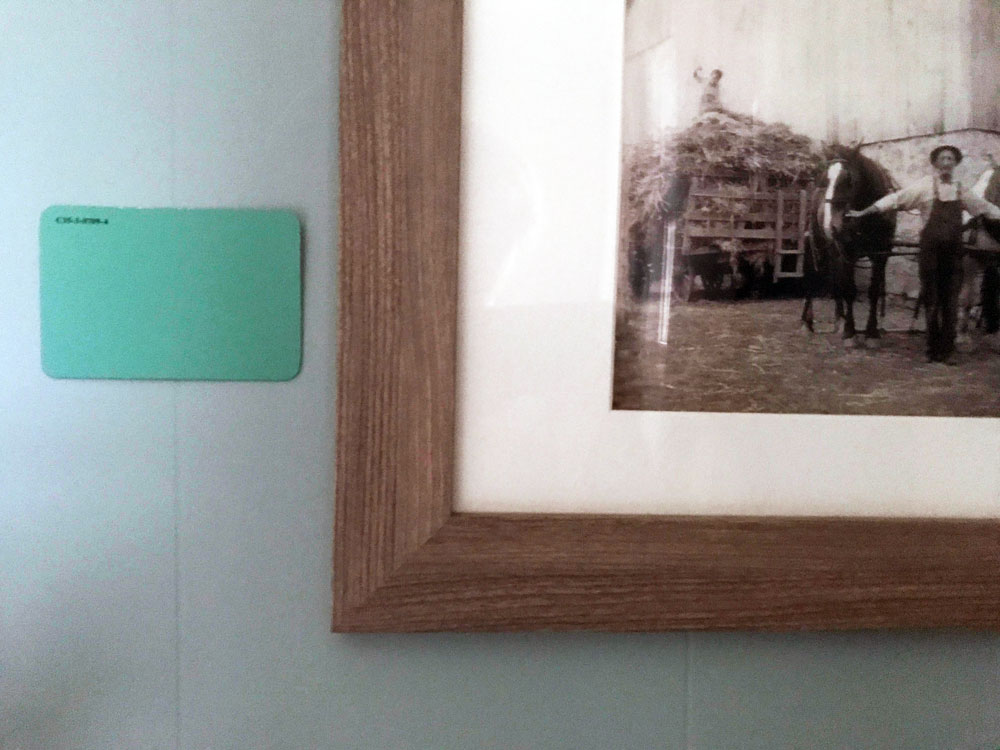
Ellie’s favourite colour at the start of the makeover was green, and she chose the paint chip she liked (Calmness C35-3-0709-4 by BeautiTone from Home Hardware). It’s much brighter than I would have chosen, but it ended up working perfectly with the vintage bedspread I wanted to use. Of course, by the time she moved in she informed me her favourite colour was no longer green. It was purple. But she’s tolerated the green.
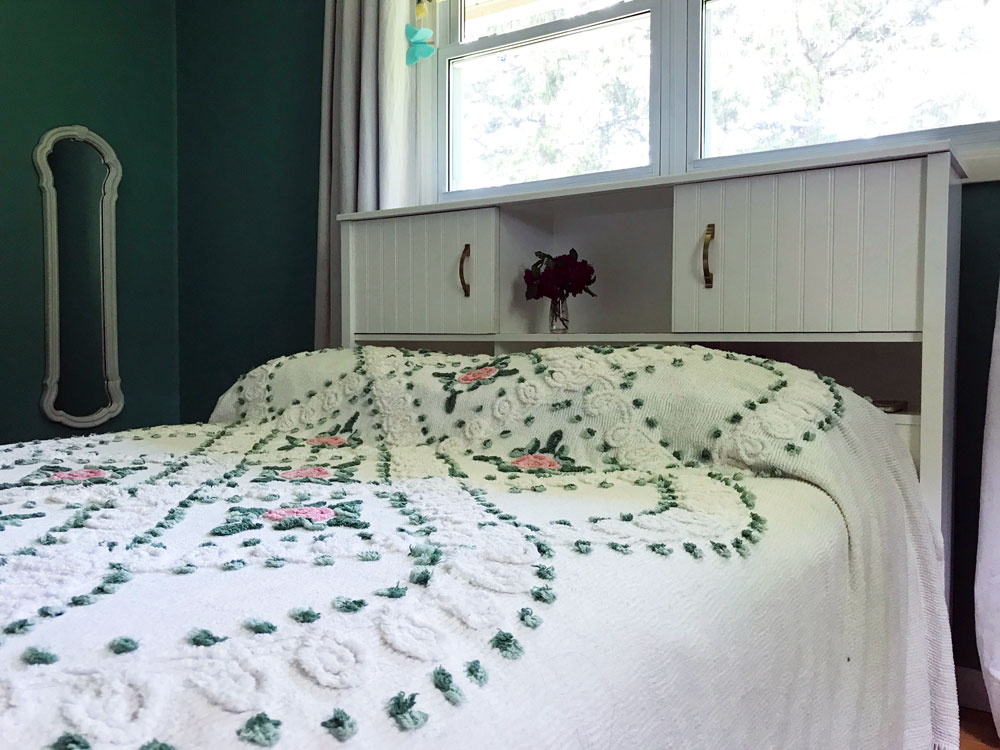
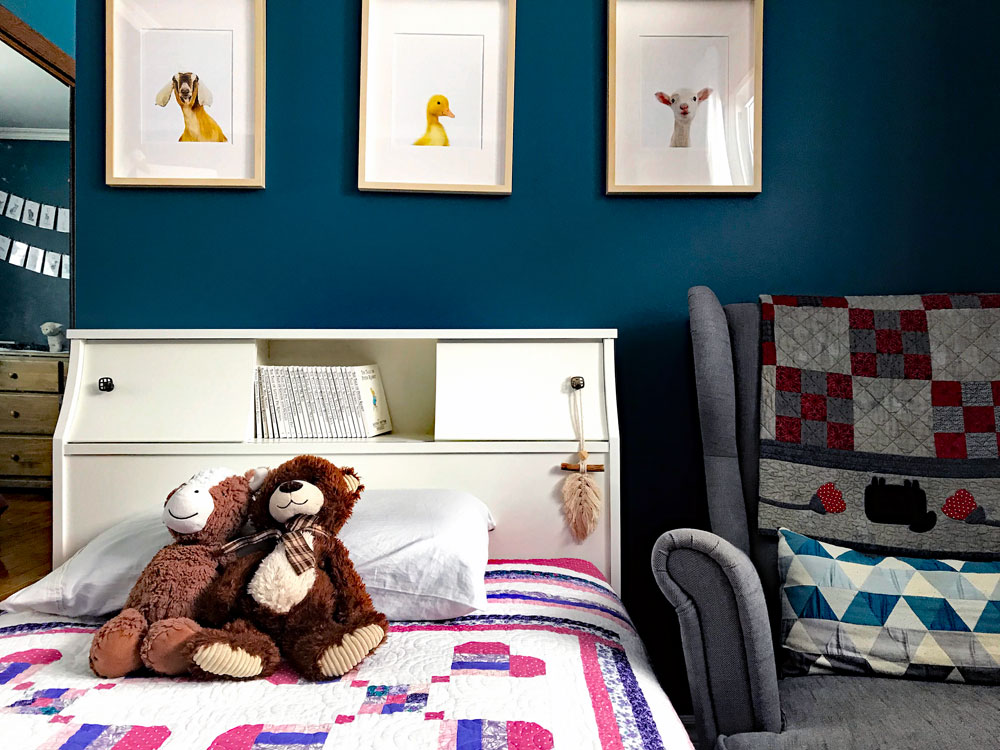
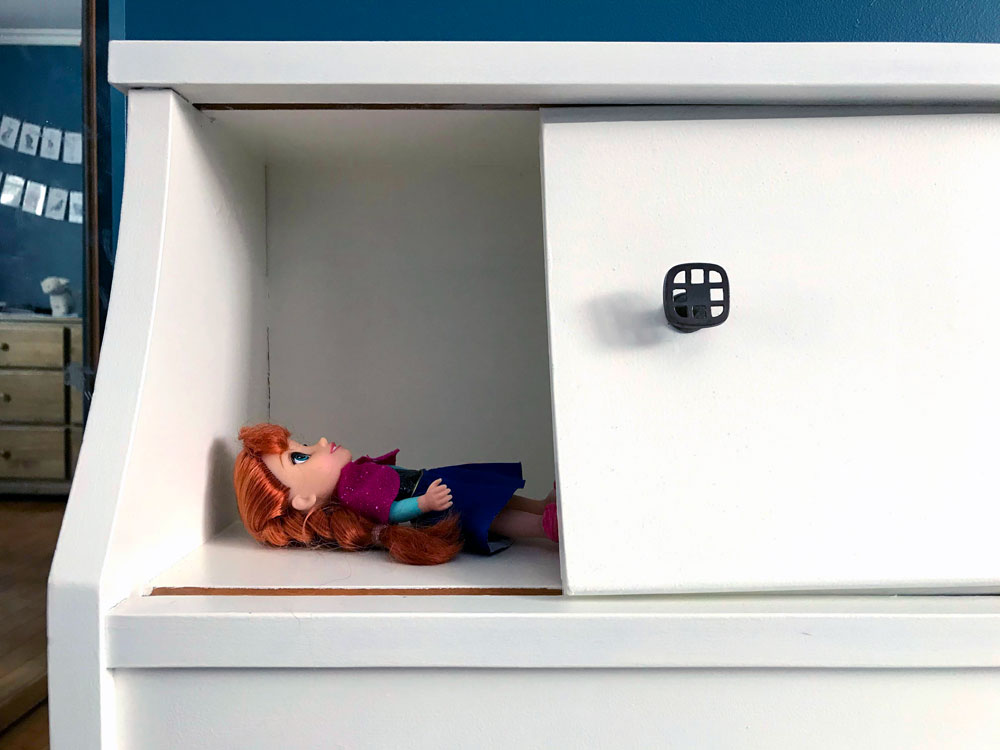
In Ellie’s old room, she had my childhood bed, which had cubbies with sliding panels in the headboard. She liked those secret hiding spots and requested the same style in her new bed. I had plans to build a headboard, but then I found a double size headboard with cubbies in a thrift store. I was amazed at my luck and that re-energized me to get moving on the makeover.
I added bead board to the headboard to match Ellie’s bookcase and then painted the whole thing white. I attached the headboard to an old metal bedframe that we had in the barn, and Ellie picked out some handles for the sliding panels. It all came together so well. The cubbies are full of “treasures.”
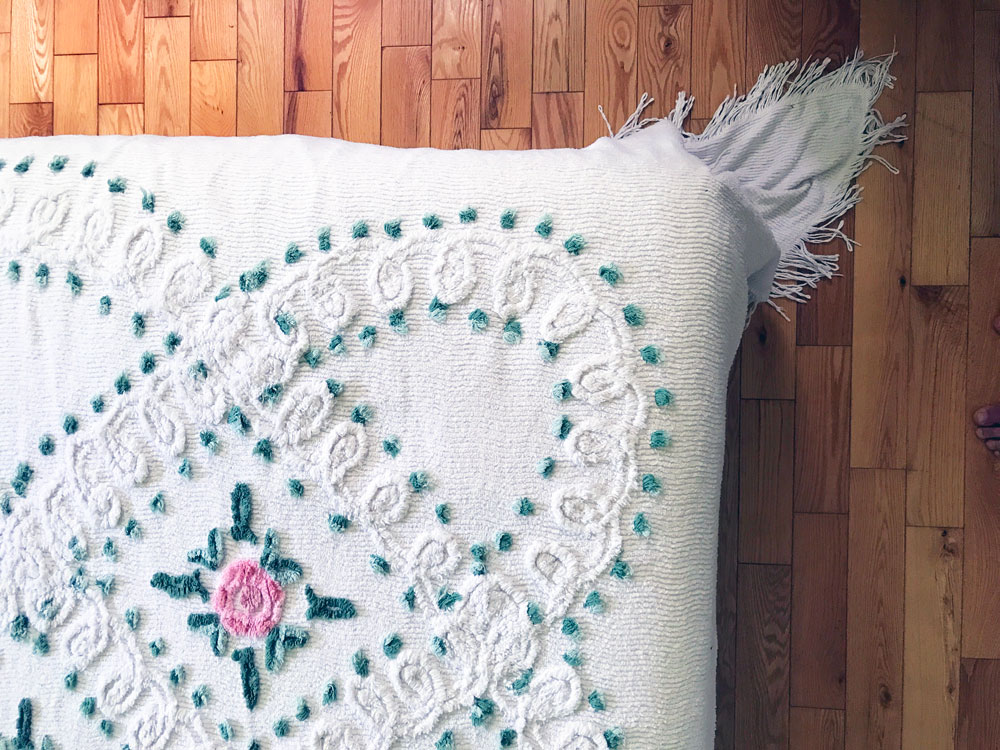
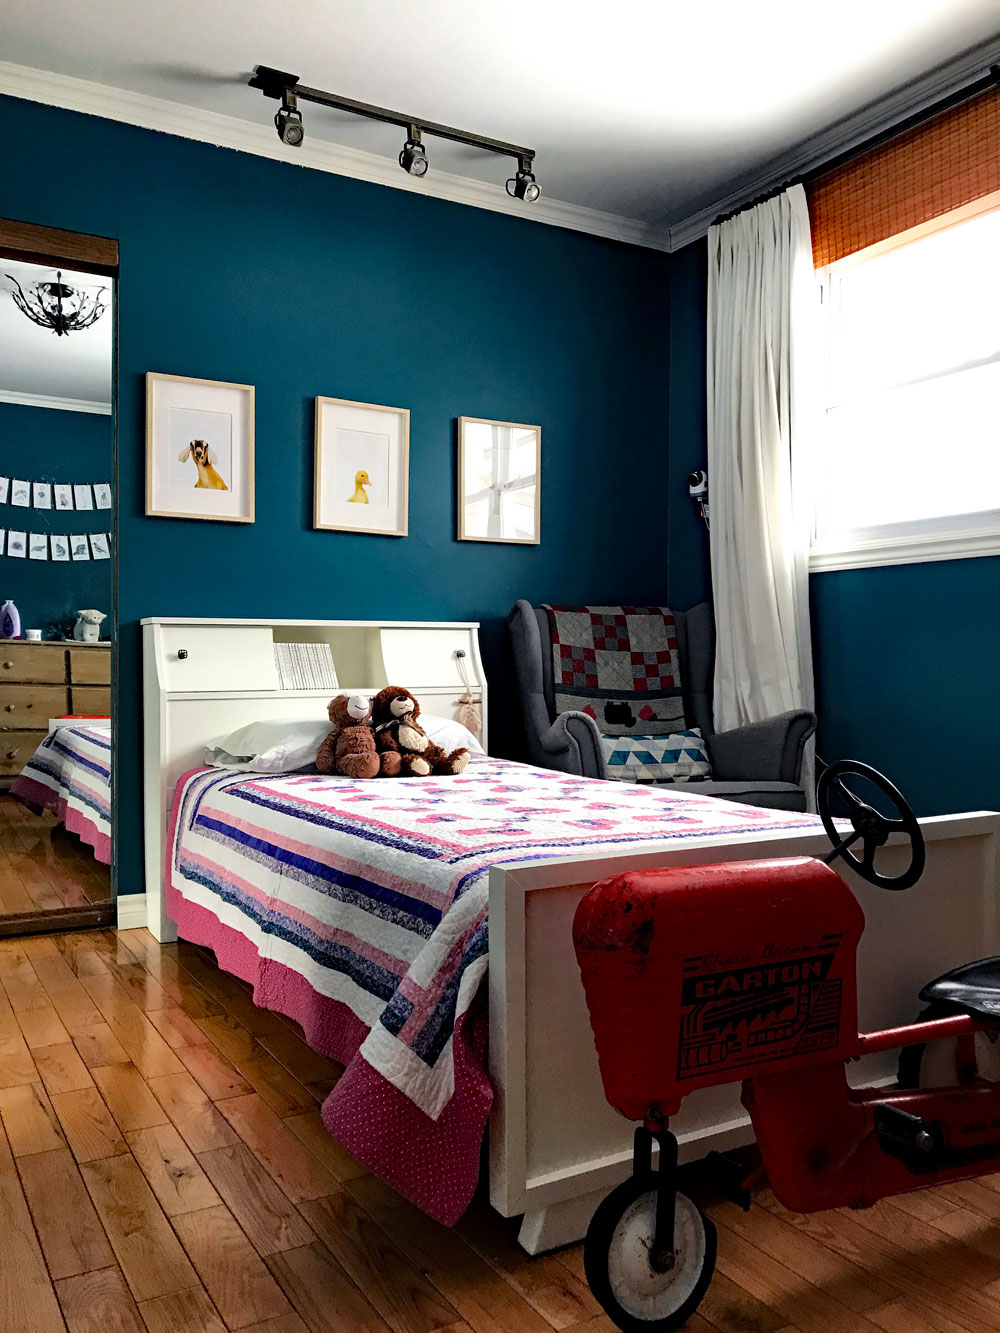
The bed is covered with a vintage chenille bedspread from my grandparent’s cottage. I love this bedspread so much. The colours are so vibrant and the contrast of the green and the pink is so pretty. Plus the fringe is super fun.
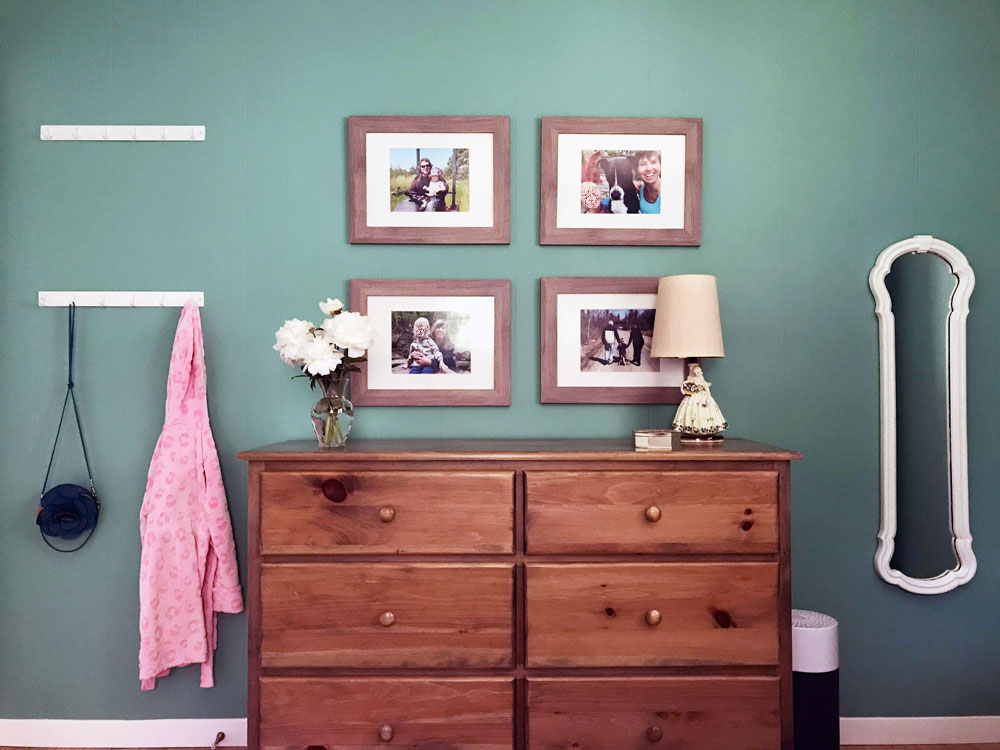
The bookcase and dresser moved from Ellie’s nursery and they work great here. The mirror I thrifted for this space when it was the guest room.
I also moved in her Ikea Strandmon wing chair. It is too large for the space and we don’t use it anymore for reading, but it’s been a comfort to Ellie to have the chair. As excited as she was for her new room, she was only up for so much change.
I kept the same dropcloth curtains that I sewed for this room back when it was the guest room, but I added blackout lining. Probably unnecessary since I also bought blackout blinds. We’ve never had to close the curtains. I like that they’re a neutral colour but not white. They add a little bit of contrast and also soften the bright green walls.
The bamboo valance is a technique I’ve used in all of our bedrooms so far. I even used the same blind, just chopping it up for each window. The delay in finishing Ellie’s room was that I didn’t have very much blind left. I had to reweave part of it to make sure it was long enough to cover the top of the window. This was a tedious job that took me awhile.
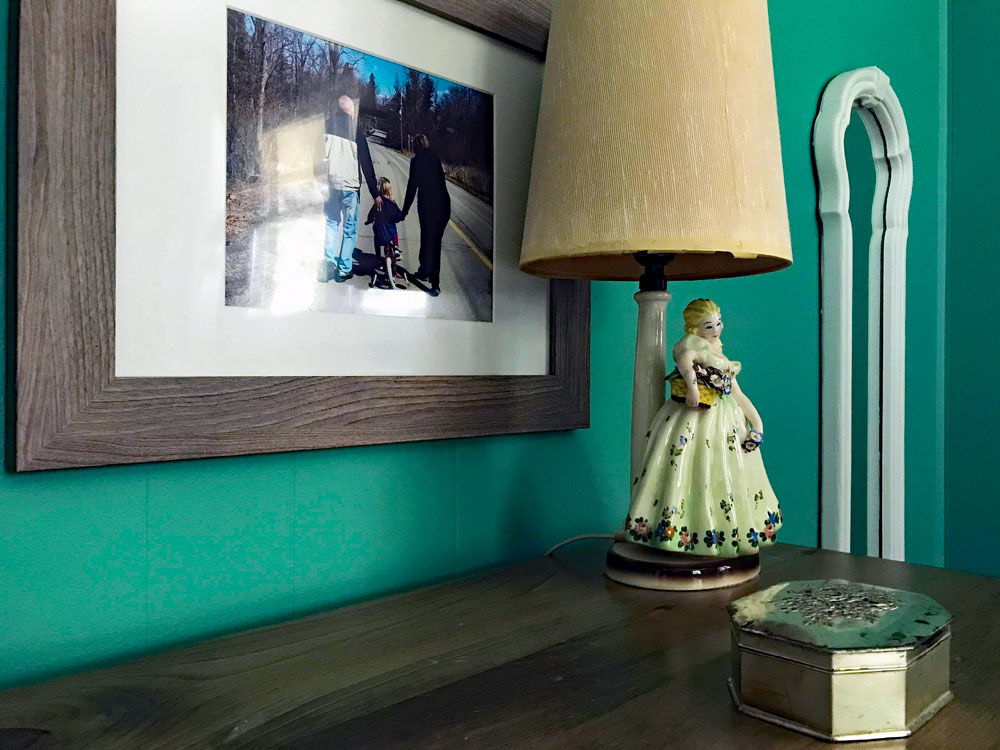
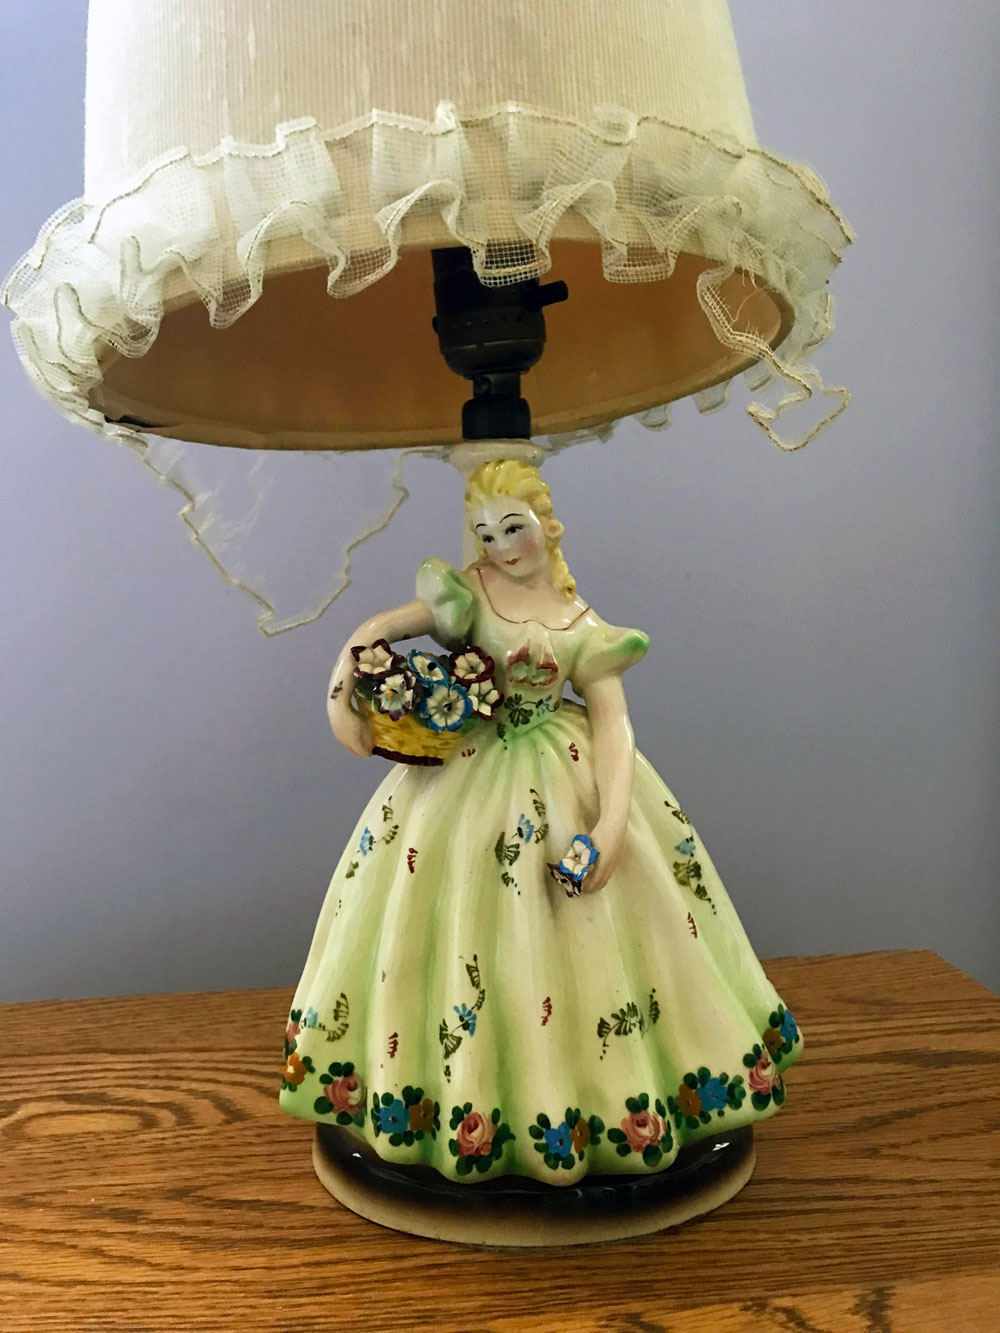
On top of Ellie’s dresser is a treasure that I’ve had in mind for her room always. My Mom’s flower girl lamp. My Mom’s grandparents had a furniture store, and she remembers going in when she was about Ellie’s age and being able to pick out whatever she wanted. She chose this lamp. The lamp was in my room for a little while when I was little. I love that it’s in Ellie’s room now.
Above the dresser are four photos of Ellie with Matt, me and her grandparents. I wanted her to see how much she is loved and have these important people present for her every day.
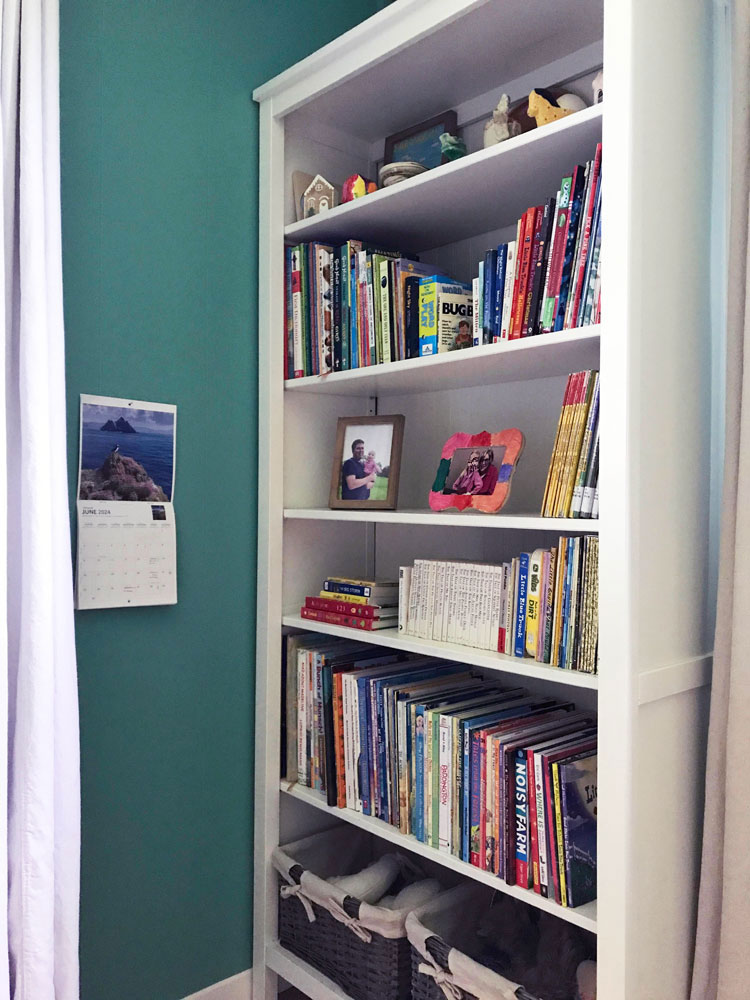
She’s added her calendar to the wall, coffee filter butterflies on the curtains, a sparkly glass ball in front of the window, suncatchers on the windows, lots of toys and treasures in the headboard cubbies and other places too.
It’s become a really fun, comfortable space that is unique to her.
I’d love to hear what your favourite detail is from the room. Do you have a favourite memory of your childhood bedroom?
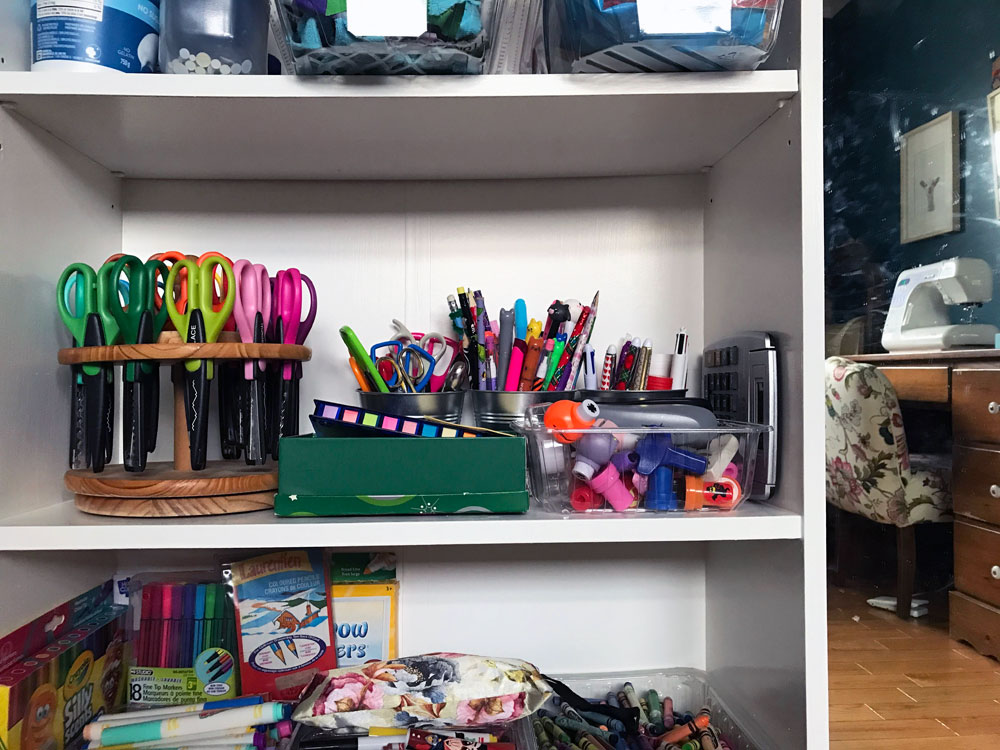
It was the scissors that did it. They tipped the balance from crowded into chaos. To be fair, it’s a whole carousel of scissors. And the living room has been maxed out for a while.
The journey to move Ellie’s play zone out of the living room and into her old bedroom has begun. While I had a vision of it being a one and done undertaking, I’ve come to terms with this being a more gradual process.
We started with the crafts.
Ellie is a prolific and varied crafter. Paper, fabric, stickers, glue, beads, wool, she loves it all. We’ve managed the crafting process and supplies with a small table in the corner of the living room and storage in the coffee table and sideboard. For a while it’s been a tight squeeze.
Then Matt’s aunt arrived for Easter lunch with an assortment of provisions, including a carousel of scissors (she knows what our girl likes). This, just weeks after Ellie’s birthday where she received rolls of colouring sheets, cases of beads, and sacks of needle felting, meant we were overrun with craft stuff.
I had the idea to shuffle some things around. As I said in my home goals post at the start of this year, this shuffle becomes like a row of dominoes. I reorganized and relocated some of Matt’s things. That freed up a cabinet and a bookshelf in the basement. More of Matt’s things moved into the cabinet and the bookshelf came upstairs.
After a quick coat of paint, the bookshelf moved into the playroom and became craft supply central. The first item to move in? The carousel of scissors.
While we were stocking the bookshelf, we made a few other changes to the room. (Though we obviously did not clean the mirror.)
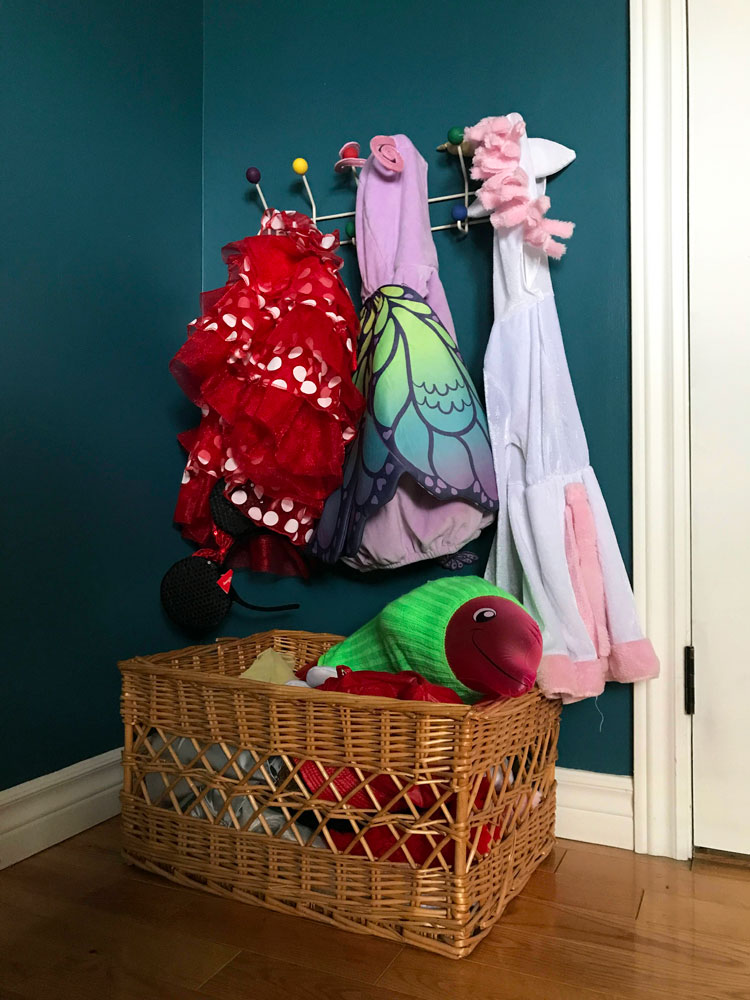
Her little table and chairs moved from the living room to the new (soon-to-be) playroom. I also used my knock-off DIY Eames hang-it-all to arrange a little dress-up area for her with all of her costumes and a bin for accessories such as hats, crowns, scarves, Minnie Mouse hands, or an inflated pink dolphin wearing a fluourescent green legwarmer (???).
This is just the start (and it’s definitely not Pinterest-perfect), but now Ellie has most of her craft supplies in one spot, clearly visible and easily accessible.
Anyone else have a crafty house? How do you handle craft supplies? Who else feels like home tweaks are like dominoes?
Ellie’s room makeover was the first project of the year. We got started in January, clearing out the old guest room and coming up with a plan for the space. And then we stalled.
This is a relatively simple project that could be done in a week. A different kind of blog would even do it as a weekend makeover. We are now at the beginning of April, which means Ellie’s room has been going on for three months.
It’s time to get moving.
Fortunately, something happened a few weeks ago that brought my motivation back. I found a headboard.
Ellie’s directive was that she wanted the same bed that she had, just bigger. I had planned to construct a headboard with a built-in shelf. But while browsing a thrift store, I found a double headboard that had shelves and sliding door cubbies, just like her current bed. I’m going to give it a coat of paint, attach it to a metal bedframe that we already have, buy a new mattress and cross this task off my list.
Speaking of the list, here it is.
Empty room – We finally got (pretty much) everything out this weekend. The big furniture was dragged into the middle of the room.
Paint walls – We patched the holes, primed the patches and picked up the paint. Hopefully it goes on the walls this week.
Window treatments – I ordered new curtain rods which have already arrived. Blinds are on order. I need to sew a blackout lining for the existing dropcloth curtains. Then install my layered window treatments.
Bed – The doors to the headboard’s cubbies are going to get a little makeover, then I will paint everything white. I need to buy a new mattress and box spring. I dug the metal bedframe out of the driveshed. It needs a good cleaning and then I can attach it to the headboard.
Decorate – We’ll need some pictures on the walls, some accessories, a mirror.
Move in – We’ll make the bed, hang her clothes in the closet, bring in her books, and hopefully our girl will like her new room.
My plan is to tackle one thing a week (painting week, window week, bed week, etc.) until we’re done. Painting is up first.
The One Room Challenge, which kicks off this week, is providing a little extra motivation. While I’m not officially joining up, I love the ORC for how it helps me focus and gives me a deadline. So I’m making Ellie’s room my own personal One Room Challenge.
Stick with me. We’ll get this done… eventually.
Anyone else have a stalled home improvement in progress? How do you stay motivated during projects? Have you made any good thrifting scores recently?
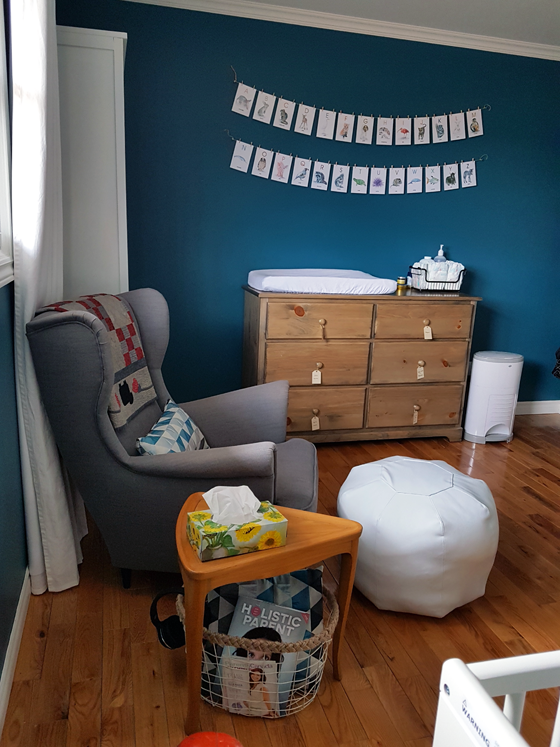
The last project on my Home Goals 2023 list (and the only indoor project) is going to be our first project of the year. Ellie’s new room.
If you’ve been following along, you know I’ve been trying to convince Ellie to move into the guest room for a while. The room is bigger, so she can have a double bed instead of a single. Her current room is closer to the centre of the house, a good location to become a playroom (and remove some of the toys from the living room). Most importantly, sleeping next to each other–with an open door between us–is not restful.
In December, we were struck down by a bad cold, and I moved into the guest room so that my coughing fits wouldn’t disturb her. Even with being sick, we both slept so, so well. I think that showed Ellie that the guest room was maybe okay, and she became a little more open to the idea of moving.
There’s still some resistance and sensitivity. Our girl is not thrilled with change. But talking about her new room and how we can design it like she wants is helping… a bit.
My initial plans (reuse the bed, paint the walls a muted green, make it soft and girly and floral) are shifting a bit based on her vision. But I’ve decided to let her make the choices. It’s her room, and I want her to be happy with it.
Right now, her favourite colour is teal, so that’s where I’m starting. We went to the store and looked at paint chips last week. With no hesitation, she immediately picked the colour she wanted (Calmness C35-3-0709-4 by BeautiTone from Home Hardware). It’s not as bright as I expected, and actually isn’t too different from what’s on the walls already. I’ll still be bringing in lots of neutrals to balance everything out.
I’m planning to reuse the dropcloth curtains that are currently in the guest room. Their warm colour will soften the bright walls better than white, I think. Hopefully I have enough bamboo shade left to make my standard layered window treatment. I need to buy blackout blinds to go underneath, and I may also add a blackout lining to the curtains (we like to sleep in the dark).
White will play a part with a new headboard. I had planned to reuse the metal bedframe that is in the guest room. But our girl likes how her current bed has a shelf (or as she calls it a nightstand). She stashes her water bottle and various other treasures. So I’m going to build a simple headboard with a shelf and paint it white. We have an extra metal bed base in the driveshed, so I will attach the headboard to that.
Her bookshelf (also white) and dresser (grey-ish wood tone) will move with her to the new room.
The tractor and likely the Strandmon wing chair will not. In my new quest to be thoughtful about how we use our house (like, do we really need a guest room?), the chair doesn’t make sense for her room. The chair was helpful when she was really little (especially for nursing), but now we read stories sitting on her bed. I’m trying to minimize clutter, and a big chair that we never sit in seems like clutter. The tractor can move out to the garage. Thanks to her new headboard, she won’t need nightstands.
Accessories and finishing are a bit undetermined right now. I really wanted to use the flowered chenille bedspread that I shared previously, and it looks like it is a nice match with the paint chip. My Mom’s flower girl lamp will hopefully find a home (and a new shade) as well.
For art, I’m wondering about a big gallery wall of black and white family photos. But I’m not sure black and white are what Ellie has in mind. There’s a cute curvy mirror (with a white frame) in the guest room already, but it’s a bit small to get a good look at your outfit. Maybe the light fixture should be more sparkly. Or I could paint the ceiling a really light pink.
I’m all over the place. Usually I’m pretty good at picturing spaces and have a vision in mind. Designing for someone else is a challenge.
Work on the room is kind of underway. The first step is clearing it out. As the guest room has been a catch-all space for years, this is a bit of an undertaking. We’re slowly going through things and have sold, donated and thrown out a lot with more to come.
Some major progress was getting rid of Matt’s and my bed last week. I don’t love sleeping in a king size bed and it was too large for our room. So in the spirit of making our house work for us, I posted it on kijiji and it went to a new home. The guest room bed is now my bed–once again. It was in my cottage bedroom as a child and was Matt’s and my bed at our first house and when we first moved to the farm. I’m glad that it continues to have a place in our lives.
Now I have more space to work on Ellie’s new room and make it what she wants it to be.
Is anyone else having realizations about what works and doesn’t in your house? What would you mix with teal to make beautiful room for a happy, sensitive, energetic young girl?
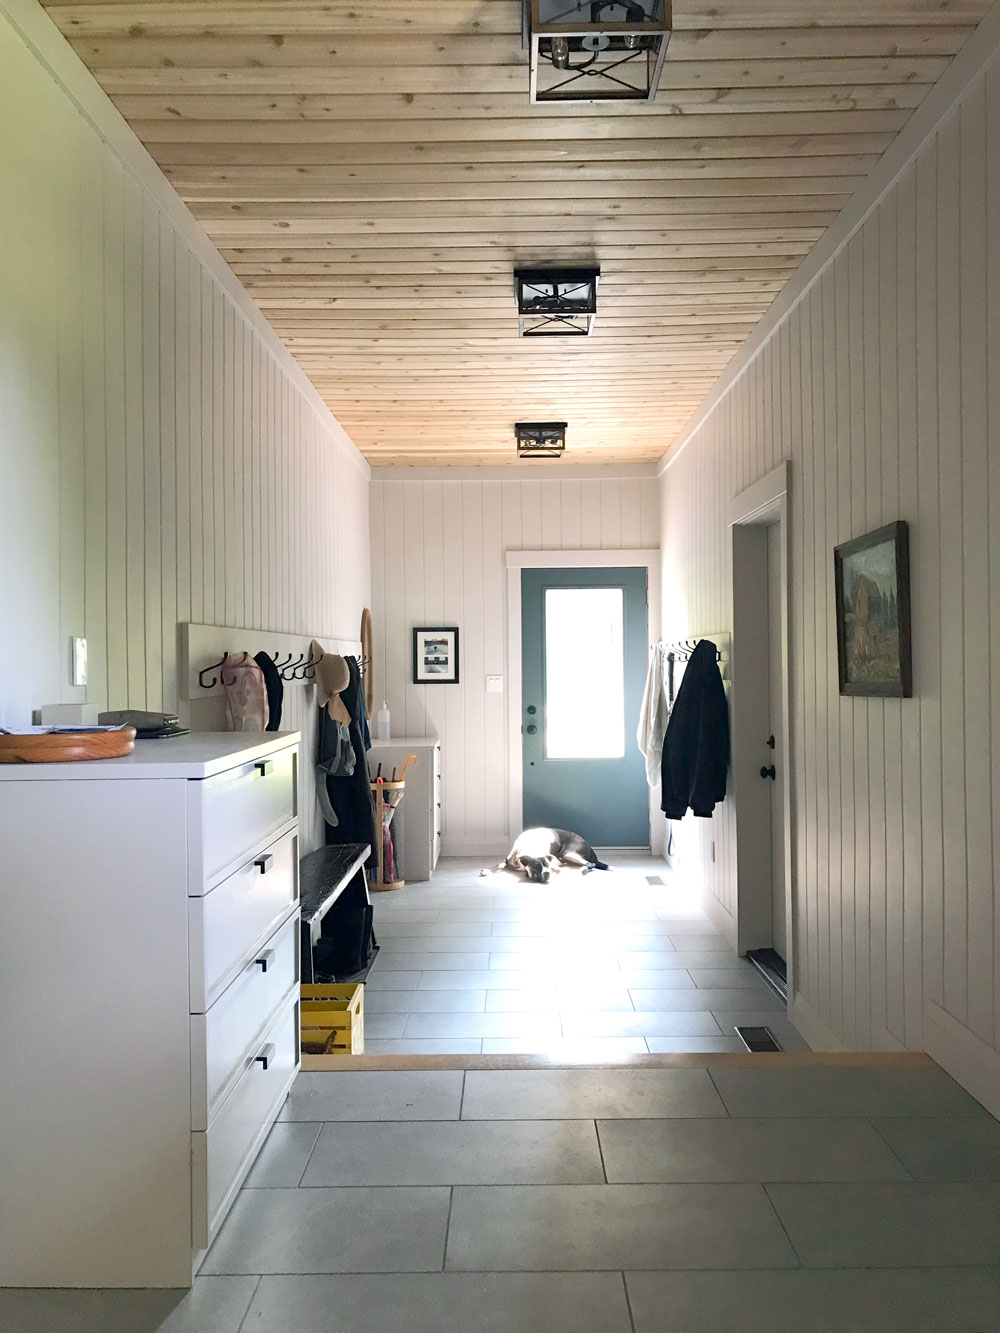
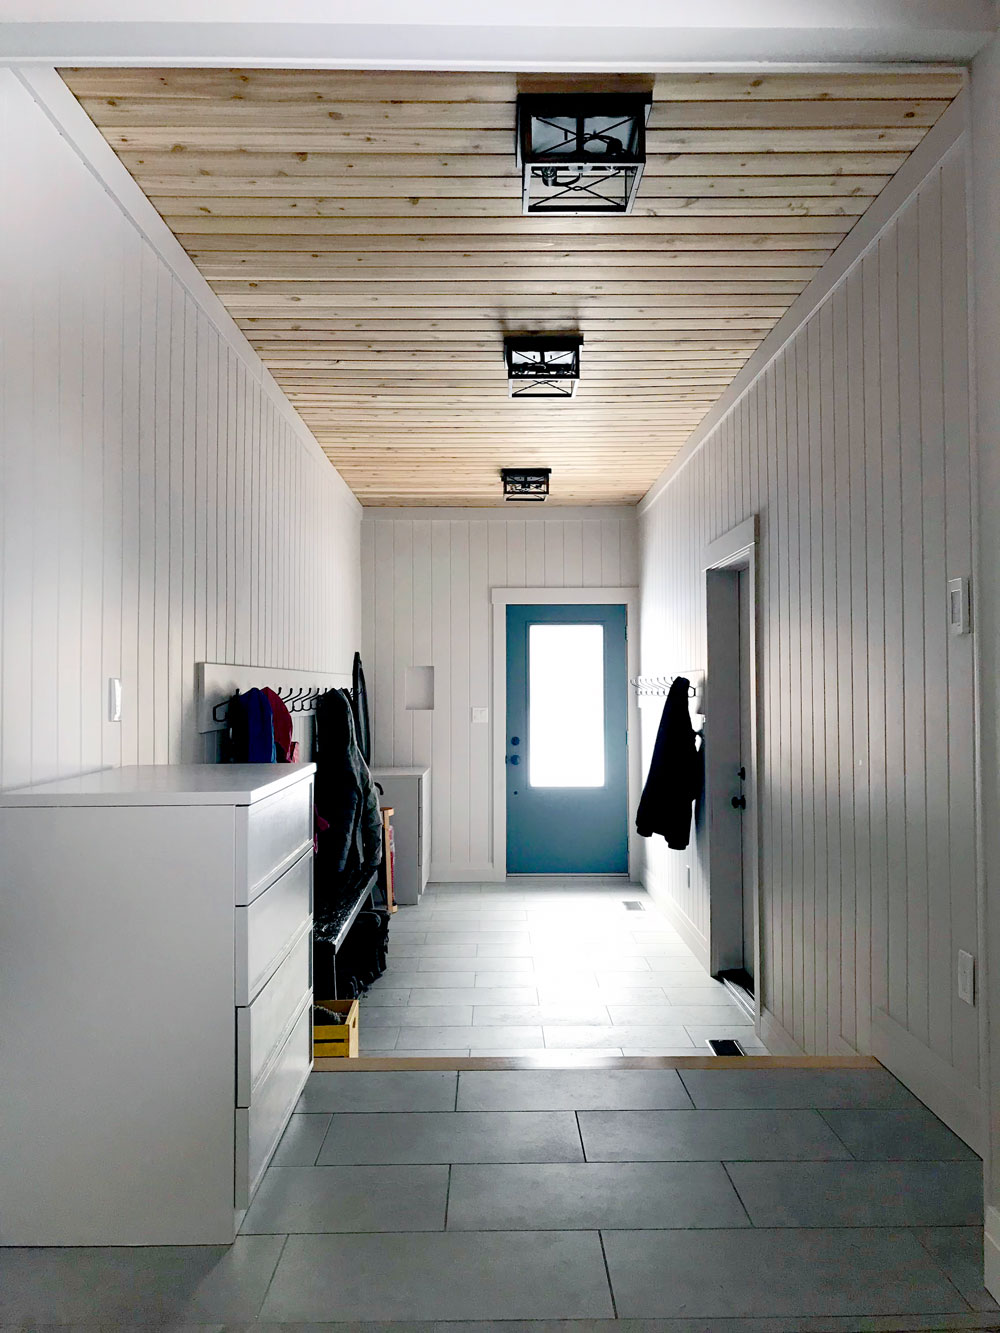
Our mudroom is done–for now. This room was the first on my home goals list for this year. I had just five small tasks to do, and they are finally finished.
Today, I’m giving a tour of the space and highlighting some of my favourite features.
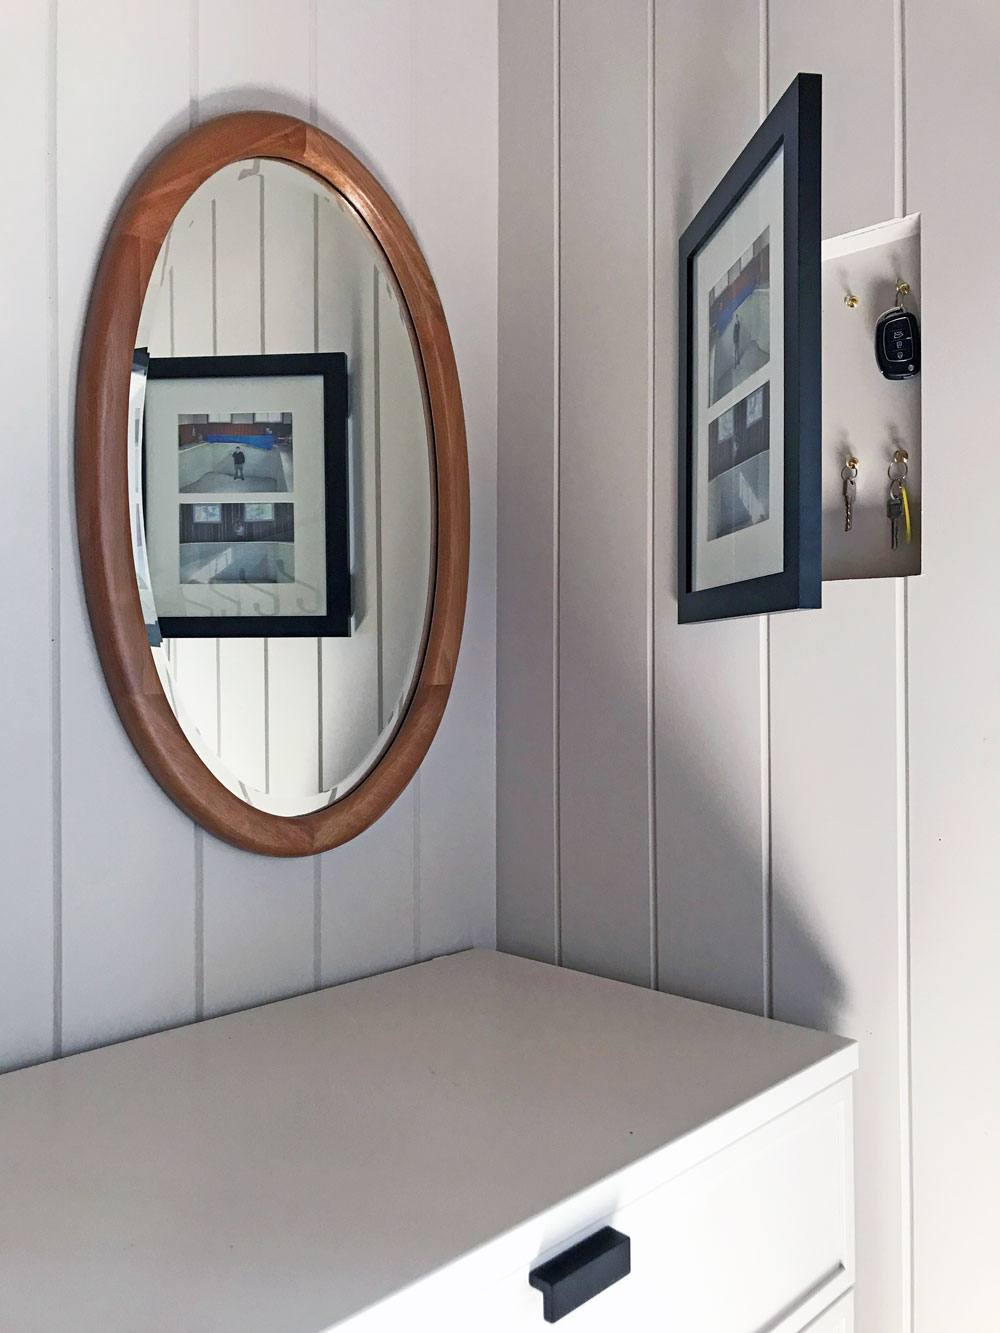
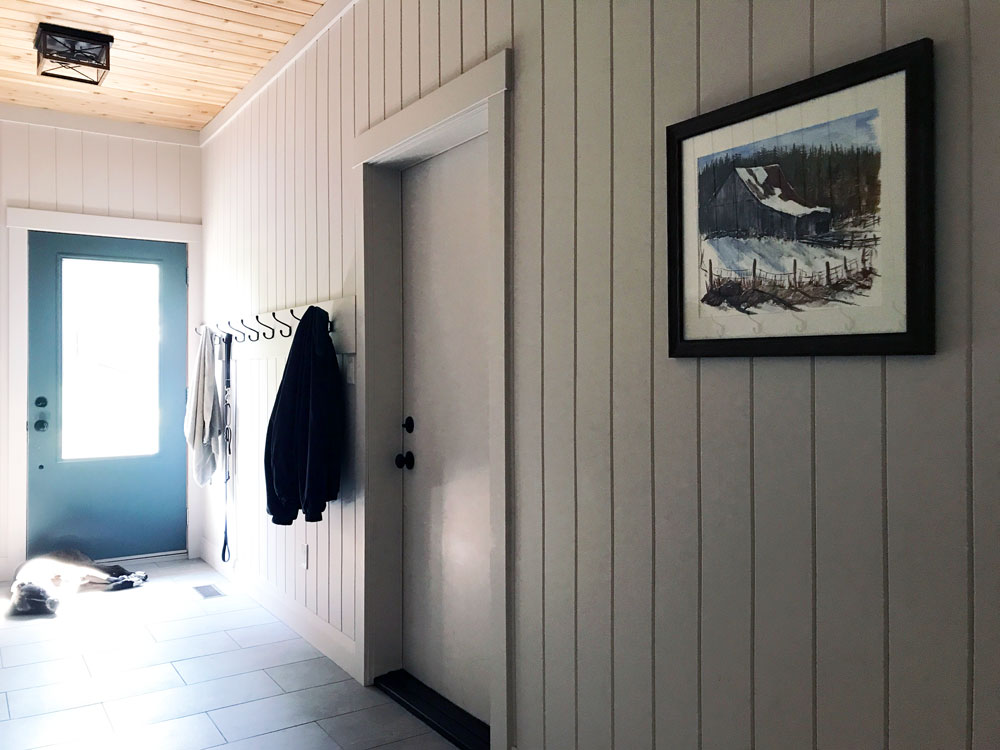
The secret behind the picture
Let’s start with the hidden (literally) gem. I’m particularly proud of how this secret cupboard turned out.
One weekend, I built a little box. When our contractors arrived, I asked one of them to install it in the wall next to the door. Then I attached hinges to a picture frame and installed it over the box. Inside the box, I screwed two rows of little cup hooks. Voila, hidden key cupboard.
I like having our keys hung up, rather than jumbled together in a basket in the drawer. Originally I’d planned to find a farmy painting for the door. But when I couldn’t find the right size, I decided to go with photos. I chose a picture of Matt in the pool during our home inspection, and then I selected another photo of Ellie and me in the pool during demolition. A literal snapshot of the history of the mudroom, and our little family together in this space we dreamed about.
Figure it out furniture
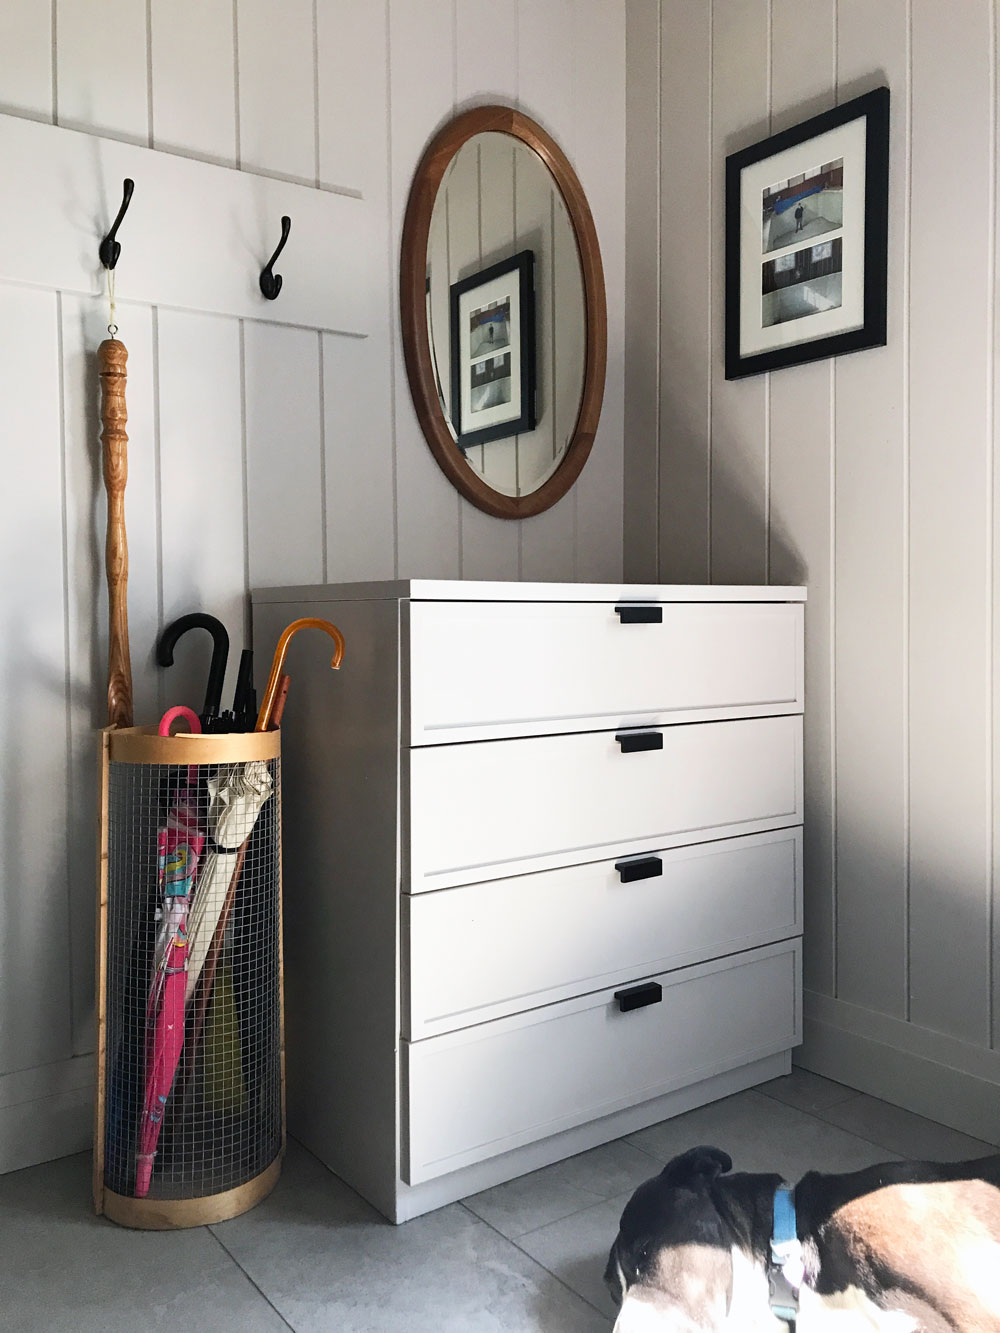
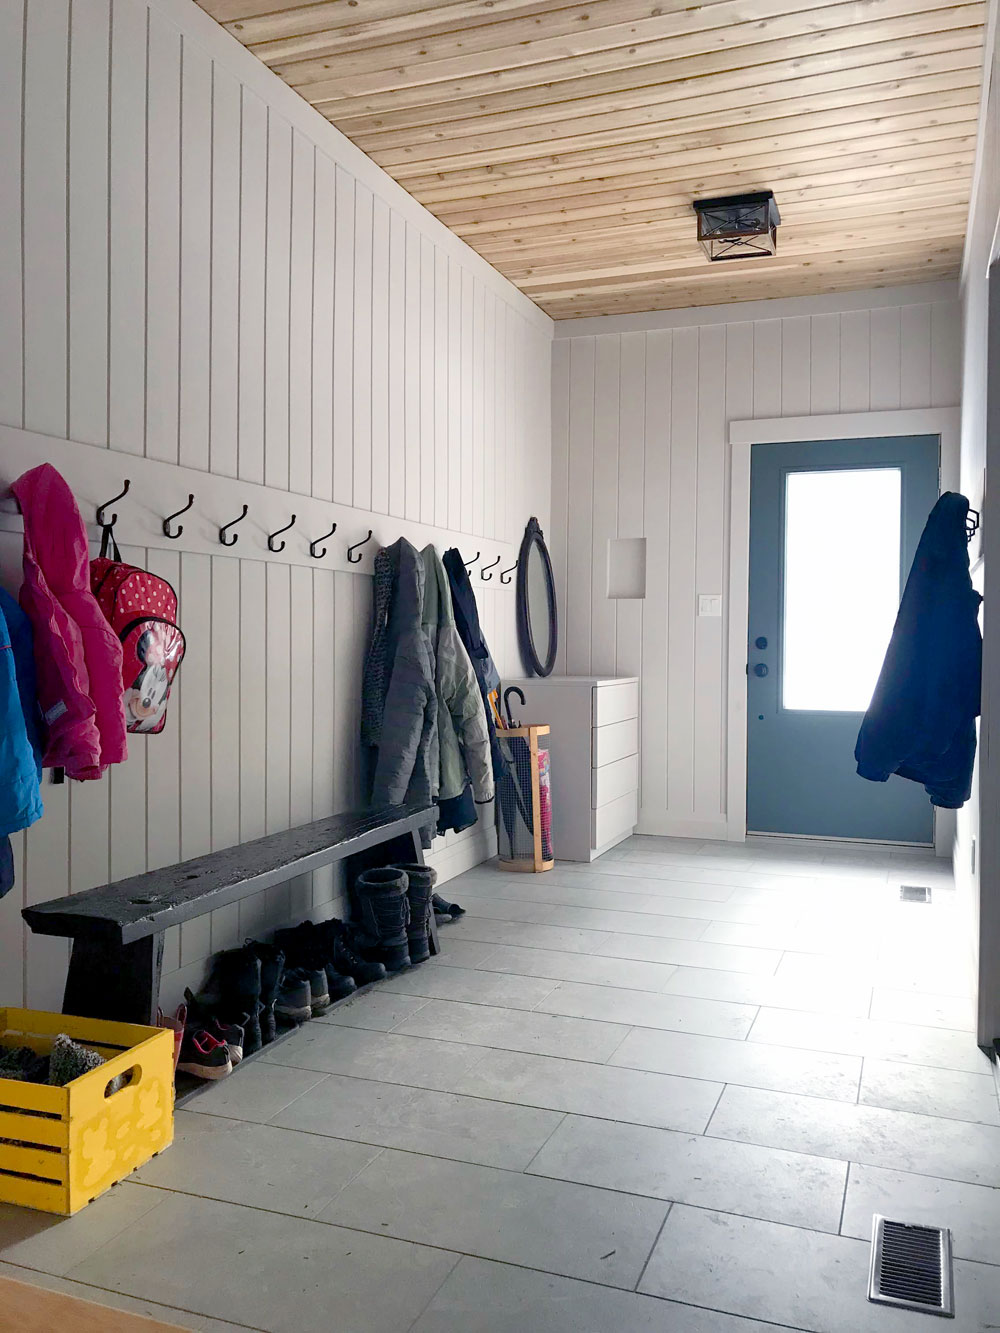
Someday the mudroom may have beautiful built-ins. But for now, we’re making it work with free hand-me-down dressers, our homemade bench and other DIYs. And honestly, they’re working great.
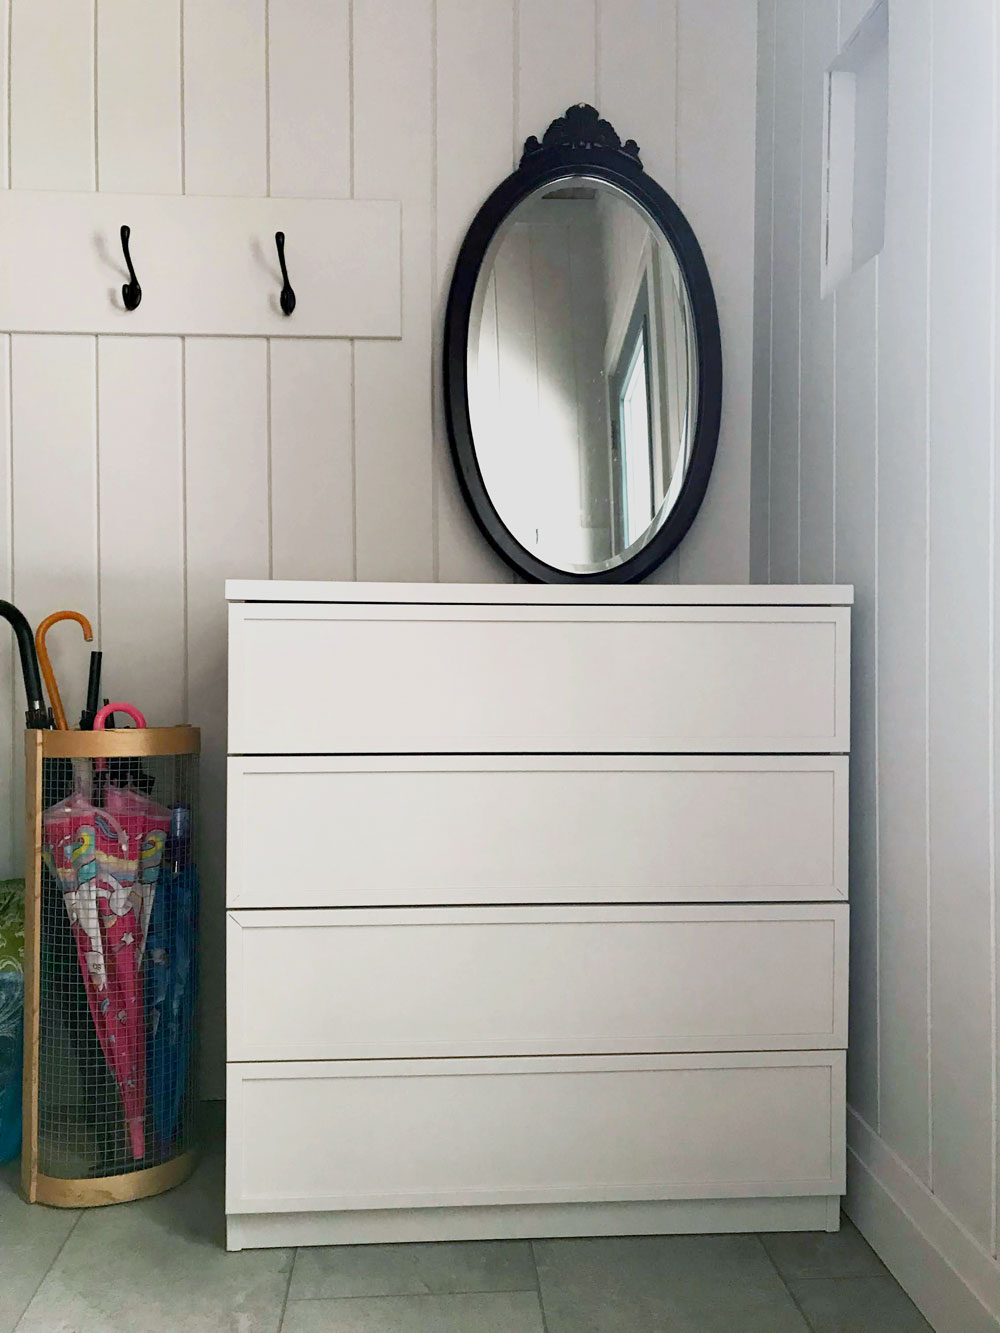
The dressers look fresh after a coat of paint to match the walls. Spraying the hardware to match the black hooks that we used in the room was the finishing touch. The dressers are likely not going to be here forever (the one on the landing is too small and the one by the door is too big), but they’re doing everything we need.
The upper one holds puzzles, colouring books and games for Ellie. Plus cards, flyers, coupons. It’s also our mail drop, wallet and phone charging station. The lower one holds sunglasses, sunscreen, bug spray, masks and some outdoor toys and tools. In the winter it stashes hats, mitts and scarves. Both dressers have empty drawers, so we have more than enough storage for now.
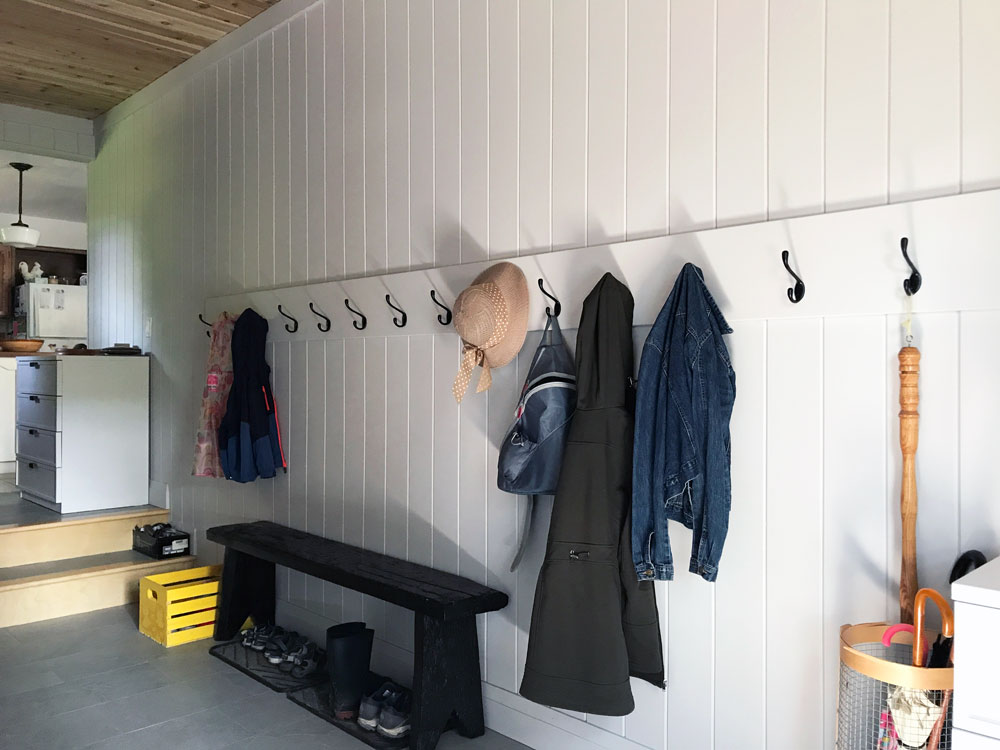
Matt’s nephew and I made the bench almost nine years ago. I’ve been surprised by how much I like having the free-standing shorter bench. It gives space for my longer coats to hang freely, instead of puddling on the seat. Ellie is still a bit short to reach too high, so having her hats or other gear in a dresser drawer or a bin on the floor works best for her, rather than putting them on a too high shelf.
Living with the space as it is now gives me an idea of what we need and what works best.
A little bit country
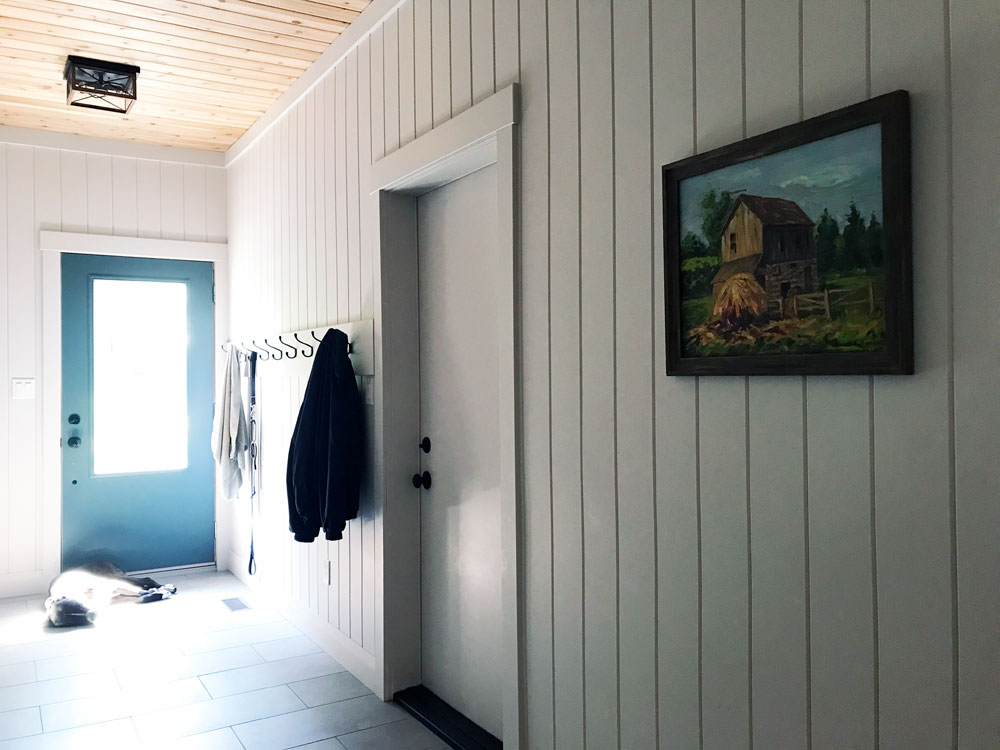
We live on a farm, but we don’t have a farmhouse. With every tweak we make, I try to inject more country character. The V-groove paneling on the walls, cedar on the ceiling and simple black hooks are all examples of that.
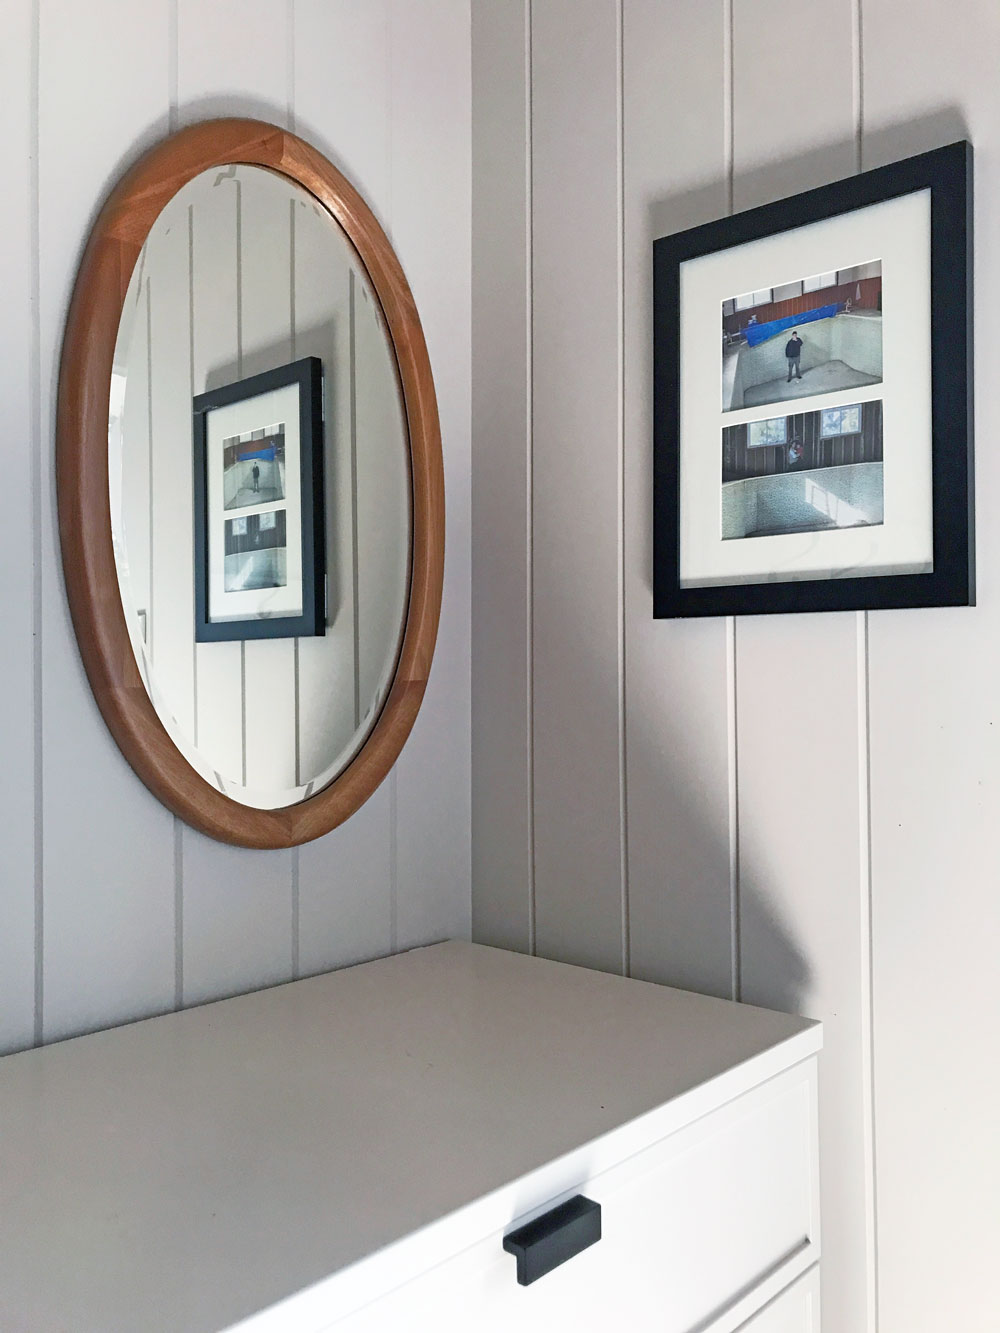
The mirror is another. It was a bit ornate when I found it in the thrift store. Removing the decorative top piece and the cherry-esque finish countrified it a lot. The factory finish was so hard and thick, but patience and a lot of sandpaper prevailed. Finding the right way to refinish it took a bit. Everything I put on the wood turned red. Finally, I went with simply varathane. That countrified it the rest of the way.
The mirror bounces a bit more light into the room (enhancing Cigo’s sunbeam), and its round shape contrasts with all of the straight lines from the paneling and other elements in the room.
Designed for us
Installing an LED nightlight cover plate on the landing (I was influenced by Young House Love) was probably the easiest task on my to-do list. It gives a perfect glow for the stairs. The location of this plug–and all of the other switches, outlets, light fixtures, heated floor control panel–was very carefully mapped out by me. The electrician and the tiler didn’t completely agree with my choices, but I’m the one that lives here, so I got my way.
The dimension and height of the landing, the way the doors swing, where the openings were located, and the height of the archway into the kitchen were other areas where I pushed for what I wanted. Sometimes I felt guilty asking for a change, but I knew I would regret it if I didn’t make the mudroom exactly the way I wanted.
Now everything is so convenient and it works for how we live.
Make it personal
Like all spaces in our house, the mudroom is personal to us. Matt’s nephew and I made the bench and I made the umbrella stand for our last mudroom. My sister-in-law made the yellow crate for Ellie. My Dad made the wooden shoehorn that’s hanging from the hook and the large wood plate on the dresser that we use for mail. There’s even a box on the stairs to hold stones, sticks, pinecones, feathers and other treasures that Ellie collects.
Matt’s winter coat which I wear to take the dog out hangs beside the door. Having a whole section dedicated for Cigo has been a game-changer. In the old mudroom, towels were draped over the bench, leashes were piled on top of each other. Now we have ample hooks for everything. I even stash his nail clippers and a bottle of dog shampoo in the dresser by the door, for those moments when he smells a bit too farmy to allow in the house.
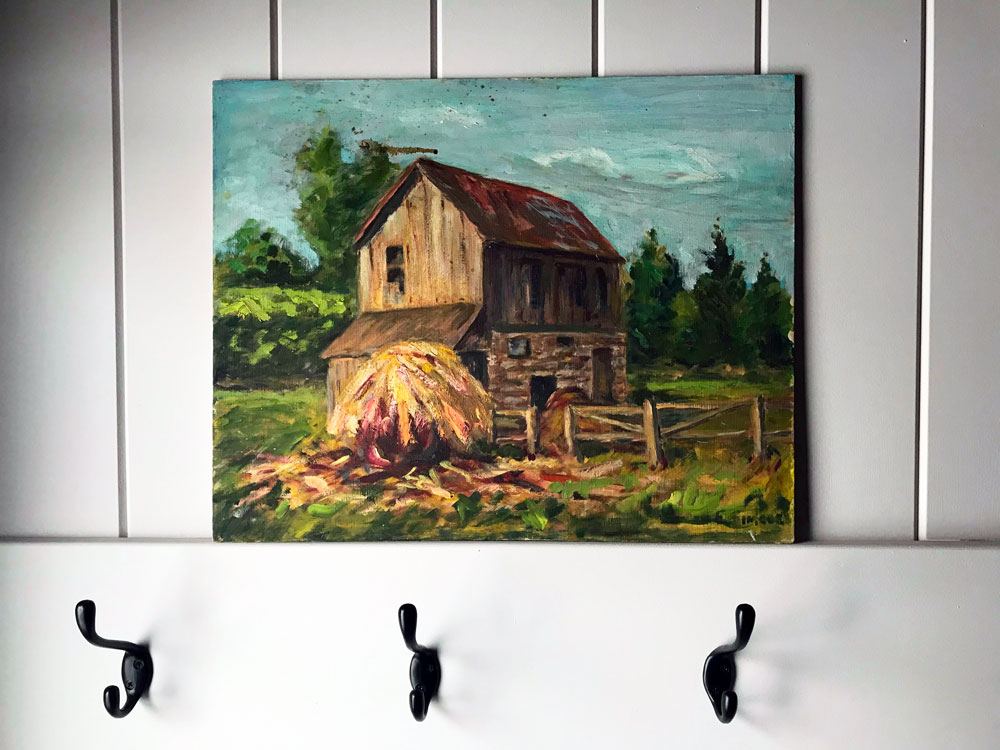
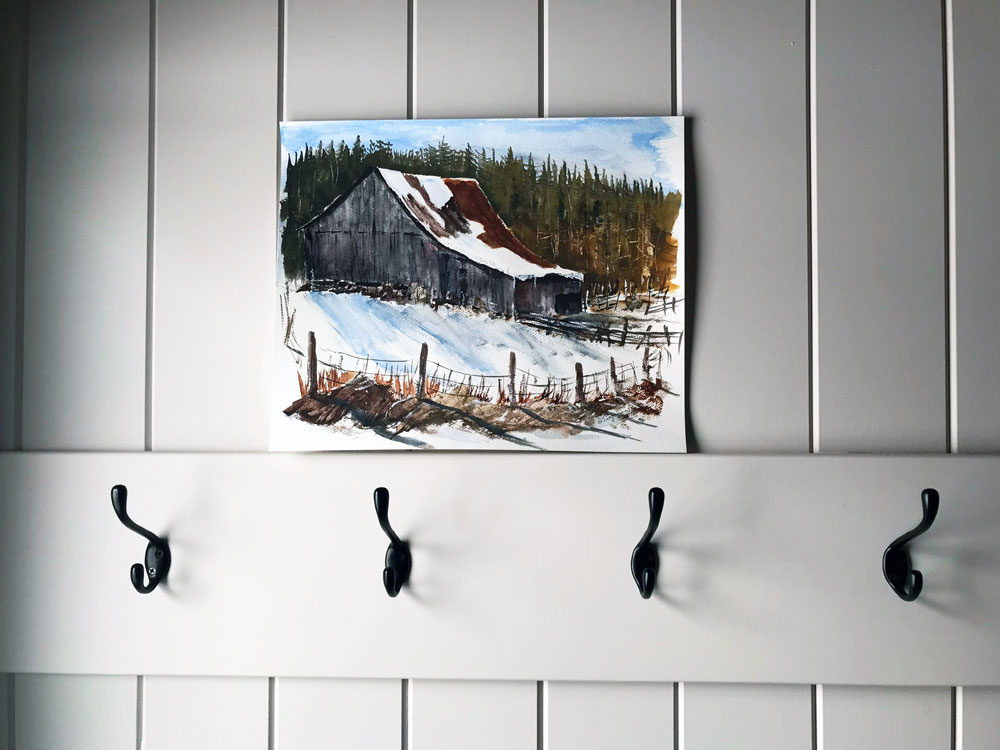
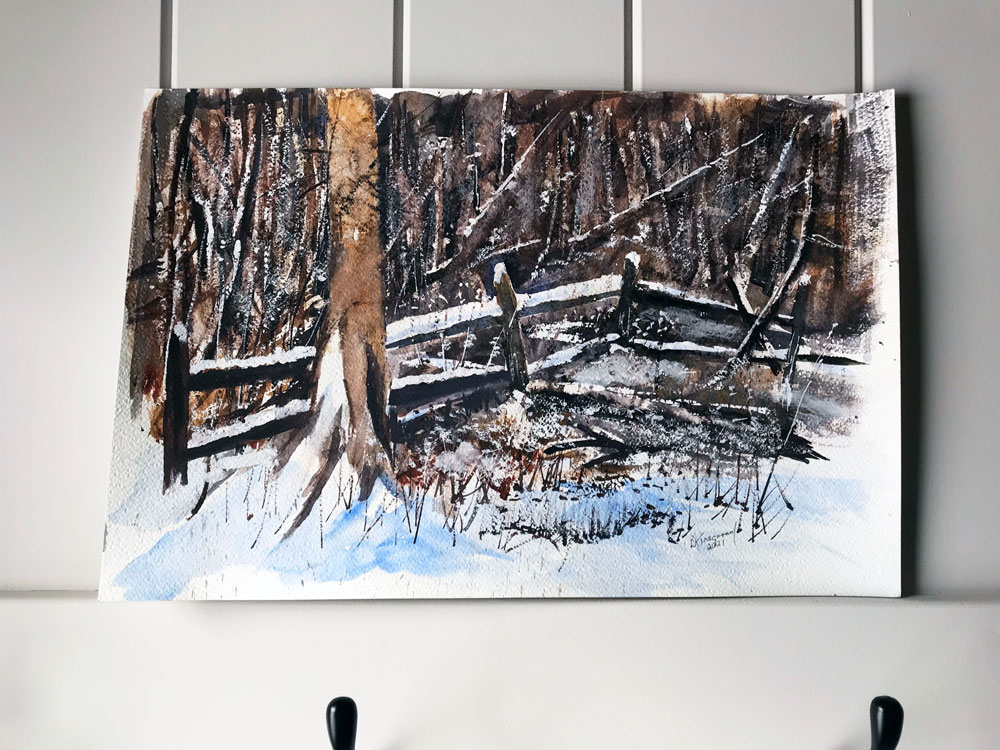
The painting on the wall is another special, personal touch. Like so much of the art in our house, this too was painted by Matt’s grandpa. When I shared art options for the mudroom a long-time reader had a brilliant suggestion: switch between paintings. So I had two framed. One summer scene (by Matt’s grandpa) and one winter (by my Mom’s friend). They’re roughly the same size, so they can hang on the same hook.
The mudroom has been a great addition–literally–to our house. This is a space that we live in every day, and that I enjoy every day. I am very proud that we dreamt it and we built it. It’s much more than a mudroom.
Do you have a room that’s more than a room? What is your must-have for an entry? Do you have any secret storage at your house? Who else switches art seasonally? Anyone else have a sunbathing dog?
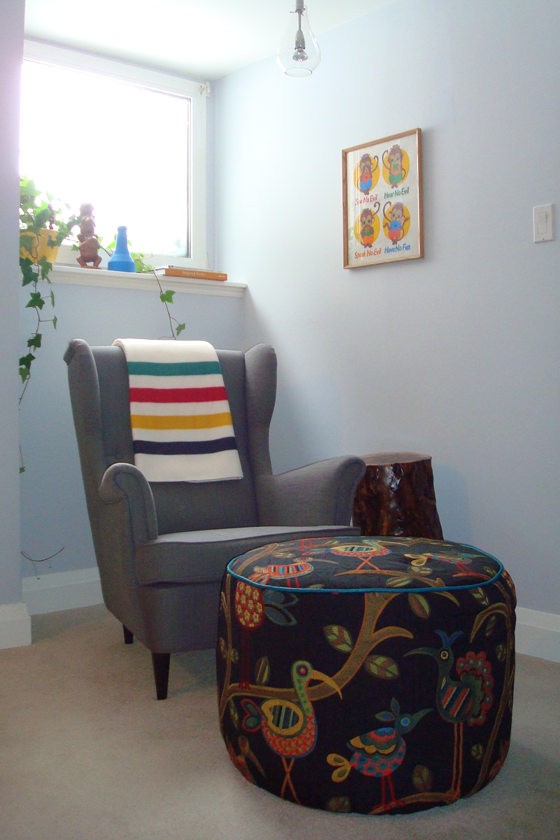
Recently, I did a mental inventory of our house. I counted 6 pieces of furniture that we bought new. All of the rest are hand-me-downs, handmade or thrifted.
The basement reading nook shows our mix: Strandmon wing chair (new, though it was a birthday gift), ottoman (made by me), stump table (made by Matt’s Dad and me), monkey art (hand-me-down from Matt’s Grandpa).
I’m pretty proud that we’ve only bought 6 things new. I like walking through a room and seeing all of the things that I’ve made or found or rehabbed. I think it makes our home personal. It also makes me feel capable when I reflect on all of the projects we’ve done.
The environmental aspect is really important to me as well. By reusing and recycling we’re reducing our impact.
Here are my 6 newbies, along with the year we purchased them. I’m curious to know what’s your number?
Ellie’s dresser (2018)
Another good example of a mix from Ellie’s nursery: dresser (new–Matt’s parents covered half the cost as I was stricken with sticker shock from buying new furniture), bookshelf (thrifted and repainted), Strandmon wing chair (thrifted this time), ottoman (made by me), triangle table (hand-me-down from my grandparent’s cottage). I should note that the crib was new as well (a gift from my Mom). It has since been passed on, so it is having a second life.
Basement wingchair (2013)
Basement ottoman (2013)
Basement couch (2012)
Living room couch (purchased in 2006 for our first house. Does this count as vintage now?)
Living room chair (also from 2006)
This total does not include appliances, mattresses, lighting (though all of our lamps are second hand), or accessories (art, pillows, etc.).
If you look at the dates above our “new” furniture is not all that new. Holding onto things for a long time is another way to reduce our impact.
Furnishing our house in this way is financially beneficial as well. The Strandmon wingchair that I bought secondhand for Ellie’s nursery was less than half the price of a new one. Keeping the same couch for 16 years is obviously cheaper than buying a new couch.
Here’s a final mix from the basement TV area: sectional and ottoman (new), wood side table (hand-me-down from Matt’s Grandpa), lamp (thrifted and repainted), TV cabinet (made by my Dad and me), TV (new, but bought mostly with points), chair (won), Monopoly art (made by me).
Mostly, I thrift and DIY for fun. This is what I like to do and I love furnishing our house in this way.
How much new furniture do you have at your house? Any great thrifting scores to share? Do you have any DIY furniture you’re particularly proud of?
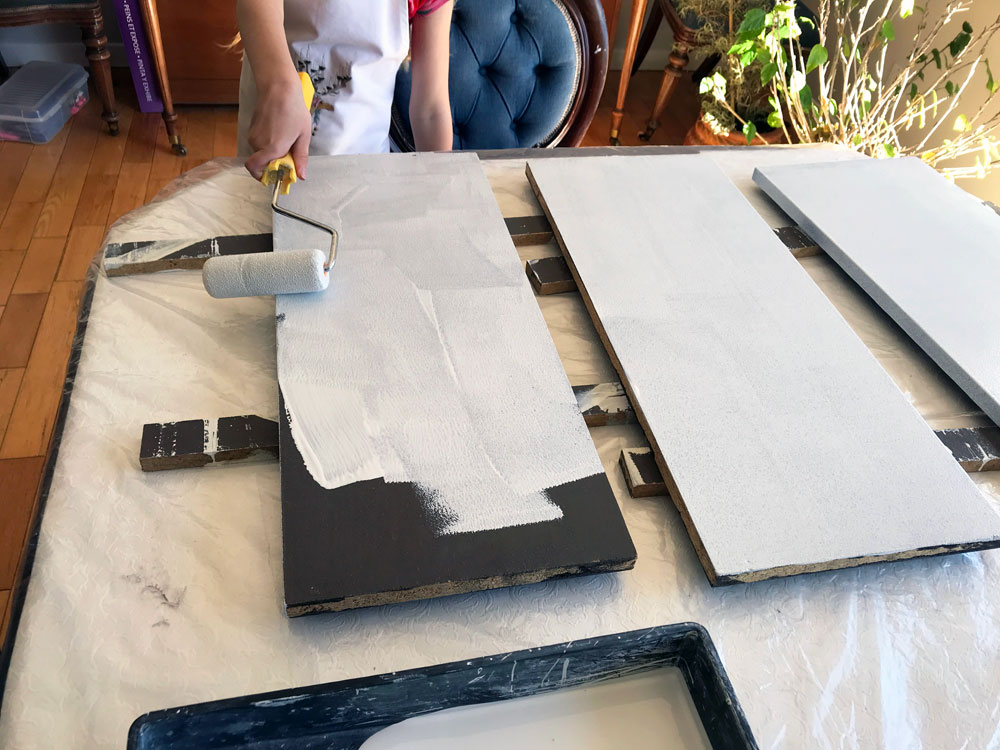
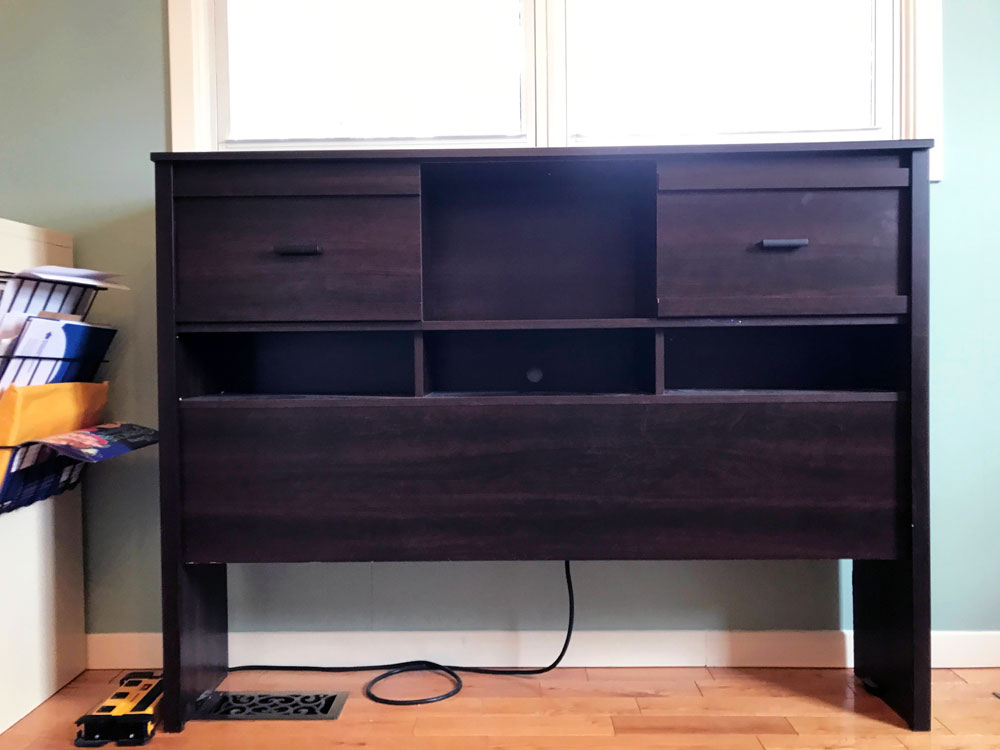
We also added two dressers, which I painted last week.
They give us eight big drawers of storage, so I finally have a place to put my hats and mitts. As well as car keys, sunglasses, reusable bags, pens, notepads, phone charger, masks (who thought we’d need mask storage?) and so much more stuff.
One dresser is by the door–keys, outerwear, sunscreen, bug spray, etc. will live here. One dresser is on the landing by the kitchen. My vision is that it will become a kind of command centre for mail, papers, household stuff, and even some of Ellie’s toys.
Part of my goal with not adding built-ins right away is to discover exactly what kind of storage we need.
The dressers aren’t quite the style I’m looking for in our eventual built-ins and they’re not quite the right size for their spots, but they do the job for now. And the price was right. Matt’s Dad picked them up years ago and they lived first in his shed and then in our barn. After some repairs, a cleaning and a coat of paint, they are a great interim solution.
Here are some of the other things I’m planning to do in the mudroom.
Install dresser hardware
The dressers don’t have a lot of space to screw on drawer pulls. The centre recessed panel is actually glass, so I can’t drill through it. I’m likely going to reuse the old pulls, but I’m going to spray paint them black first.
Refinish mirror
I found a big oval mirror at a thrift store this fall. The rounded shape will be a nice contrast to all the straight lines in the room. I’m going to remove the decorative piece on the top and refinish the wood frame, aiming for a rustic finish that will go with our cedar ceiling.
Install nightlight cover plate
I remembered last week that I had one LED cover plate left from a three-pack I bought a few years ago (I was influenced by Young House Love). The mudroom would be a perfect place for a nightlight, so I dug it out. Bonus, the cover plate also has a USB port, so it will be going at my new phone charging station on the landing dresser.
Build key cupboard
During construction I had our contractors insert a little wood box that I made into the wall beside the door. This box is going to become a hidden key cupboard. A few rows of cup hooks will give us plenty of space to hang keys. For the cupboard door, I’m going to use a picture attached to hinges. Storage. ✓ Art. ✓ Function. ✓ Form. ✓
Hang art
We don’t have a lot of wall space for pictures (and I don’t want to put too many holes in the paneling). I’m planning on hanging one painting. Matt’s Mom and my Mom have both sourced art for me. Matt’s Mom gave us a painting by Matt’s Grandpa. My Mom’s friend gave her two water colours that he painted. They’re all great farm scenes, and I really like how the blue and green tones contrast with the beige paneling. (Note that despite the photo differences below they’re all close to the same size.) Which would you pick?
We are definitely at the fun stage of the mudroom. These are pretty quick, inexpensive, easy projects. All of these little details make the room function the way we need it to and personalize the space for us.
What’s your first project of 2022? How do you handle storage at your entry? How many hooks is enough?
Ellie’s room got an update just before Christmas when we took apart her crib and set up a bed.
I had always envisioned this bed in the space. This was my bed when I was her age. Before that, it was my uncle’s bed when he was a child. It came from my grandmother’s family’s furniture store.
It is solid wood. Clean lines. Great quality. With super cute cubbies built into the headboard.
The finish was natural wood, but a little bit orange for my taste and also for her space. I didn’t want to change the other parts of her room. The turquoise paint on the walls, the grey wood toned dresser, the white bookcase. Those were all staying, so I needed the bed to work with those pieces.
I was a bit worried my Mom (the caretaker of the bed) wouldn’t like my plan to paint the bed, but she was all for it. A few coats of my go-to Cloud White by Benjamin Moore (in their Advance finish, which is good on furniture), and it was exactly what I had envisioned. And my Mom was thrilled, both that the bed was being used again and that it looked so fresh with its new white paint.
Ellie’s room is not large, so we could only fit a single bed. We rearranged some of her other furniture to make everything fit. It might be a wee bit tight, but everything fits (including her tractor) and the layout works for us.
And, best of all, the transition from crib to bed went pretty well too.
Who else likes secret cubby-holes? Have you repurposed any family hand-me-downs at your house? What is your crib-bed transition story?


