Fall to do list update

Baxter walking on a frosty morning

Back at the beginning of October, I posted my fall to-do list. I’ve had a month, and frosty mornings are coming more frequently. Have I made any progress to being ready for winter?

1. Clean out the vegetable garden

Pruning the raspberries was a big item I was thrilled to check off my list. The squash was our last crop to harvest. Now only clean up remains. A lot of clean up yet.

2. Remove window screens

Screens are off the dining room window. The rest will come down eventually.

3. Wash dining room and living room windows

Done. We can now turn off the outside water any time. Inside, my Norwex glass cloth made quick work of years of grime (seriously, years) and layers of puppy nose smears.

(I’m not affiliated with Norwex. If you’re looking for a good glass cleaner, I can’t recommend Norwex glass cloths enough. As I’m trying to be conscious of what chemicals I use in my home, I love that this uses only water. Plus it works the best out of lots of products I’ve tried for windows.)

Norwex window cloth

4. Put away the birdbath and put out the feeder

Matt and Wiley worked late last night, and they got this done by headlight.

5. Bush hog the meadow, septic and pond shore one more time

My handy nephew is coming to visit this weekend, and he’s enthused about practicing his tractor driving again.

6. Clean gutters

Matt’s done this once. More leaves are coming down everyday though and those pine trees never stop shedding, so I expect there will be at least one more session before winter.

Matt cleaning the gutters with the leaf blower

7. Switch out the mudroom mats

Still to come.

8. Sweep the chimney

The hunt for a right-size chimney brush took a little while. I think I’ve found one that will work, and I’m aiming to grab poles from my parents today.

Chimney brush in front of the hearth

9. Vacuum my car

Still to come.

10. Service the tractor

Wiley did his last mowing two weeks ago–and he was more than ready to be done for the season. He got stuck and I had to tow him again, and he hit a stump and threw a blade. Also, Matt’s not happy with how our little tractor is running. So a pre-winter check up is definitely in order.

11. Build a new coffee table.

Still to come.

12. Pick up the lumber pile beside the silo

Still to come.

13. Regrade back and side of house

Still crossing my fingers that this will come too.

Roughly two months ’til winter. That’s still enough time, right? Now that the weather has gotten colder, I find I’m less motivated, especially when it comes to working outside. I keep reminding myself that everything I do now, I will be grateful for in the spring.

How are you doing on winter prep at your house?

Garden wrap-up from Illinois

Sarah in Illinois is doing better at her garden wrap-up than we are. In fact, she’s here today with her end of year recap of how her garden grew in 2017.

Last year I did an Olympic style recap of our garden in honor of the summer Olympics 2016. So I will continue that tradition this year.

Overall, I am very happy with how our garden did. We kept the weeds fairly under control, most plants were productive. I think my number one complaint is I wish I had planted more variety. So on to the winners.

Gold Medal recipients

Tomatoes

No question: tomatoes thrived in our garden. If you remember, I canned 45 quarts of tomato juice, 4 quarts of whole tomatoes and 4 quarts of salsa. We ate fresh tomatoes as much as we possibly could, gave many to my parents, and we still have tomatoes rotting on the vines because we couldn’t use them up.

The only thing I will change next year is that I wish I had planted Roma tomatoes. Also my cousin planted Amish Paste tomatoes that she said were excellent for juice and sauce so I may look in to planting some of those next year.

Green Beans

I canned 24 quarts of green beans, froze 4 gallons and ate some fresh, gave some to my mom and we still had beans that went to waste on the plant. I planted two separate times about 3 weeks apart. This worked really well. Next year I just need to plant less by about 75%.

Peppers

I’m going to toot my own horn here: my peppers were gorgeous this year! I had the best crop of peppers that I’ve ever had. My change for next year would be planting less hot peppers and more green peppers. I had about a 50/50 mix of sweet and hot. However, based on what we ate, I should plant 85/15.

Brussels Sprouts

Brussels Sprouts also got a gold medal. There is really nothing I’d change in variety or quantity.

Sugar Snap Peas

I had an abundant crop of sugar snap peas this year. I think shielding the strong sunlight by planting sunflowers in front of the row of peas helped to extend my harvest by not drying up the vines too early.

Silver Medal

Cucumbers

Cucumbers got a silver medal this year. The plants provided several cucumbers and bloomed until September. The only drawback is I only planted one variety and wish I had planted pickling cucumbers for their compact size and smaller seeds.

Sunflowers

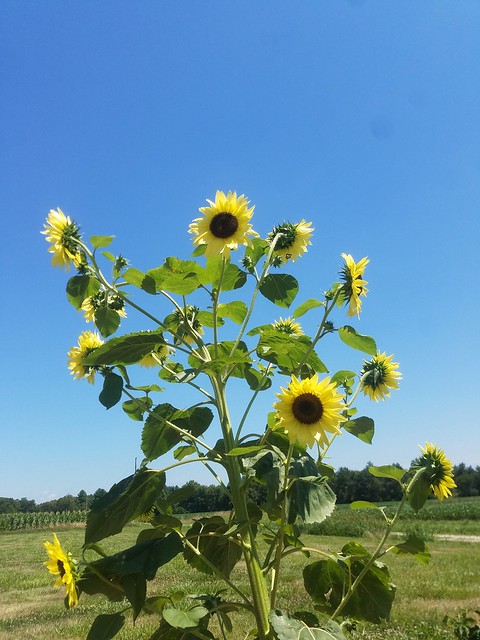
The sunflowers grew nice and tall with most 8-10 feet in height. Again, lack of variety was my only complaint.

Watermelon

We planted a small sweet variety called Sugar Baby. Steve and the kids are the watermelon eaters in our house. They said that the one they ate was good, but the vine only produced 3 total melons. I think lack of rain was a factor in the poor output.

Kale

After two failed plantings, I finally got two bunches of kale to grow. My step-daughter and I make some kale chips with what we could pick.

Radishes

I posted about radishes earlier in the year. I planted a lot more manageable amount. I think too much rain was kind of hard on them early, but they did okay.

Onions

Remember that we planted 150 red onions? Well as you can guess that was way more than we can use. They did really well. I think the rain compacted the ground to the point where they did not grow as big as I would have liked. Adding compost next year should help with the quality of the soil. I also would like to add a sweet onion to our mix.

Bronze Medal

Potatoes

I almost placed these in the “did not finish” column because the output was terrible. We did get one or two little messes of new potatoes but overall a terrible year for them. Next year I plan to try again and also add sweet potatoes back into rotation.

Pumpkins

I really expected some big beautiful carving size pumpkins to decorate my front steps this year, but instead I got about 6 pumpkins that were just a little bit bigger than a softball.

Spaghetti Squash

My vines only produced about 4 squash compared to about 20 last year. When I felt like they were ripe, they were actually soft inside. I did eat one, but threw the rest on the compost pile.

Carrots

Even with planting our carrots on mounds, the ground was really hard and compacted around the carrots and it was really hard to pull them up without a shovel. They also did not seem as sweet as they have in years past.

DNF “did not finish (produce)”

Tomatillo

If you look back to August, I mentioned how beautiful my tomatillo plant looked, but that it had no fruit. I did a little research and found that I have to have more than one plant for pollination. So this wasn’t really as much a problem with the plant as my failed research.

Blueberries

I planted 3 varieties of blueberries this spring. However, not one of them survived. I think a combination of too much rain, then too little rain, then one incident with the weed trimmer getting too close was too much for my little plants.

Zucchini

Most years I have to find people to give extra zucchini to. This year the plants grew about 3 inches tall and then died.

Honorable Mention goes to our new fruit trees and grape vines. None of them are mature enough to produce any fruit but they look nice and healthy and will be ready in the next few years.

Once again we are very happy with our garden. Growing a vegetable garden takes knowledge, patience, practice and a whole lot of luck.

There are some things to improve on like planting more variety and planting more according to what we use to reduce waste. But unfortunately, some of the factors in our poor or failed crops are out of our hands. If I ever find a way to change the weather to our advantage, I will sure let you know.

Keep us posted on that, would you please, Sarah? Congratulations on the productivity and also the lessons learned. So much of gardening is absolutely due to luck, but there’s a lot of hard work in there too, and the results of your efforts are impressive.

Squash harvest 2017

Wheelbarrow full of butternut and acorn squash

Squash seems to have become our signature crop.

The first year of the garden, we harvested 39 butternuts and about 70 acorns. Last year we intentionally planted fewer plants, but we still ended up with a tonne of squash (although I didn’t bother counting them… or at least didn’t record the count).

This year, we’re finally approaching a manageable number. This year’s squash harvest was 35 acorns and 11 butternuts.

Wheelbarrow full of butternut and acorn squash

Plenty for soups, side dishes and more. (Along with being our signature crop, they’re our signature food that we love to eat). I’m looking forward to trying this for my lunches.

Garden clean out is happening slowly. I pulled all of the vines off of our A-frame trellis and sent them to the compost pile. (I did not do any weeding.)

Squash A-frame trellis

Weeds or not, I’m calling the centre axis of the garden done for the season (as good as it gets is how we’re rolling this year).

Looking across the garden from the raspberry row to the squash trellis

Four quadrants and the perimeter raised beds still to go.

Hopefully I wrap those up before the snow arrives.

What does it mean to be “off the grid”?

A bit more than a week ago, Matt and I watched the final episode of Sarah Richardson’s latest show, Sarah Off The Grid. For those that don’t know, Sarah Richardson is a popular Canadian TV personality and designer.

She does beautiful work, and I was excited to see a new show from her. I was particularly excited because this series was all about her and her family building an “off-grid” house. The shows were mostly focused on decorating–that’s what Sarah’s known for mostly and I of course enjoyed seeing the beautiful spaces she created.

I was a bit disappointed that they didn’t share a lot of details on the off grid portion. In fact, I couldn’t find any photos of the barn with its solar array to include in this post (all photos are from HGTV).

What they did feature made me think about what it means to be off the grid.

For Sarah and her family, they were focused on being off the hydro grid. A large array of solar panels provides all of the power needed. Woodstoves and fireplaces supplement a heating system that runs on propane. They installed a well and septic system (drilling the well took a few tries as they had trouble finding enough water, and there was discussion of adding a cistern, but I’m not clear if they had to do that as well).

For me, when I think of off the grid, I tend to go all the way to self-sufficiency. In particular, avoiding fossil fuels. So I was a bit disappointed to see Sarah’s crew installing a giant propane tank.

I love at our farm that we generate power through our solar panels, we have no need for propane or oil thanks to our geothermal system, and our well and septic handle all of our water needs. We could be self-sufficient.

We’re not self-sufficient because our solar panels are not off grid. They feed back into the grid, and we’re paid for the power we generate. We then draw the power we need for the house from the grid. Usage and production are completely separate. Batteries, and potentially more panels, would be needed if we wanted to disconnect from the provincial hydro system entirely (like Sarah was able to do).

I’m not sure why Sarah elected not to do geothermal. Perhaps the (small) amount of power required to run the system was too much for their solar panels, which also had to run the rest of the house. Perhaps it was a budget consideration. Perhaps the system required for her (giant) 5,000 square foot house would have been too difficult to set up.

They did take a number of steps to ensure their house is as energy efficient as possible from insulation to lighting to windows. Sarah’s husband Alex shares some of his tips in this video.

I was glad to see environmental impact considered throughout the build and the show. That’s a message I don’t often hear on other shows. I wish they had focused on it even more and explained more of their thought process about what off the grid means to them.

Tim at Design Maze posted recaps of each episode, including more beautiful photos.

What does off the grid mean to you? How are you minimizing your home’s impact on the environment? Did you watch Sarah Off The Grid? What did you think of the show?

How to prune raspberries

How to prune raspberries

Pruning the raspberries was one of the items on my “putting the garden to bed” to-do list.

Pruning removes dead canes, opens the rest of the canes up to light and air and gives new canes room to grow.

The best time to prune is in the fall. The canes have finished fruiting. Leaves have died and fallen off. New growth won’t start until the spring.

The first step is to identify which canes are dead. You want to look for the canes that are woody. For our berries, that means I can see actual bark and it looks like the outer shell of the cane is peeling a bit. The cane in the centre of the picture below needs to go. The two on either side can stay to bear berries next year.

How to prune raspberries

Using sturdy clippers, cut the dead cane a couple of inches above the ground. Pull the cut cane out of the row and throw it on your compost pile. If your canes are very thick or tangled, you may need to clip the dead cane in half so that you can extract it from the row.

How to prune raspberries

It’s okay to have a little stump left behind. In a year or two, this stump will rot away.

How to prune raspberries

While you’re in your raspberry patch, now is also the time to weed (the last time this season). I also tuck the canes back under the wires of our trellis (here’s how we built our raspberry trellis). This contains the plants, helps them grow upright rather than flopping over and makes it easier for picking and care next year. You can see in the picture below one guy is on the wrong side of the wire (while his neighbour has bent over nearly backwards to grow within the row).

How to prune raspberries

At this time of year–especially while temperatures are still warm–the canes are pretty flexible, so it’s easy to bend and coax them under the wires. The result is a tidy row of plants with plenty of space to walk between the rows.

How to prune raspberries

How to prune raspberries

Has anyone else been pruning raspberries? Any tips to share? How are you doing on your garden clean up this fall?

Burning tree stumps

Let’s go back in time. Waaaaay back to my second month of blogging and my 20th post ever.

On a foggy spring morning, I snapped a photo of this old stump covered in moss and mushrooms.

Old stump

While I certainly appreciated the natural beauty of the stump, I didn’t appreciate its location in the middle of the “yard” (can’t really call it a lawn back then) between the driveshed and the garden.

My strategy was to make the stump into our firepit.

Burning a stump

That was in spring of 2013.

Burning a stump

Now, in the fall of 2017, I can finally stay the stump is officially gone. On the weekend, I shoveled up two years worth of ash (I’ve done this cleanout once before) and leveled the ground.

Surprisingly, remnants of the stump were still there. It was very squishy and rotten, so I easily hacked it down with my shovel (here’s how I keep my shovels sharp). Then I raked everything level.

Burning a stump

After Matt hit another stump with the mower over the weekend, we have a new candidate for the next firepit. We also happen to have no shortage of brush and deadfall, so stump removal 2.0 is now underway.

Stumps to be burnt

Burning brush at the farm

Tree maintenance is ongoing at the farm.

Do you have a firepit at your house? Have you ever burnt a stump? Any techniques or advice for removing stumps?

If a tree grows at the farm…

Maple sapling alongside the driveway

Three and a half years ago, we got four maple saplings from Lowes. They were free and part of a giveaway in response to the ice storm we’d been through the previous Christmas. Three of the trees have survived, but interestingly they’re growing very differently.

We planted most of the trees alongside the driveway to further my ambition of having beautiful big branches arching over the driveway some day. One of these trees is the one that died. We planted the final tree on the turnaround. We already have a huge old maple that I love on the turnaround. But I’m worried that some day it may come to the end of its life, and I’d like to have a new tree established at that time.

The trees were all very, very small when we got them from Lowes, but they were all roughly the same size.

No longer.

For some reason, the tree on the turnaround is growing big and fat, while the two on the driveway are still fairly spindly.

Observe the one on the turnaround–with a handy maple leaf for scale.

Maple tree trunk

And now let’s walk down the driveway with our same measuring leaf.

Maple tree trunk

Does it seem weird to anyone else that these trees are so different? They’re supposed to be the same type of trees (red maples), planted at the same time on the same property and cared for neglected in the same way.

As I’m writing this, I’m looking out the window at the turnaround, and I’m wondering if this tree is different from the others. You can see in the photo at the start of this post that the driveway tree sports a crown of beautiful red leaves. The turnaround tree–which has many, many more leaves and branches–is still completely green. Hmmm. That would certainly explain why it’s growing differently.

Any other ideas? Any tips for tree care? I admit, my usual approach is to do nothing.

Looking for sander suggestions

Attention. Vicarious tool shopping opportunity ahead. Sarah in Illinois needs your help selecting her new sander. Our sander is one of the few tools that I’ve bought for myself, rather than getting a hand-me-down. Like Sarah’s last sander, I bought it quickly without much research. But it’s also one of my most used tools, so I’m very interested to hear your suggestions of what sander or brand you recommend.

Since most of my summer has been spent out in the yard and garden, I was really excited the other day to have a chance to spend a few minutes on a project in the wood shop. I actually have to admit I am looking forward to cold winter months because I will have more time to spend out there.

However, when I grabbed one of my most used tools and found it had finally died, I decided it was time to do a little research and add a replacement to my Christmas wish list.

I need a new electric hand sander.

(Honesty here: I am not being sponsored by anyone to write this. The following is my opinion on my experiences. And a note from Julia: Links are not affiliate links.)

For years I had a DeWalt hand sander. Actually I had two: a 1/4 sheet palm sander and a random orbit sander. I used them and used them until they literally fell apart in my hands. I found this picture from years ago when I was sanding wood siding on my old house.

At some point, I needed a sander and ran to town and found something inexpensive to use to get me by. That’s how I ended up with a Skil.

This sander lasted much longer than I ever expected, but I was never happy with the hook and loop attachment for the sandpaper. Many times it flung the paper off in the middle of use. I know that hook and loop attachment seems to common with most sanders, but I actually prefer using adhesive backed paper.

Steve and I have had very good luck with Hitachi brand tools. We now have a compound miter saw, portable chop saw, cordless drill and 9 inch grinder all Hitachi brand, and we couldn’t be happier with the longevity and strength of these tools. So naturally I looked first at Hitachi. I was thrilled to see they still make a 1/4 sheet hand sander. They also have two options for orbital sanders that both have hook and loop attachment. DeWalt has a similar option.

So here is the reason for this post: I want to hear from other people with actual experience. What hand sander do you use? What brands have you had luck with? Which ones would you not recommend? How do you feel about hook and loop attachment versus adhesive back versus 1/4 sheet that is held on with clamps?

Finally, the reason I was out in the wood shop the other day: Our small town is having a scarecrow contest. There are many scarecrows all over town and I decided to add one at work. (The sander was needed for that mega-wrench he is holding!)

I was late getting him ready, so I didn’t get to enter the contest, but it is still fun to decorate and join the fall spirit around town. Here is the link to the contest entries if you would like to see the fantastic scarecrows.

I am so glad to live in a town that is so friendly and has such great community spirit.

What a great community building project, Sarah. I love seeing people’s creativity with their scarecrows.

We have a random orbit sander made by Mastercraft (I think it’s Canadian Tire’s brand). I bought it very much like you bought your Skil–quickly and cheaply. But I’ve been pretty happy with it. It is hook and loop, and I’ve had no issues with the pads staying attached. The sawdust bag sometimes slips off, which can be a bit annoying, but usually I just leave it off and accept the dust. It’s a bit big for my hands–usually I’m for gender equality, but tools made for smaller hands would be a very good thing. Just don’t make them pink.

Now over to everyone else. What sander(s) do you recommend?

Refinishing a vintage metal bed frame

Thanks everyone for your good wishes on my last post. Matt seems to be recovering well from his surgeries. We’re hopeful that our follow-up appointments over the next few months give us more positive news.

The guest room has become Matt’s treatment room where we can lay out all his drops and ointments, and the patient can receive them. You may recall that back when I shared the finished guest room nearly, oh, a year and a half ago, the room was missing a key component–a bed frame.

Well, we’ve finally managed to remedy that.

Metal bed frame in the guest room

We had an old metal bed frame that was in my cottage bedroom growing up and then Matt and I used it in our first house. This style of frame has become pretty trendy, and I’m seeing various versions all over the web, so I wanted to keep it. Plus it was free.

However, the finish was in rough shape. During the cottage days, it was a greyish, pinkish flesh tone. Matt and I repainted it cream, but it was our first foray into spray paint and the finish was drippy and chipped (and dusty after living in the barn for several years).

Vintage metal bedframe painted cream

One of my home goals from 2016 was to strip the frame. I had hoped that the metal was in good enough shape that it wouldn’t need to be painted and it could just go right into the guest room.

Stripping paint off metal is very similar to stripping paint off wood. I used my usual chemical stripper, scrapers and wire brushes. It was a fiddly process because of all of the spindles and layers of paint (and as usual my sidekick was no help).

Baxter helping to strip the paint off the metal bed frame

The original finish on the bed was a faux wood treatment. It was not what I expected to find at all. I had seen glimpses of this stenciled basket through the subsequent layers of paint and thought it might be embossed into the metal. That was not the case, and it was a feature of the original finish.

Faux wood grain paint on a metal bedframe

Stripped metal bed frame

Unfortunately, the metal was not in great shape once I got the paint off. There were scratches and pits and rust and the welds were obviously different colours. I knew I would have to repaint the whole bed. Faced with that reality, I stopped stripping. I had removed the paint from the headboard and two siderails, but I had visions of simply adding another layer of paint to the footboard.

Stripping paint off a vintage metal bedframe

But I knew that wasn’t what I really wanted. If I’m going to do the job, I might was well do it right and take the footboard back to the original metal. Plus the footboard is the most visible part of the bed, and I was worried that the chips and goopy layers of paint would show through my new finish.

So this summer I returned to the bed frame and finally stripped the footboard. Then I waited for the weather to cool off enough to paint–and to figure out what colour I wanted to paint.

So many of the metal bed frames I see are black. I love the look. But between the trunk that’s already in the room, the chandelier and the curtain rods, I already have my pops of black. I didn’t feel like I needed more.

Rustic black chandelier

The second place colour seems to be white, but there’s also a few white pieces in the room, we’d kind of already done this with the cream paint and honestly I wanted something more interesting than white.

I sampled a bunch of colours, but that didn’t help. Finally, I went to the store and just picked a colour. I chose Antique Brass by Rustoleum. I liked the idea of echoing traditional brass beds. Plus some of the hardware in the room on the desk and the chest of drawers is brassy.

Rustoleum Antique Brass spraypaint

I figured, if I didn’t like it, I could always repaint. At least I now have a smooth surface to do so, and I wouldn’t need to strip again.

We set up the bed on the driveway, and I went to town. Given the state of the metal, I think I could have used a primer, but after a brief sanding I went straight to paint–and ended up having to run to the store to get more cans. In the end, all of the scratches were covered and the finish looks good–much better than any of the previous finishes.

Metal bed frame set up on the driveway for painting

After a week of airing out in the driveshed, we brought the bed in and set it up.

Antique brass metal bed frame

And now, I can finally say the guest room is done. Ready for our next patient guest.

Thankful

Two and a half weeks ago Matt was diagnosed with an ocular melanoma–a tumor in his right eye.

Today, as we celebrate Thanksgiving, I’m thankful for many things.

Holding hands in the hospital after surgery

I’m thankful for Matt’s worrywart tendencies that made him notice his peripheral vision was blurry. I’m thankful that he didn’t listen to me when I said, “You’re trying to look at an impossibly sharp angle. Of course it’s blurry. There’s nothing wrong.” I’m thankful that his parents happened to be at the optometrist and made him an appointment for the next afternoon.

The optometrist, who diagnosed a detached retina, took the situation seriously and referred him immediately to an emergency eye clinic at a local hospital. As the optometrist predicted that Matt would likely have surgery that night, he came home to get me, so that I could drive us to the hospital.

I’m grateful for the ophthalmologist who saw us, even though we arrived quite late after his shift had ended. Expecting to hear “detached retina” and “surgery” and hearing instead “tumor” and “melanoma” is still a blurry moment.

The ophthalmologist referred us to Princess Margaret Hospital, one of the leading cancer centres in Canada and experts in this type of eye tumor. Five days after Matt’s appointment with the optometrist, we were being seen by specialist after specialist at Princess Margaret.

I’m thankful that Princess Margaret is within driving distance of the farm. I’m thankful that the staff is so amazing and their processes make everything so easy. I’m thankful for Canada’s healthcare that gives us access to all of this. By the time we left the hospital we had a confirmed diagnosis, a treatment plan and a surgery scheduled in just two days.

Matt had a surgery that involved placing a small disc in his eye called a plaque. The radiologist described the plaque as like a bottle cap filled with radiation. It is placed over the tumour and stitched in place. The plaque stayed in his eye for six days and was removed on Wednesday in a second surgery.

Wearing an eye patch and oxygen mask after surgery

I’m grateful for medical science that has come up with this treatment that is usually very successful and that allows Matt to keep his eye. I’m grateful that in most cases this type of tumor doesn’t spread (although we’re going through tests to try to make sure this is the case).

I’m thankful that Matt’s recovery has been smooth and we have family and friends supporting us both. I’m thankful that I’m now working at home for myself so I can easily juggle things to be where I need to be. I’m thankful that Matt and I have the relationship where we can get through this together with generosity, kindness, sympathy, openness, fear and humour for each other.

I’m sharing this situation because I want to remember this moment in our lives. I want to articulate gratefulness and thankfulness.

I also want to encourage everyone to go and get your annual check ups. Dentist, doctor, optometrist–it doesn’t matter how you feel. Go to the doctor. Matt has never had problems with his vision. Has never had glasses. It seemed like there was no reason for him to go to the eye doctor.

Most of the time, nothing is wrong. Great. Check that box. You did your annual check up. But maybe sometimes there is something wrong. And they notice it and you get great treatment and your life goes back to normal.

And that’s one final wish I will add this Thanksgiving, if it’s not asking too much. Amongst all of this gratitude, I will be very thankful if this treatment works, the tumor fades and my husband and I move on in health.

I’m going to be taking the rest of this week off from the blog. I’ll be back with more posts next week.