I’ve been trying to convince Ellie to move into the guest room for awhile. Our rooms join with a pocket door, which we leave open. I think we’d both sleep better if we weren’t quite so close. (I could do without a little voice calling, “Stop snoring, Mama!”)
Also the guest room is larger with a double bed.
Aaaand… her current room would make a great playroom, which would mean the living room no longer has to be overrun with toys.
(Am I selling you on this idea?)
Ellie is change averse, so she has not been a fan of my plan. But she is a big fan of green. So when I mentioned we could paint the guest room green, she was a little more enthused about the idea of relocating.
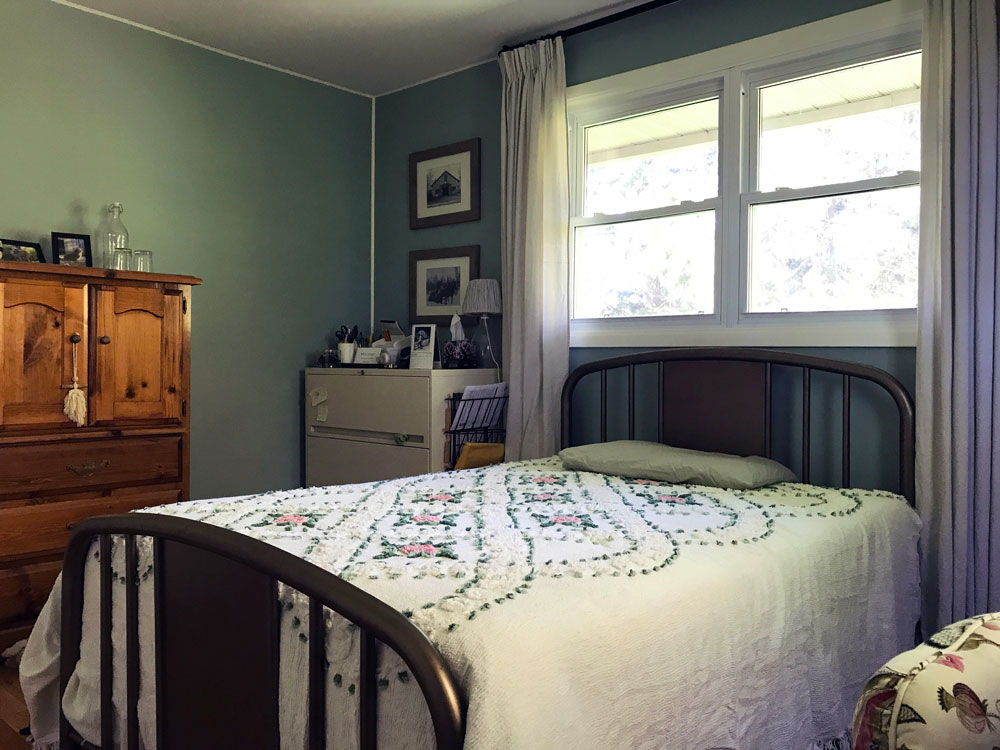
But don’t tell Ellie the guest room is already green(ish).
My inspiration is slightly softer. In fact, I’ve been planning a green room for a hypothetical little girl long before I ever decided to have a baby, all due to a special gift from my grandma.
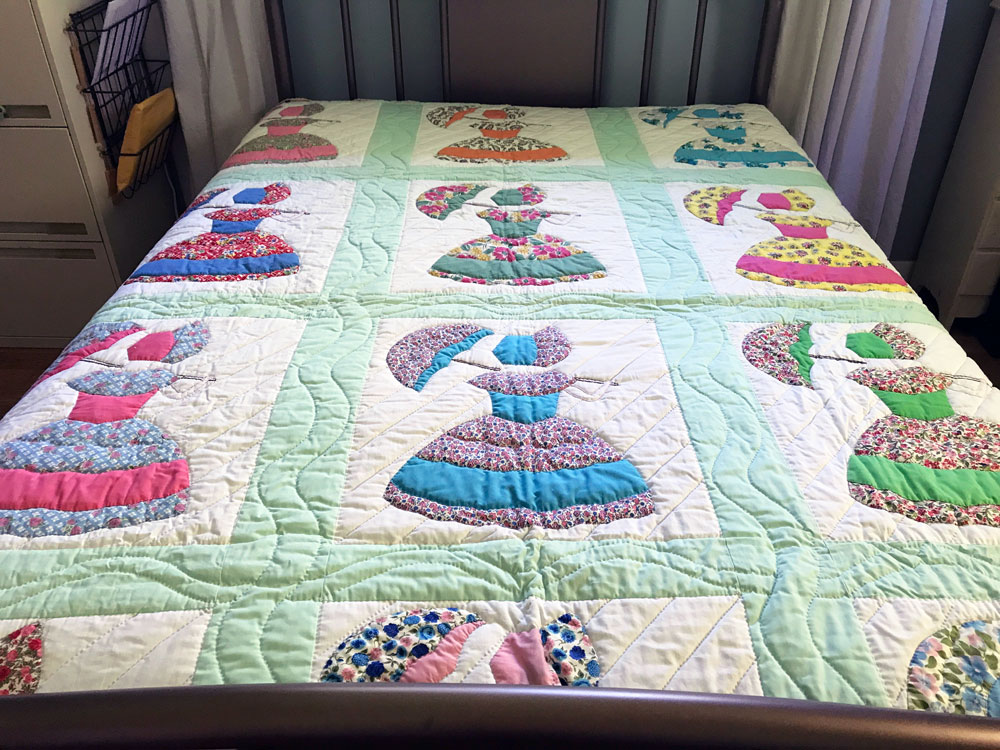
My grandmother made all of the girl grandchildren quilts for their weddings (she knit afghans for the boys). The one she gave me is girls with umbrellas–with a green backing.
I thought it would be perfect for Ellie. Though when we unfolded it the other day, her first words were, “That’s not my green.” I also realized that it’s sized for a single bed, not a double. So the quilt will not be the inspiration for Ellie’s new room, though I do hope to use it somewhere.
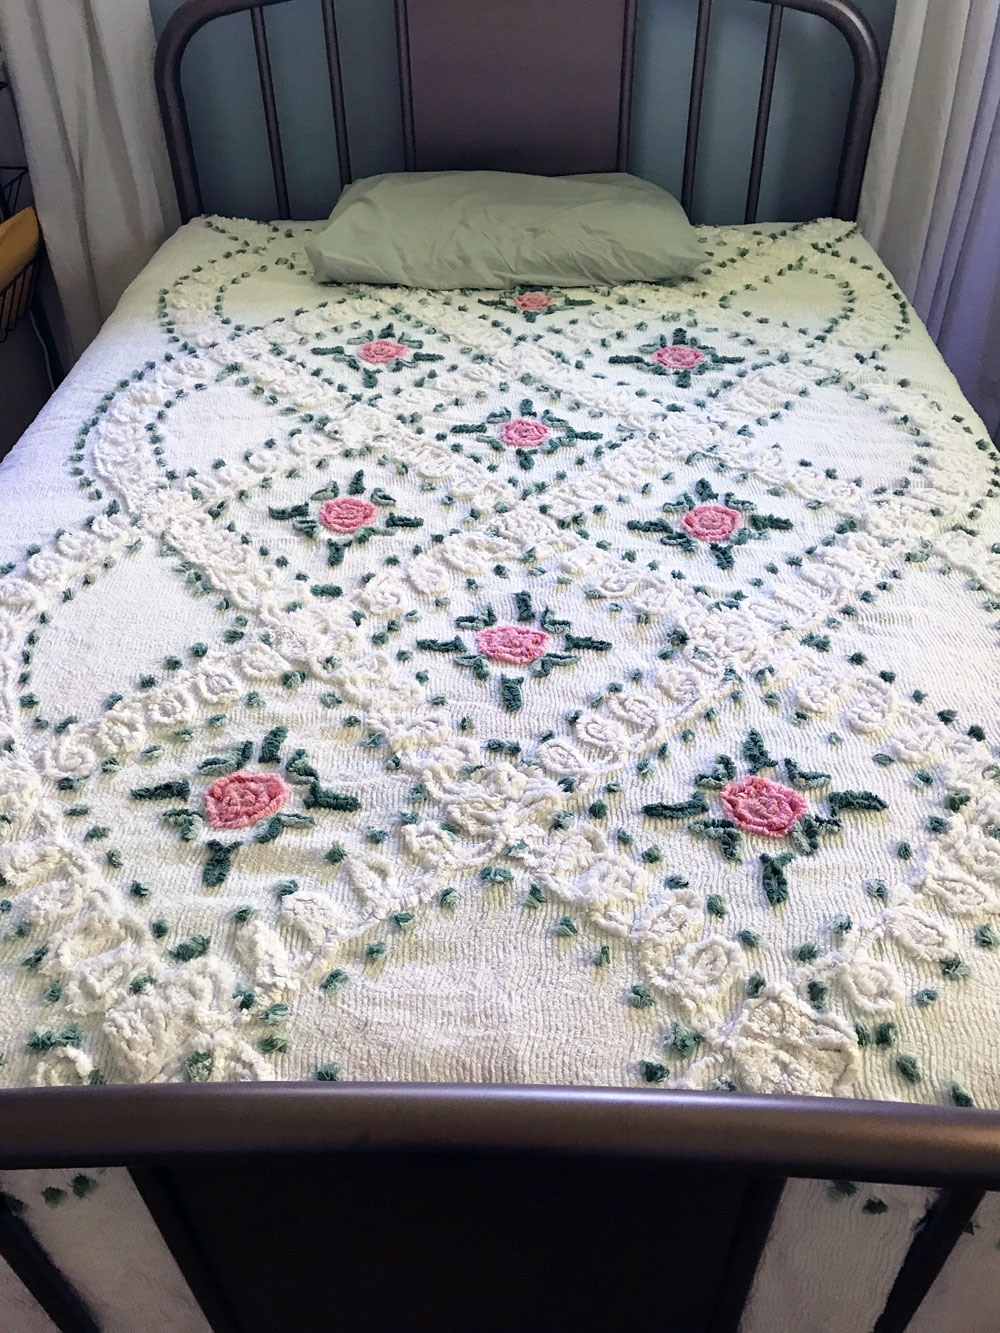
But, I have another option. An old chenille bedspread from my grandparents’ cottage was folded alongside the quilt. It’s the perfect size for a double bed and it includes a nice dark and saturated yet soft green. Plus Ellie’s first words on seeing it were, “It’s so flowery!”
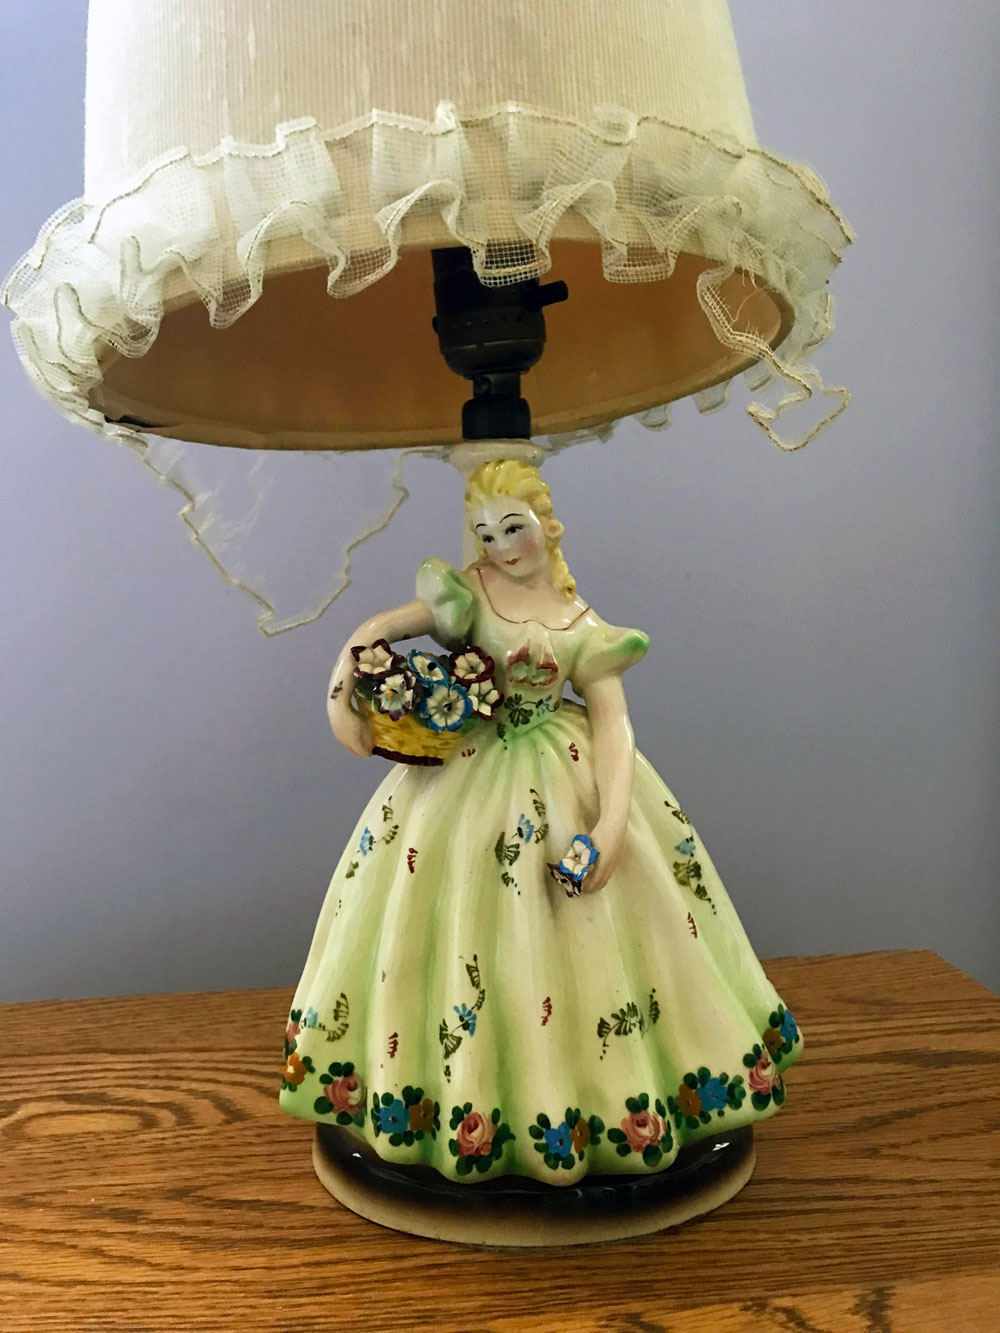
My Mom has this lamp, which she had in her childhood room, and I think the two would work really well together. (She needs a new shade and some new wiring.)
So now to find a green that is sufficiently saturated for our girl, but sufficiently mellow for Mom.
House & Home tells me that juniper green a “softer, more saturated green” is trending. They cite Webster Green from Benjamin Moore as an example. I think this green would look great (and sufficiently farmy) on our (fake) paneled walls. As long as it’s green enough for Ellie.
The brass-ish bed would contrast with the green, so we could keep that. We’d also keep the dresser that Matt’s parents bought for her nursery. Then it’s what else do we need? Nightstands? A desk? Bookshelf? Some fun, colourful, flowered curtains?
The move is likely a ways off. Moving one room has a domino effect with the rest of the house, as I would need to relocate everything that’s currently in the guest room. Plus then there’s redecorating, and it might take some time to negotiate the final design with my partner/client.
For now, I’m having fun thinking about it. And it was really special to pull out the quilt and the bedspread and share them with our girl.
Are there any other green fans out there? What’s your favourite shade? What’s your must-have for a kid’s room? Do you have any special gifts from your grandparents?
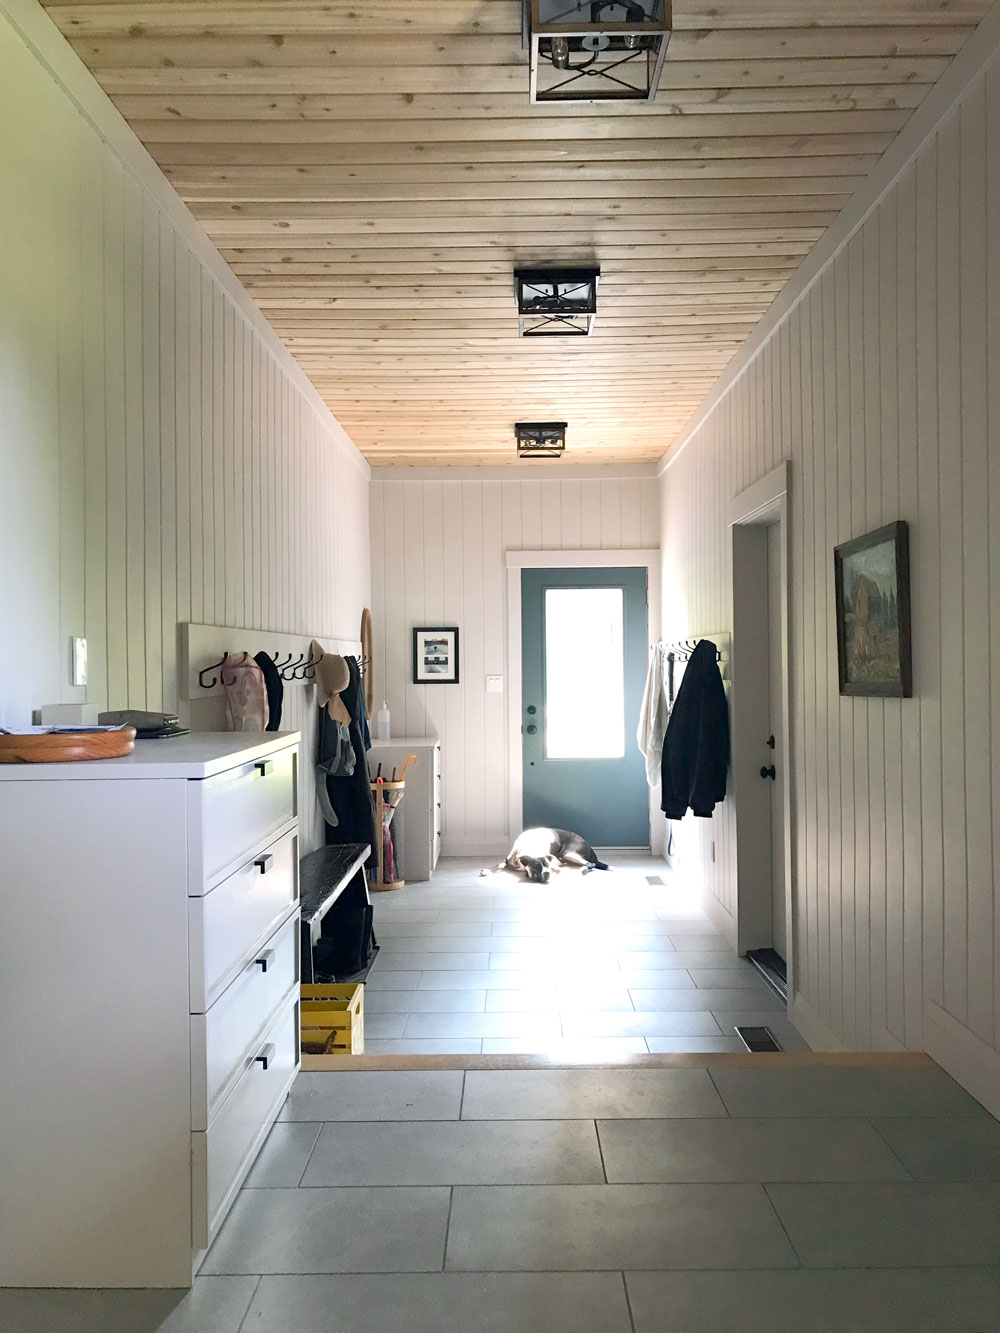
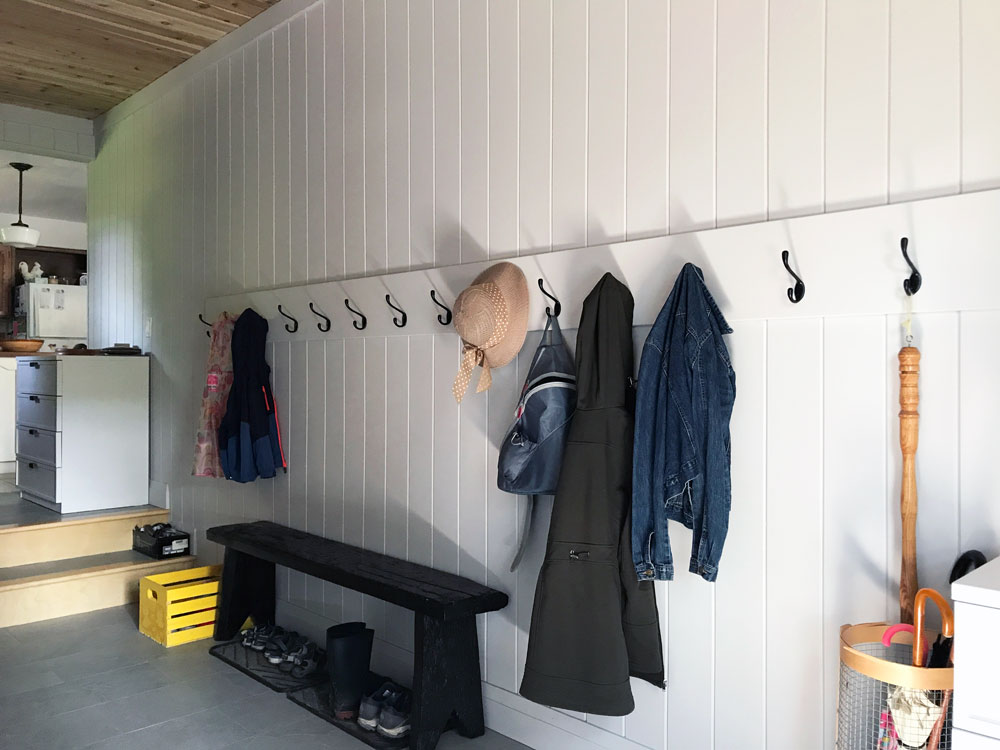
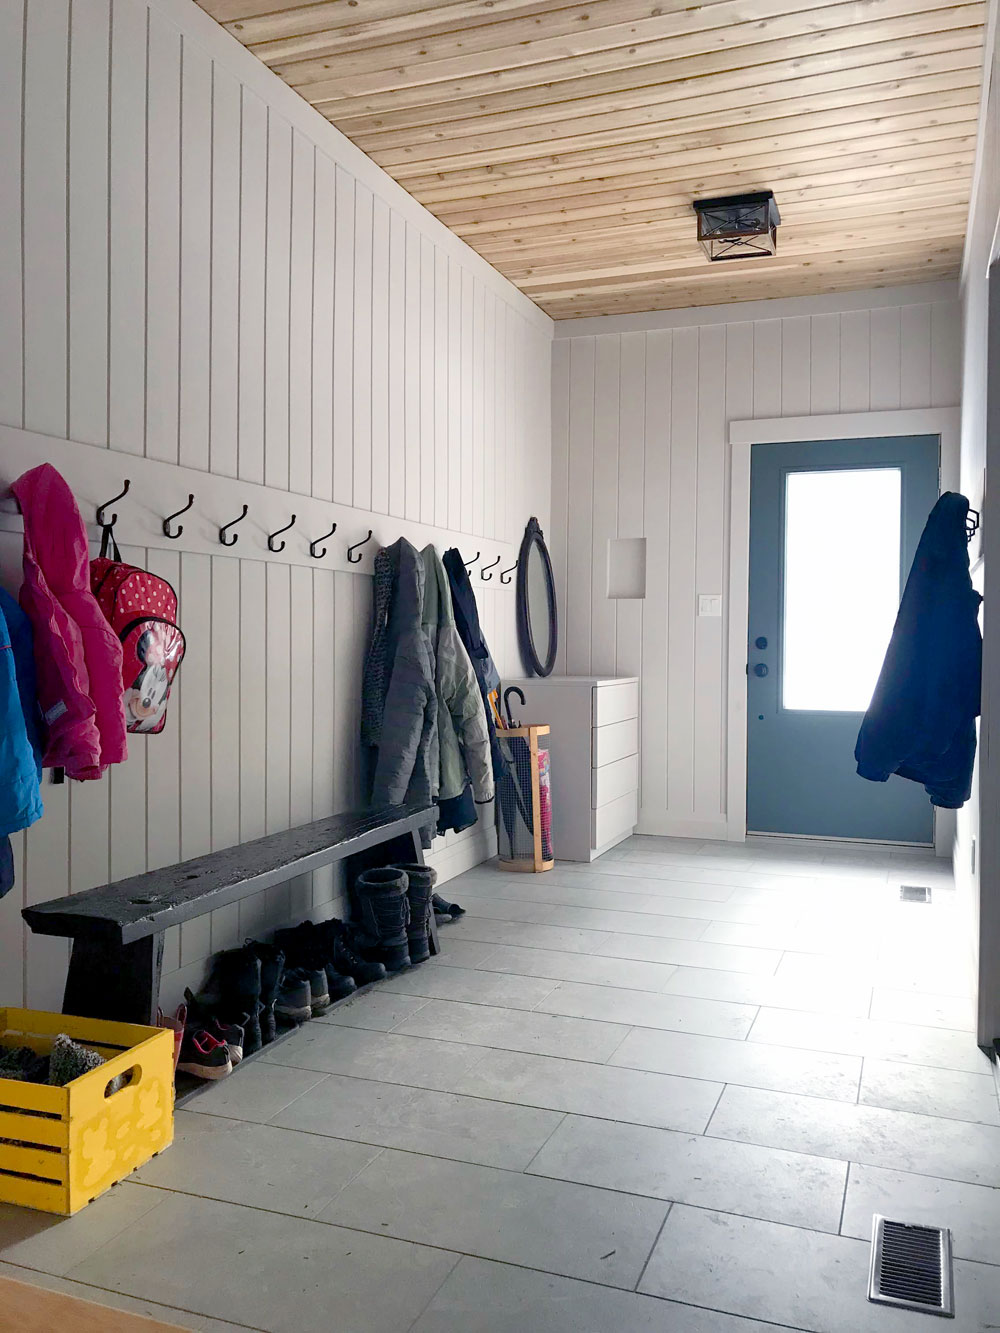
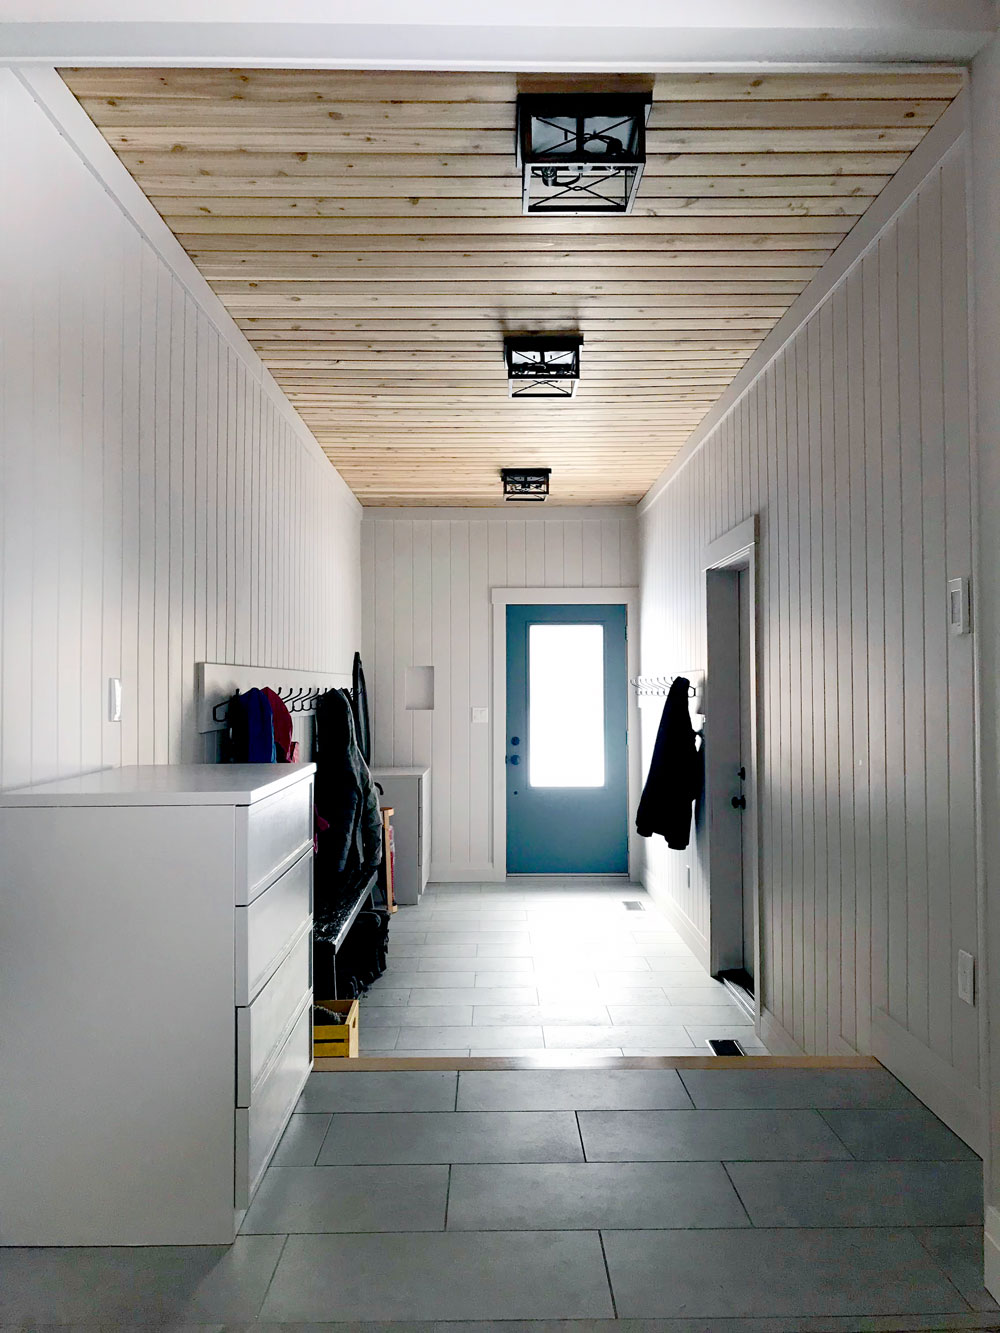
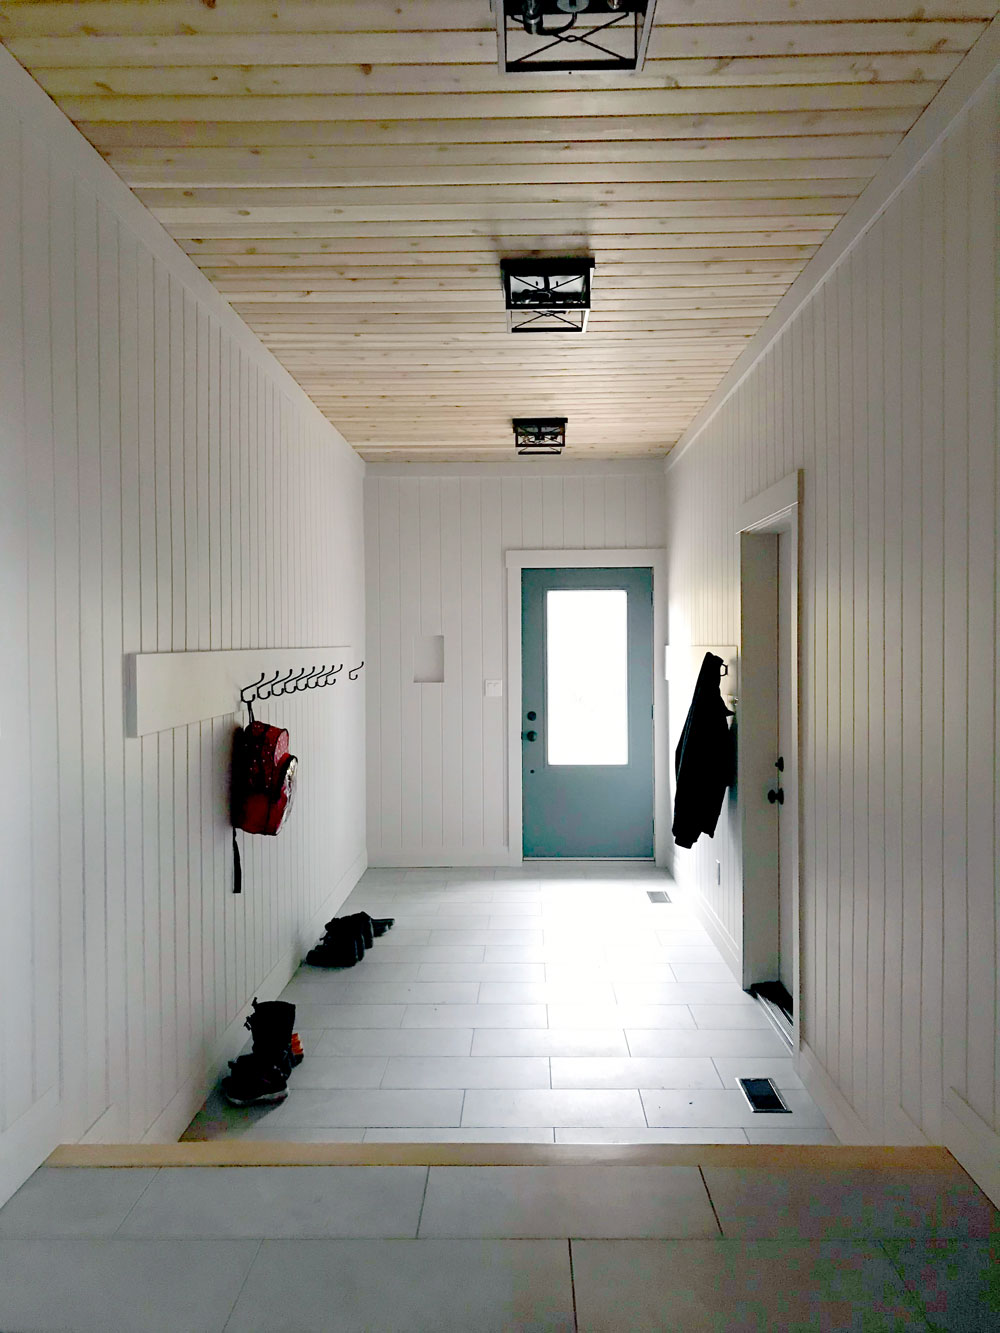
Our mudroom is done–for now. This room was the first on my home goals list for this year. I had just five small tasks to do, and they are finally finished.
Today, I’m giving a tour of the space and highlighting some of my favourite features.
The secret behind the picture
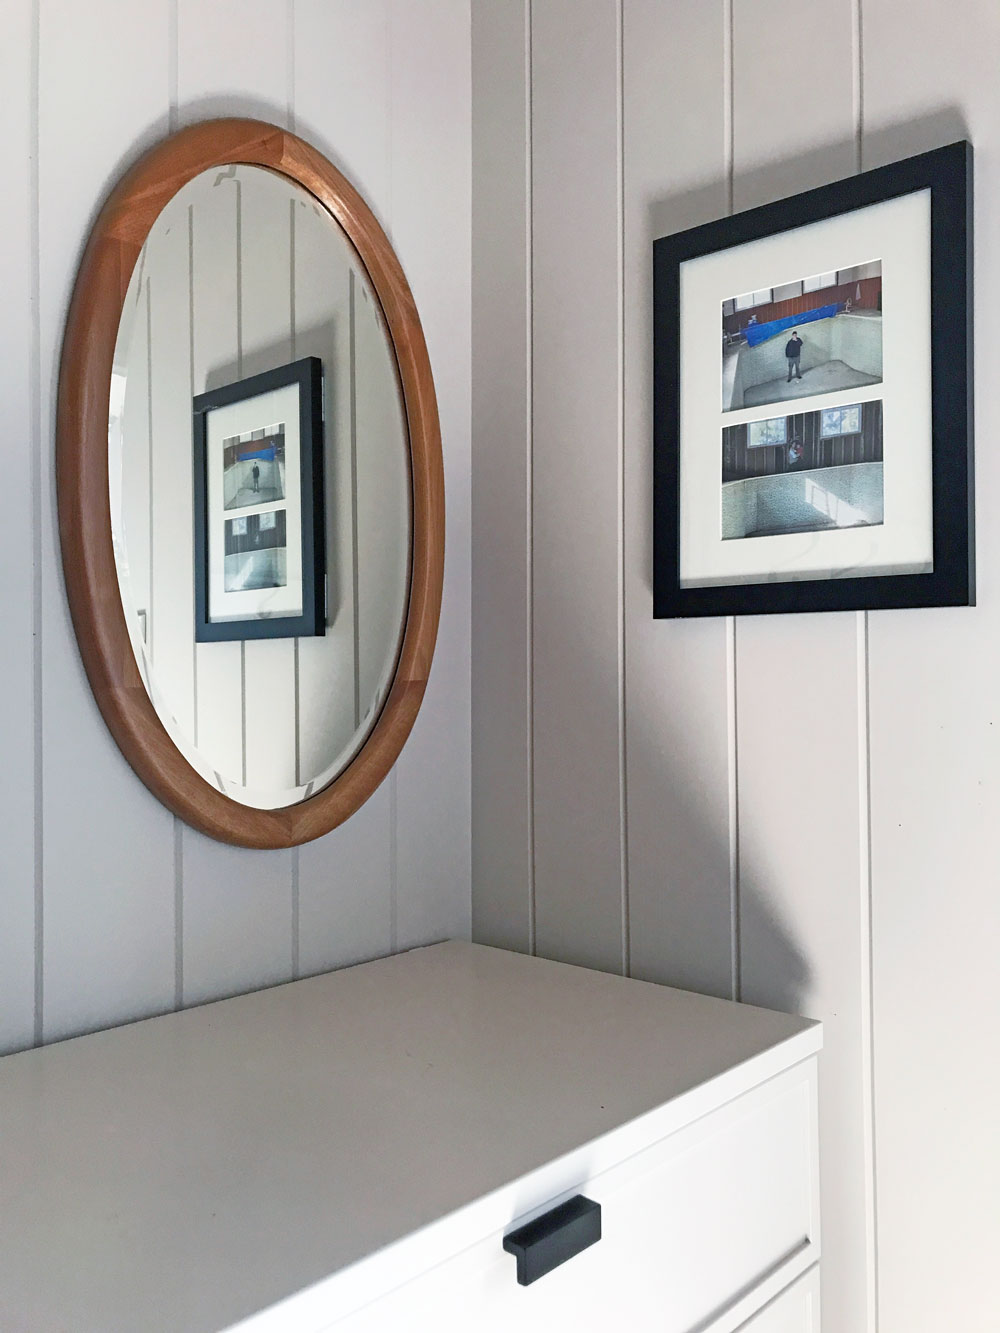
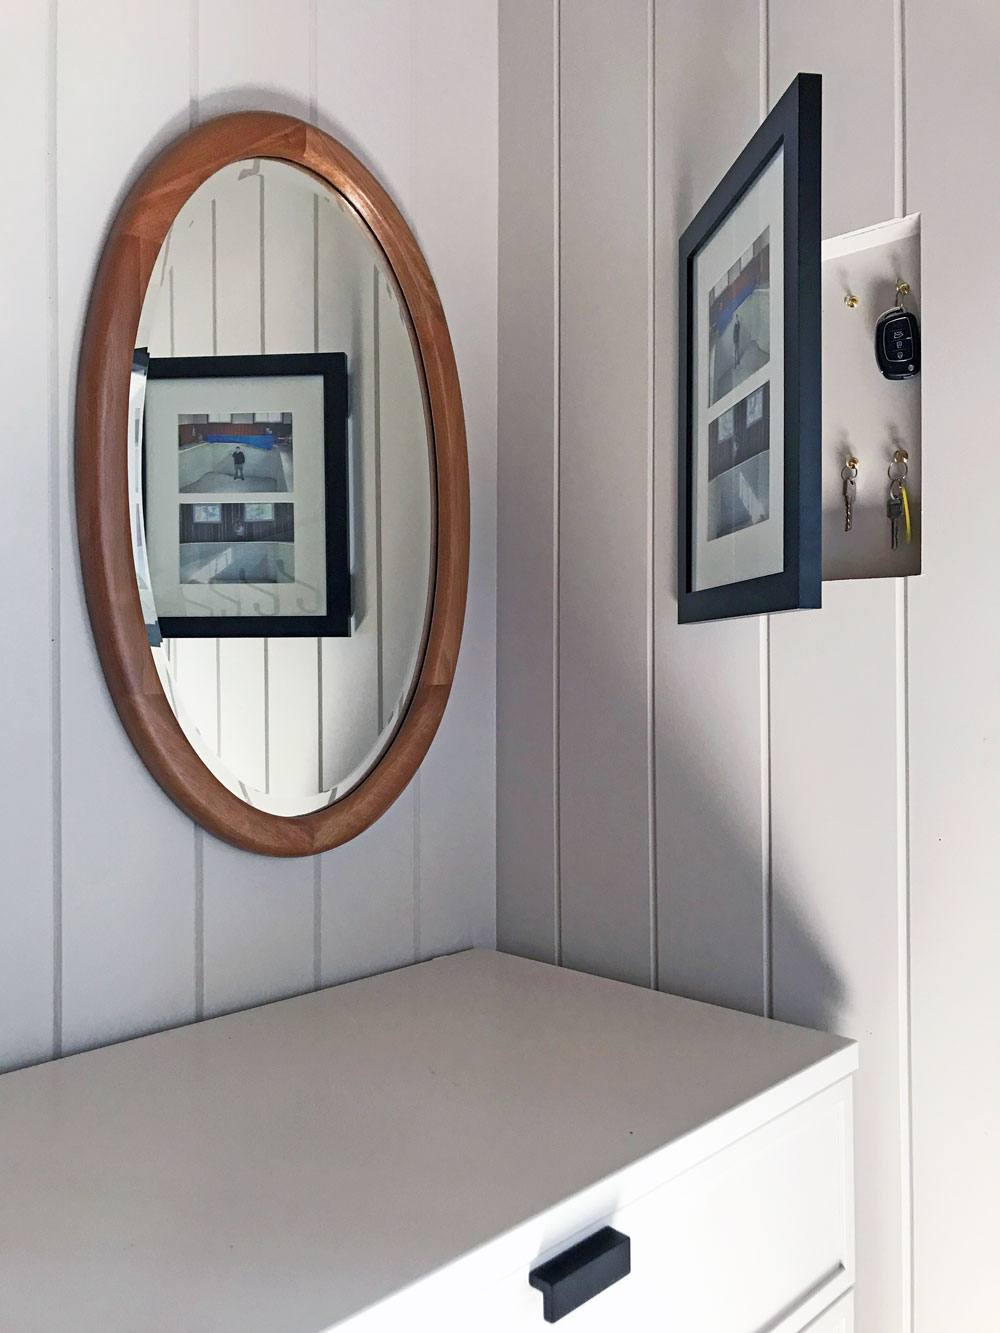
Let’s start with the hidden (literally) gem. I’m particularly proud of how this secret cupboard turned out.
One weekend, I built a little box. When our contractors arrived, I asked one of them to install it in the wall next to the door. Then I attached hinges to a picture frame and installed it over the box. Inside the box, I screwed two rows of little cup hooks. Voila, hidden key cupboard.
I like having our keys hung up, rather than jumbled together in a basket in the drawer. Originally I’d planned to find a farmy painting for the door. But when I couldn’t find the right size, I decided to go with photos. I chose a picture of Matt in the pool during our home inspection, and then I selected another photo of Ellie and me in the pool during demolition. A literal snapshot of the history of the mudroom, and our little family together in this space we dreamed about.
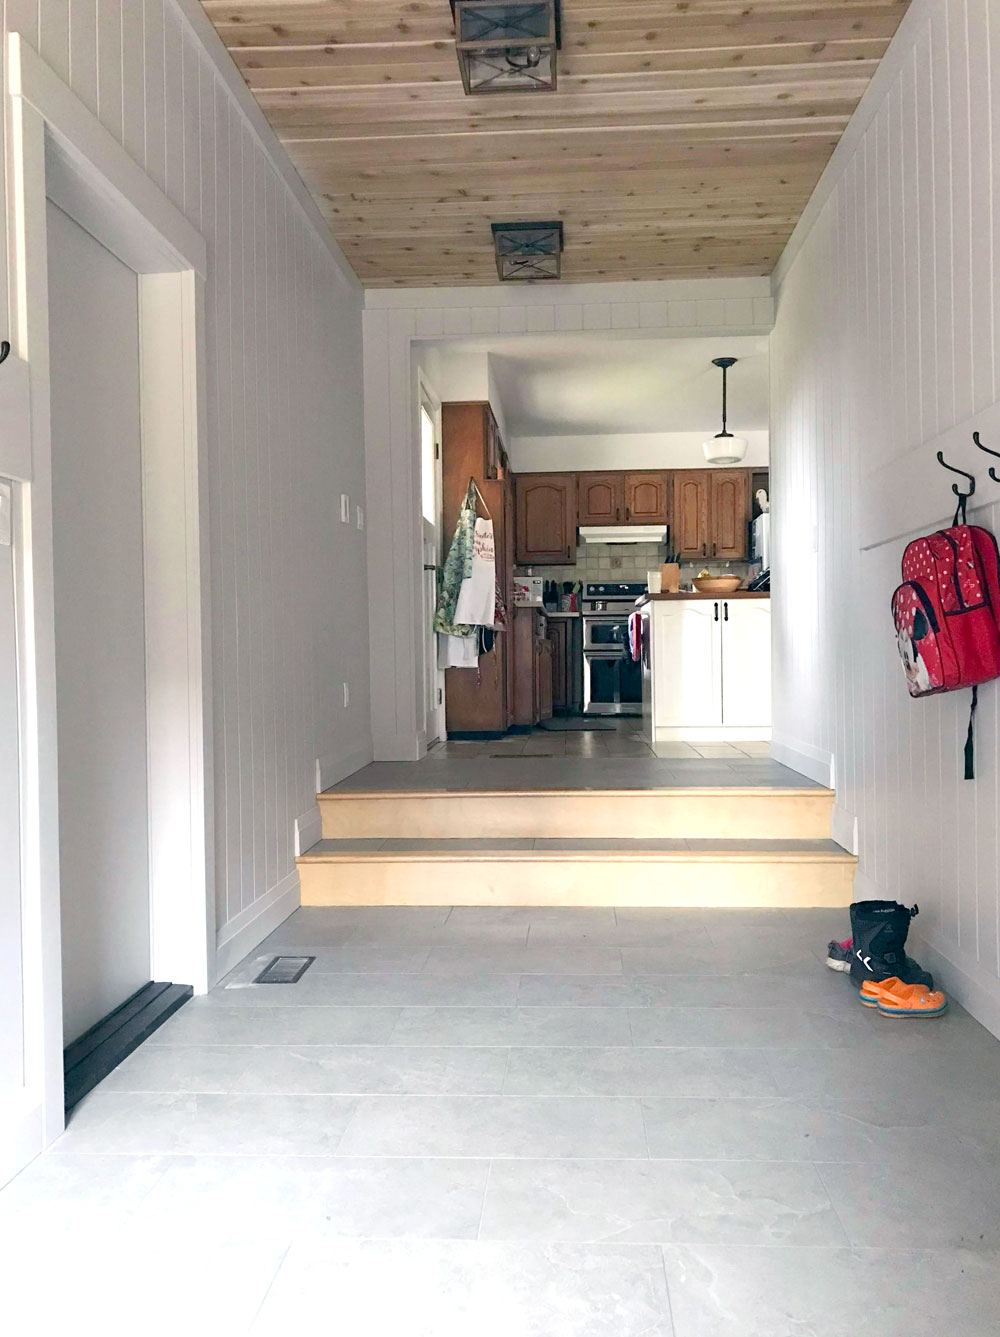
Figure it out furniture
Someday the mudroom may have beautiful built-ins. But for now, we’re making it work with free hand-me-down dressers, our homemade bench and other DIYs. And honestly, they’re working great.
The dressers look fresh after a coat of paint to match the walls. Spraying the hardware to match the black hooks that we used in the room was the finishing touch. The dressers are likely not going to be here forever (the one on the landing is too small and the one by the door is too big), but they’re doing everything we need.
The upper one holds puzzles, colouring books and games for Ellie. Plus cards, flyers, coupons. It’s also our mail drop, wallet and phone charging station. The lower one holds sunglasses, sunscreen, bug spray, masks and some outdoor toys and tools. In the winter it stashes hats, mitts and scarves. Both dressers have empty drawers, so we have more than enough storage for now.
Matt’s nephew and I made the bench almost nine years ago. I’ve been surprised by how much I like having the free-standing shorter bench. It gives space for my longer coats to hang freely, instead of puddling on the seat. Ellie is still a bit short to reach too high, so having her hats or other gear in a dresser drawer or a bin on the floor works best for her, rather than putting them on a too high shelf.
Living with the space as it is now gives me an idea of what we need and what works best.
A little bit country
We live on a farm, but we don’t have a farmhouse. With every tweak we make, I try to inject more country character. The V-groove paneling on the walls, cedar on the ceiling and simple black hooks are all examples of that.
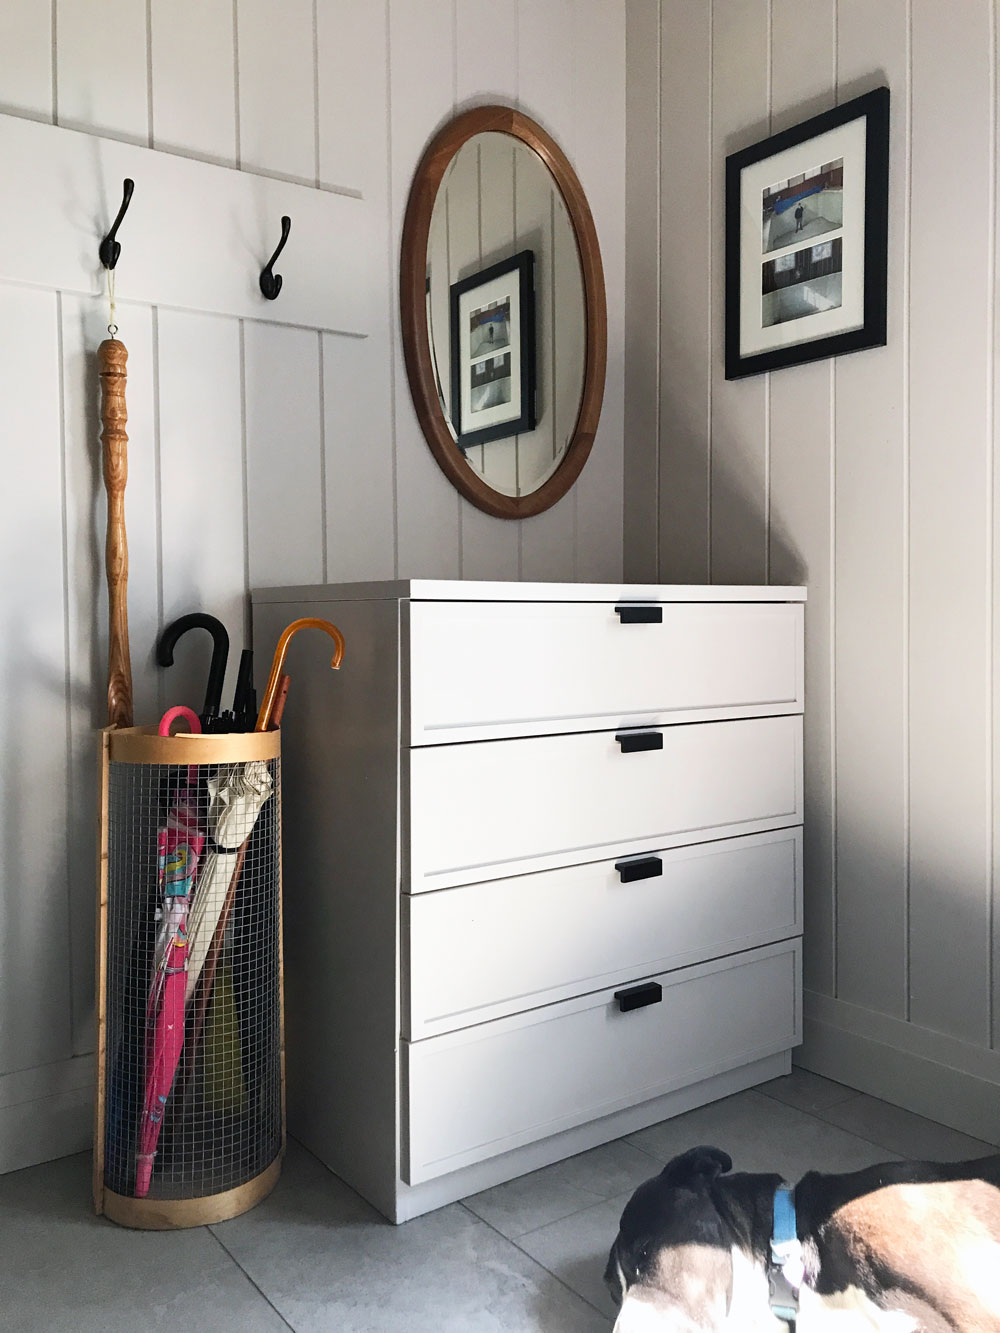
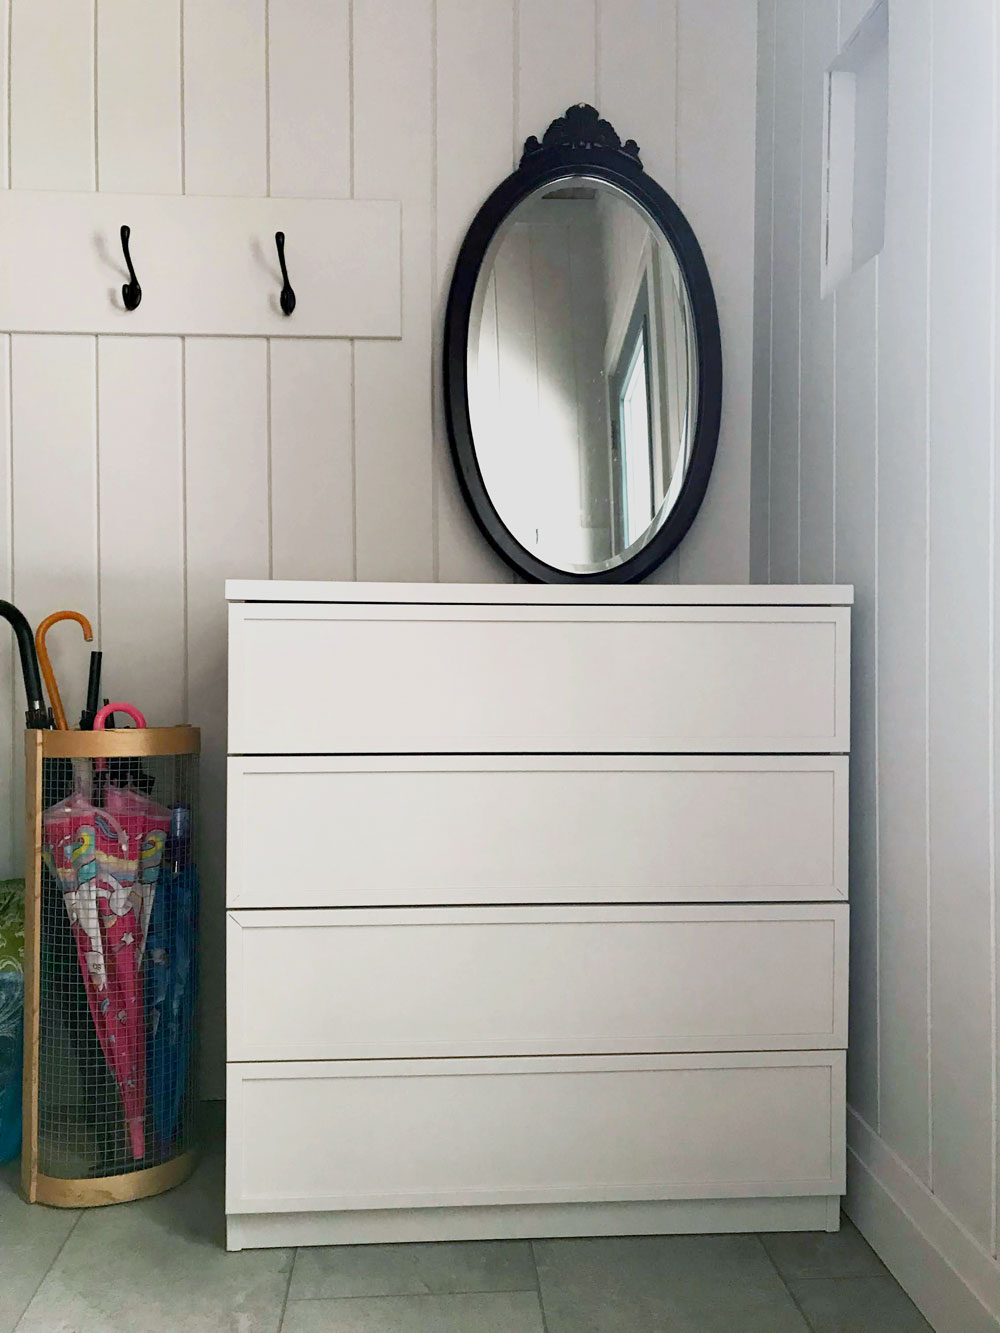
The mirror is another. It was a bit ornate when I found it in the thrift store. Removing the decorative top piece and the cherry-esque finish countrified it a lot. The factory finish was so hard and thick, but patience and a lot of sandpaper prevailed. Finding the right way to refinish it took a bit. Everything I put on the wood turned red. Finally, I went with simply varathane. That countrified it the rest of the way.
The mirror bounces a bit more light into the room (enhancing Cigo’s sunbeam), and its round shape contrasts with all of the straight lines from the paneling and other elements in the room.
Designed for us
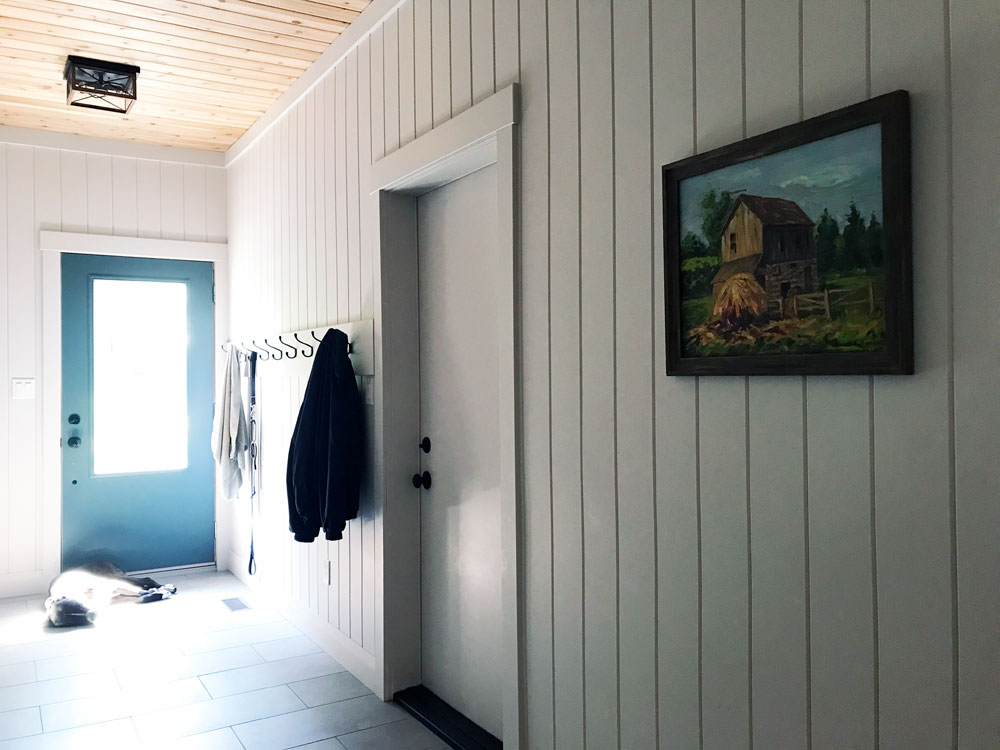
Installing an LED nightlight cover plate on the landing (I was influenced by Young House Love) was probably the easiest task on my to-do list. It gives a perfect glow for the stairs. The location of this plug–and all of the other switches, outlets, light fixtures, heated floor control panel–was very carefully mapped out by me. The electrician and the tiler didn’t completely agree with my choices, but I’m the one that lives here, so I got my way.
The dimension and height of the landing, the way the doors swing, where the openings were located, and the height of the archway into the kitchen were other areas where I pushed for what I wanted. Sometimes I felt guilty asking for a change, but I knew I would regret it if I didn’t make the mudroom exactly the way I wanted.
Now everything is so convenient and it works for how we live.
Make it personal
Like all spaces in our house, the mudroom is personal to us. Matt’s nephew and I made the bench and I made the umbrella stand for our last mudroom. My sister-in-law made the yellow crate for Ellie. My Dad made the wooden shoehorn that’s hanging from the hook and the large wood plate on the dresser that we use for mail. There’s even a box on the stairs to hold stones, sticks, pinecones, feathers and other treasures that Ellie collects.
Matt’s winter coat which I wear to take the dog out hangs beside the door. Having a whole section dedicated for Cigo has been a game-changer. In the old mudroom, towels were draped over the bench, leashes were piled on top of each other. Now we have ample hooks for everything. I even stash his nail clippers and a bottle of dog shampoo in the dresser by the door, for those moments when he smells a bit too farmy to allow in the house.
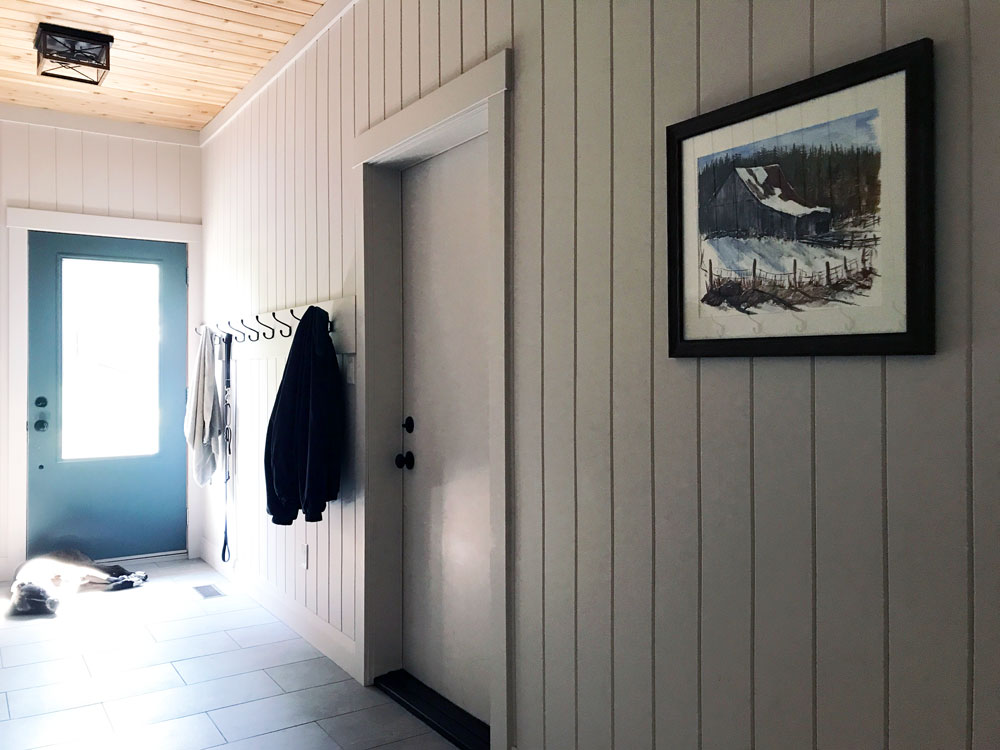
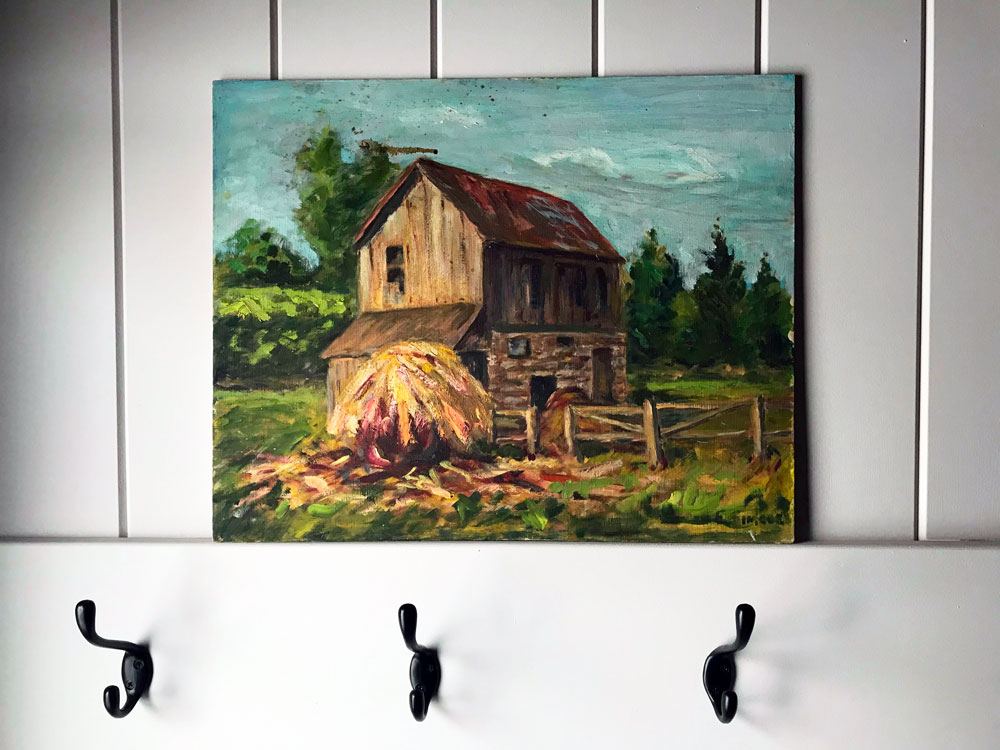
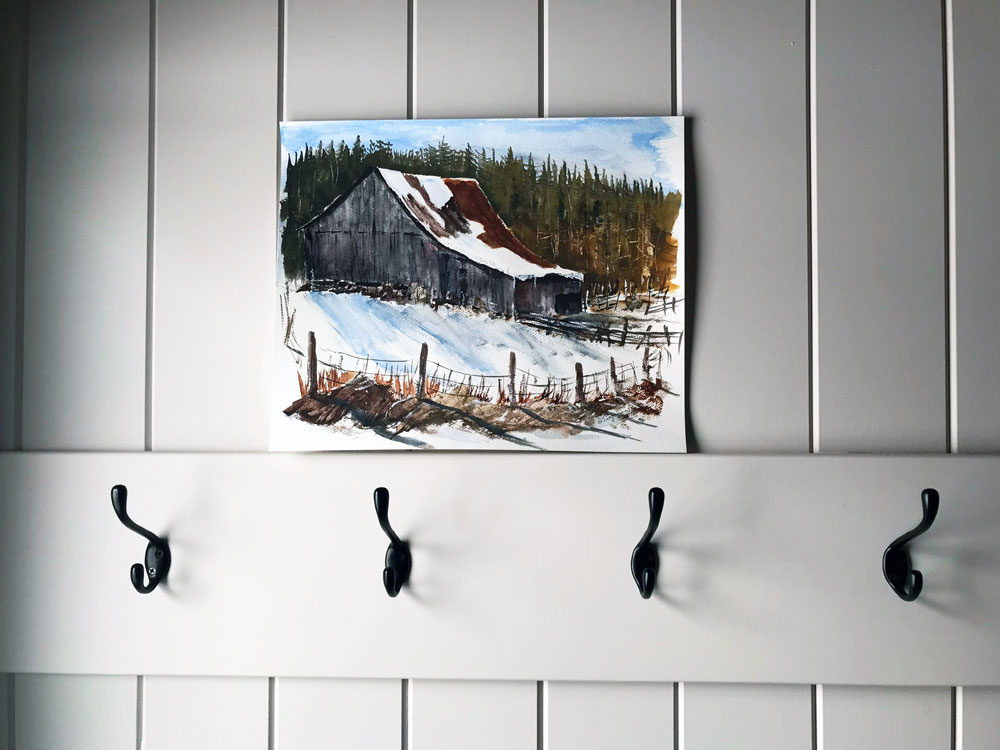
The painting on the wall is another special, personal touch. Like so much of the art in our house, this too was painted by Matt’s grandpa. When I shared art options for the mudroom a long-time reader had a brilliant suggestion: switch between paintings. So I had two framed. One summer scene (by Matt’s grandpa) and one winter (by my Mom’s friend). They’re roughly the same size, so they can hang on the same hook.
The mudroom has been a great addition–literally–to our house. This is a space that we live in every day, and that I enjoy every day. I am very proud that we dreamt it and we built it. It’s much more than a mudroom.
Do you have a room that’s more than a room? What is your must-have for an entry? Do you have any secret storage at your house? Who else switches art seasonally? Anyone else have a sunbathing dog?
Happy September. Does anyone else feel like the clock is ticking? Yesterday we had our first cool temperatures and even saw a flock of geese flying over.
Fall on the farm always comes with a bit of pressure (or at least an ambitious to-do list flitting around in my brain). I know it’s not fall yet, and I said in my last post that I’m holding onto summer as long as I can. I am. But there’s a window here. So I am declaring September garden month.
I have some very specific tasks that I’d like to tackle this month, so that I am prepped for winter. Really, I’m looking beyond winter and ahead to next summer.
Spread topsoil
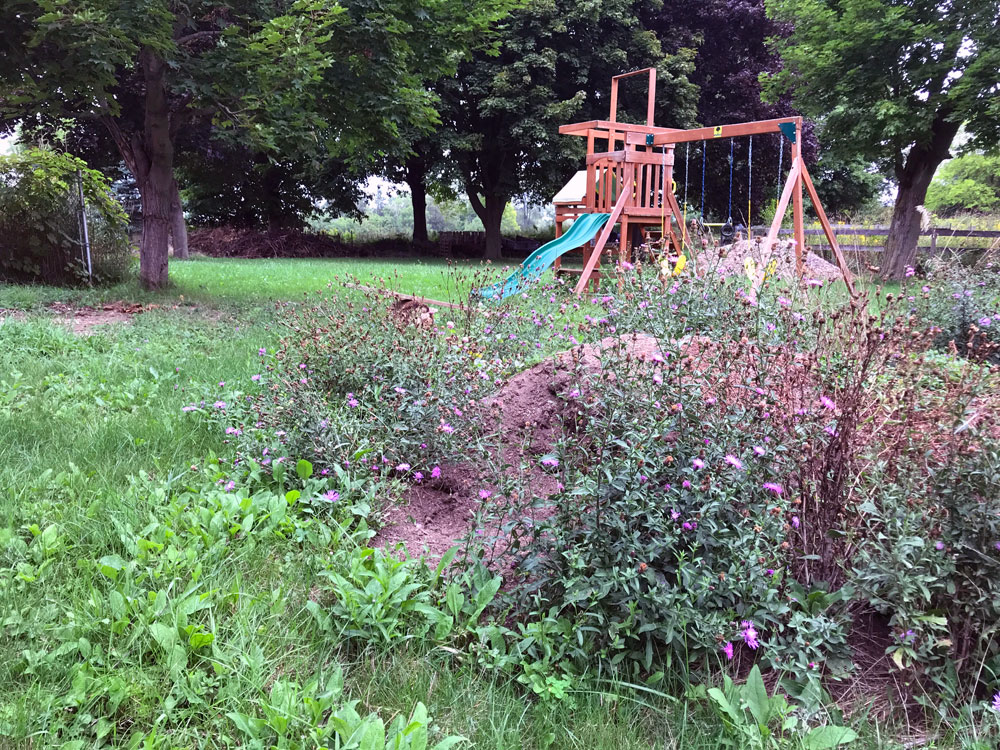
You may recall that my Christmas gift from Matt’s Dad last year was a load of topsoil. We have put the dirt to good use, but we still have a large pile left. I know exactly where I’m going to use it, and if I have a day with the tractor, I think I can get it all spread. Toss on some grass seed, and we’ll have a smooth(er), green(er) lawn next year.
Clean up vegetable garden
We had more success in the vegetable garden this summer than in many years. It’s still a complete disaster, but we made an itty-bitty bit of progress. I’d like to build on that progress by cleaning up what worked this year (zucchini, cucumbers, peas, raspberries), and getting one quadrant ready for planting next year. That means pruning, paths, rows, mulch, cover crops.
Transplant well garden
Anticipating that we will be building the driveway/mudroom patio next year, I want to empty the flower garden that’s currently in this spot. This garden is well-established, and I don’t want to lose the plants when everything is under construction. I always envisioned the turnaround being a massive flower garden, so I my plan is to use these plants to begin to fill the other half, which is currently grass.
Working on these tasks this month will hopefully give seeds and plants time to get established before winter and set us up for smooth(er) sailing next year. At least, that’s the plan. Ellie starts school next week, so I will have more time for projects (at least that’s the plan). Garden month, here I come.
Do you have any projects you’re working on this month? Anyone else feeling the pressure of winter looming? Share what you’re working on in the comments, and we’ll cheer each other on.
Inch by inch. Row by row. Gonna make this garden grow.
Garden Song Written by David Mallet. Sung by Raffi.
Row by row is the best way to characterize the vegetable garden right now.
I had ambitions to make May garden month. As in get the vegetable garden in shape. Be ready to go by the start of June as soon as the risk of frost had passed.
That didn’t happen.
But my ambitions and Ellie’s enthusiasm for the garden have not diminished.
June (or the second half of June) is now garden month. We’re planting and weeding and mulching and building as we go. It’s not my preferred thoughtful, methodical approach. But inch by inch, we’re making progress.
Pullin’ weeds and picking stones, we are made of dreams and bones
My aim is to do a no-dig garden with mulched pathways between the wide rows. This has been my goal for years now, but maybe this year we get a little closer.
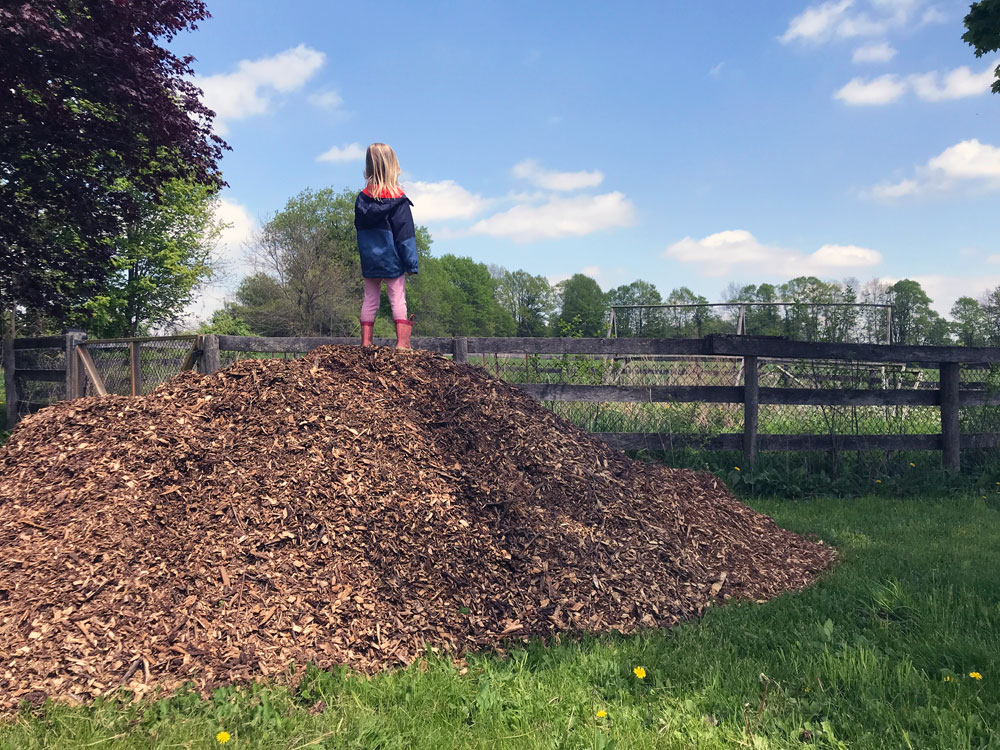
We have a mountain of woodchips piled outside the gate of the garden, thanks to a local tree company. We have piles of cardboard in the driveshed that I’ve been collecting since last year. We also have the mower, which has been my weapon against the grass and weeds that clog much of the garden.
I’m keeping my focus small. One quadrant. We have sowed cucumbers, carrots, zucchini and peas. If the plants get established and we’re on top of the weeds, perhaps the raspberries, asparagus or grapes may get some attention.
Plant your rows straight and long, season them with prayer and song Mother earth will make you strong, if you give her love and care
Just like my current soundtrack, the vegetable garden is determined by Ellie. She is very excited for the garden this year. Her excitement doesn’t involve prep like weeding or laying out beautiful raised rows, but she does make it fun.
Inch by inch. Row by row. Gonna make this garden grow
Recently, I did a mental inventory of our house. I counted 6 pieces of furniture that we bought new. All of the rest are hand-me-downs, handmade or thrifted.
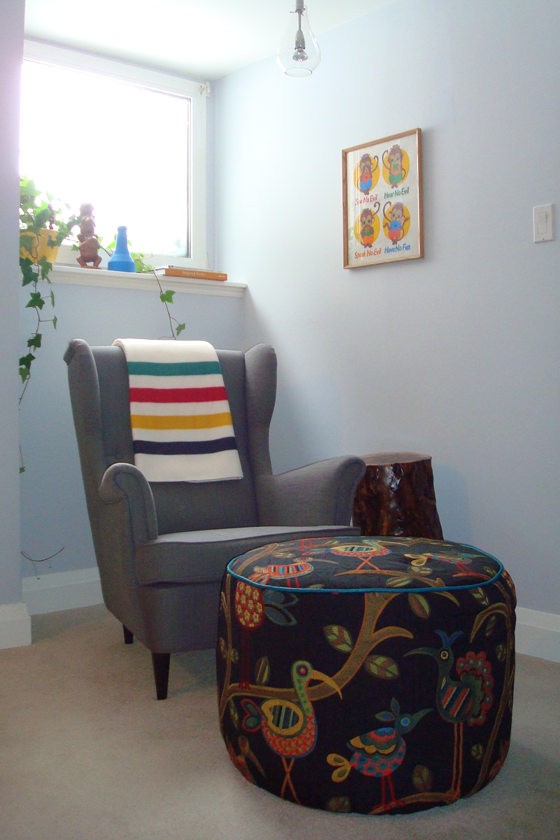
The basement reading nook shows our mix: Strandmon wing chair (new, though it was a birthday gift), ottoman (made by me), stump table (made by Matt’s Dad and me), monkey art (hand-me-down from Matt’s Grandpa).
I’m pretty proud that we’ve only bought 6 things new. I like walking through a room and seeing all of the things that I’ve made or found or rehabbed. I think it makes our home personal. It also makes me feel capable when I reflect on all of the projects we’ve done.
The environmental aspect is really important to me as well. By reusing and recycling we’re reducing our impact.
Here are my 6 newbies, along with the year we purchased them. I’m curious to know what’s your number?
Ellie’s dresser (2018)
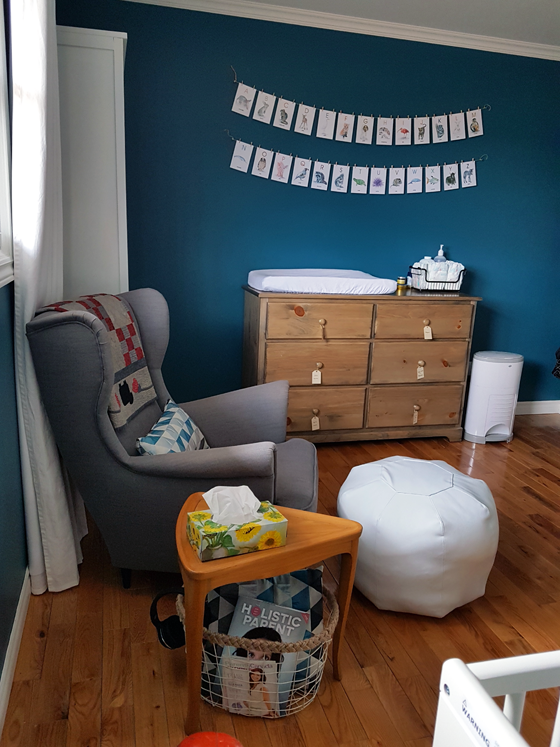
Another good example of a mix from Ellie’s nursery: dresser (new–Matt’s parents covered half the cost as I was stricken with sticker shock from buying new furniture), bookshelf (thrifted and repainted), Strandmon wing chair (thrifted this time), ottoman (made by me), triangle table (hand-me-down from my grandparent’s cottage). I should note that the crib was new as well (a gift from my Mom). It has since been passed on, so it is having a second life.
Basement wingchair (2013)
Basement ottoman (2013)
Basement couch (2012)
Living room couch (purchased in 2006 for our first house. Does this count as vintage now?)
Living room chair (also from 2006)
This total does not include appliances, mattresses, lighting (though all of our lamps are second hand), or accessories (art, pillows, etc.).
If you look at the dates above our “new” furniture is not all that new. Holding onto things for a long time is another way to reduce our impact.
Furnishing our house in this way is financially beneficial as well. The Strandmon wingchair that I bought secondhand for Ellie’s nursery was less than half the price of a new one. Keeping the same couch for 16 years is obviously cheaper than buying a new couch.
Here’s a final mix from the basement TV area: sectional and ottoman (new), wood side table (hand-me-down from Matt’s Grandpa), lamp (thrifted and repainted), TV cabinet (made by my Dad and me), TV (new, but bought mostly with points), chair (won), Monopoly art (made by me).
Mostly, I thrift and DIY for fun. This is what I like to do and I love furnishing our house in this way.
How much new furniture do you have at your house? Any great thrifting scores to share? Do you have any DIY furniture you’re particularly proud of?
Our garden is already underway for 2022–despite waking up to snow on the ground yesterday. Spring, where are you?
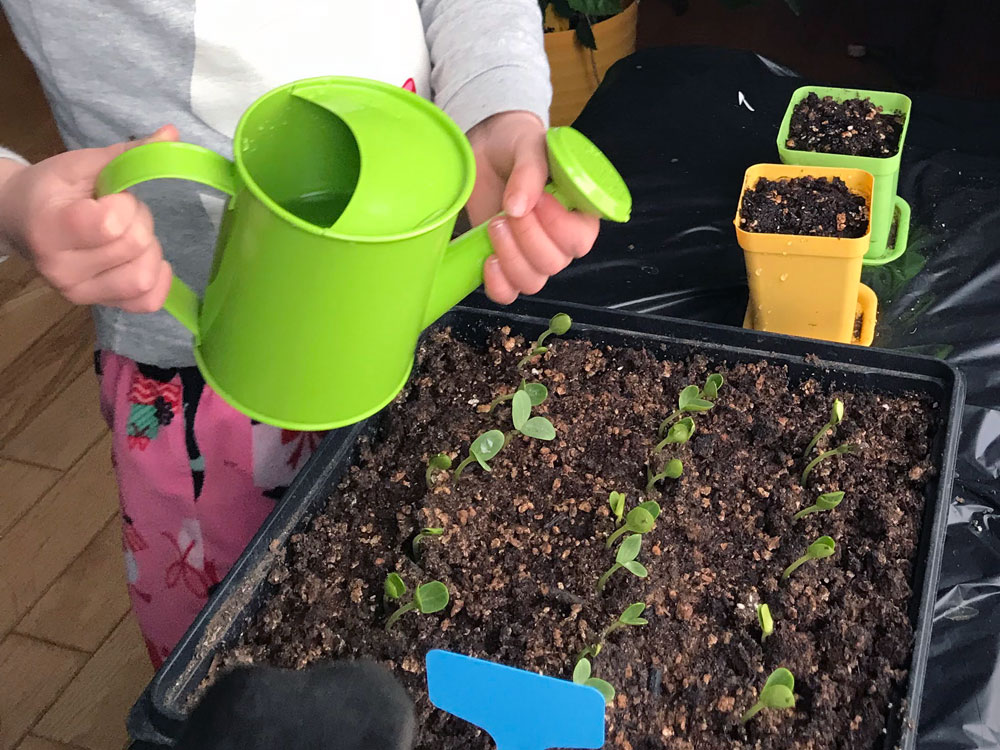
Ellie received a set of gardening tools and many packets of seeds for her birthday. She was very excited to start planting, so we have a bumper crop of tiny watermelon plants living in the dining room. I’m hoping the weather warms up before they become big watermelon plants.
The rest of her seeds are all crops that can be sown directly into the garden.
I’ve also been pruning the grapes a little bit. The grapes have been neglected (as has the rest of the garden) and they’re getting a bit wild. A longtime blogging friend, Kit, inspired me to give them some attention. I’ve not pruned as much as Kit did, as I feel like the shock might kill the vines. But I’ve tidied them up a lot, so I’m curious to see how they do this season.
I also have a line on some mulch that I’m hoping will help to subdue some of the weeds.
I aspire to have a beautiful and productive farm garden some day. We have been so, so far from that for so, so many years. I’m hoping that we can make a bit of progress this year. Ellie is extremely excited by her gardening tools (highly recommend this gift) and enthused about being helpful in the garden. So maybe this will be the year.
Are you planning to grow any food this year? Have you started your garden yet?
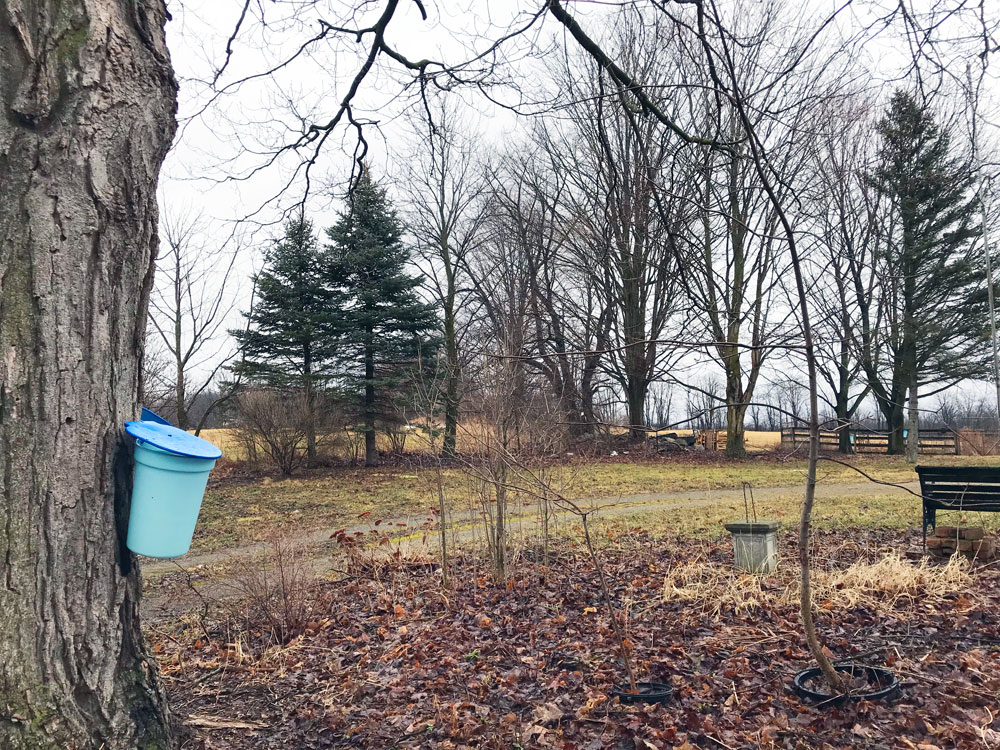
I love being outside at the farm during a full moon. Being able to see my shadow at night feels like a bit of magic. Last week we had a maple moon–a full moon that coincided with the sap running in the maple trees.
Once again, we have tapped our trees. The annual sap run and syrup making has become a fun tradition.
Ellie loves sample the sap as it drips from the trees and then monitor the sap as it boils on the stove. (We scorched our first batch, so she keeps an extra close eye now.)
Enjoying our sweet homemade syrup is a sweet treat for the rest of the year (as long as it lasts) and a continual reminder of the magic of the farm.
We also added two dressers, which I painted last week.
They give us eight big drawers of storage, so I finally have a place to put my hats and mitts. As well as car keys, sunglasses, reusable bags, pens, notepads, phone charger, masks (who thought we’d need mask storage?) and so much more stuff.
One dresser is by the door–keys, outerwear, sunscreen, bug spray, etc. will live here. One dresser is on the landing by the kitchen. My vision is that it will become a kind of command centre for mail, papers, household stuff, and even some of Ellie’s toys.
Part of my goal with not adding built-ins right away is to discover exactly what kind of storage we need.
The dressers aren’t quite the style I’m looking for in our eventual built-ins and they’re not quite the right size for their spots, but they do the job for now. And the price was right. Matt’s Dad picked them up years ago and they lived first in his shed and then in our barn. After some repairs, a cleaning and a coat of paint, they are a great interim solution.
Here are some of the other things I’m planning to do in the mudroom.
Install dresser hardware
The dressers don’t have a lot of space to screw on drawer pulls. The centre recessed panel is actually glass, so I can’t drill through it. I’m likely going to reuse the old pulls, but I’m going to spray paint them black first.
Refinish mirror
I found a big oval mirror at a thrift store this fall. The rounded shape will be a nice contrast to all the straight lines in the room. I’m going to remove the decorative piece on the top and refinish the wood frame, aiming for a rustic finish that will go with our cedar ceiling.
Install nightlight cover plate
I remembered last week that I had one LED cover plate left from a three-pack I bought a few years ago (I was influenced by Young House Love). The mudroom would be a perfect place for a nightlight, so I dug it out. Bonus, the cover plate also has a USB port, so it will be going at my new phone charging station on the landing dresser.
Build key cupboard
During construction I had our contractors insert a little wood box that I made into the wall beside the door. This box is going to become a hidden key cupboard. A few rows of cup hooks will give us plenty of space to hang keys. For the cupboard door, I’m going to use a picture attached to hinges. Storage. ✓ Art. ✓ Function. ✓ Form. ✓
Hang art
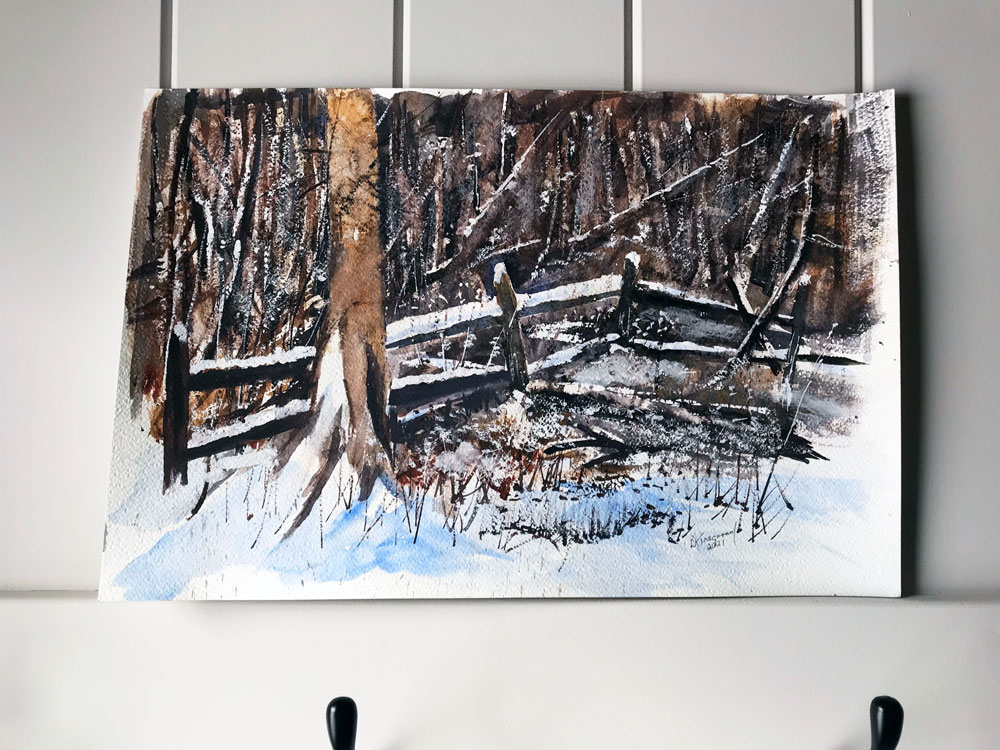
We don’t have a lot of wall space for pictures (and I don’t want to put too many holes in the paneling). I’m planning on hanging one painting. Matt’s Mom and my Mom have both sourced art for me. Matt’s Mom gave us a painting by Matt’s Grandpa. My Mom’s friend gave her two water colours that he painted. They’re all great farm scenes, and I really like how the blue and green tones contrast with the beige paneling. (Note that despite the photo differences below they’re all close to the same size.) Which would you pick?
We are definitely at the fun stage of the mudroom. These are pretty quick, inexpensive, easy projects. All of these little details make the room function the way we need it to and personalize the space for us.
What’s your first project of 2022? How do you handle storage at your entry? How many hooks is enough?
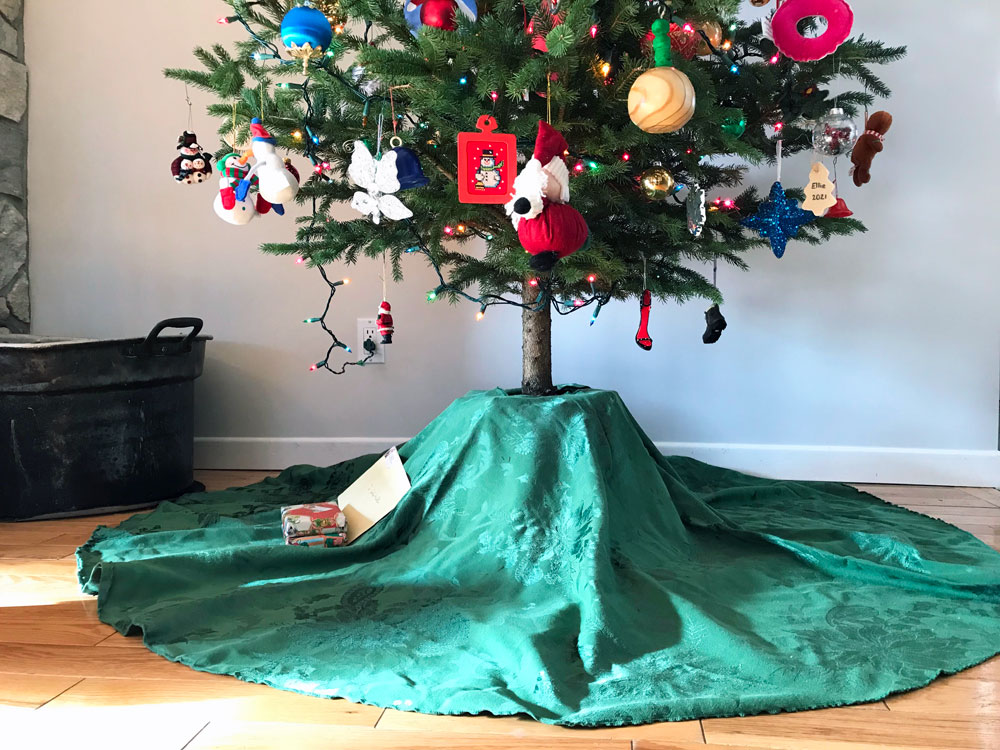
After we’d set up the tree, after we’d strung the lights and hung all the ornaments, Ellie asked, “Where’s the cape?”
The “cape,” or the tree skirt, was the final touch to hide the stand and, most important, provide a spot to rest all of the presents.
These days, there are lots of options for the base of your Christmas tree. However, I still like our simple skirt. And simple is the best word for this DIY.
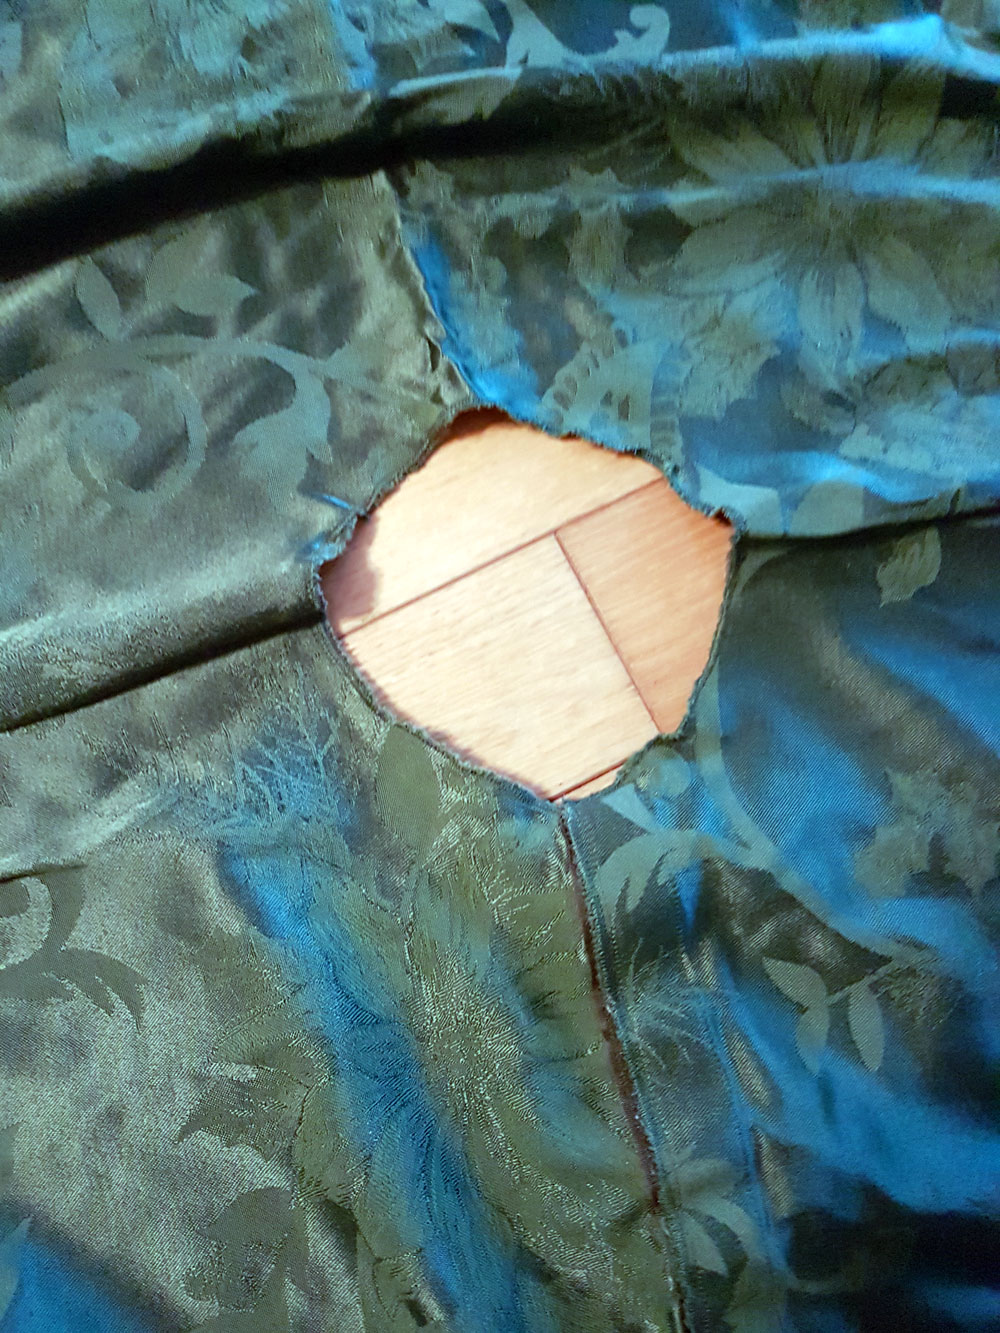
I made our tree skirt from a Christmas tablecloth.
Here’s how:
Find a round tablecloth in a pattern you like. Ours is about 6 feet in diameter.
Slit the tablecloth along the radius. (In other words, cut halfway across your table cloth from the edge to the centre. You can find the centre by folding the tablecloth in half and then in quarters. You’ll have a generous slice of pie. The point of the pie is the centre of your tablecloth.)
Cut a 6 inch diameter circle out of the middle of your tablecloth. This will be where the tree trunk goes. Use a plate or another round object as your pattern.
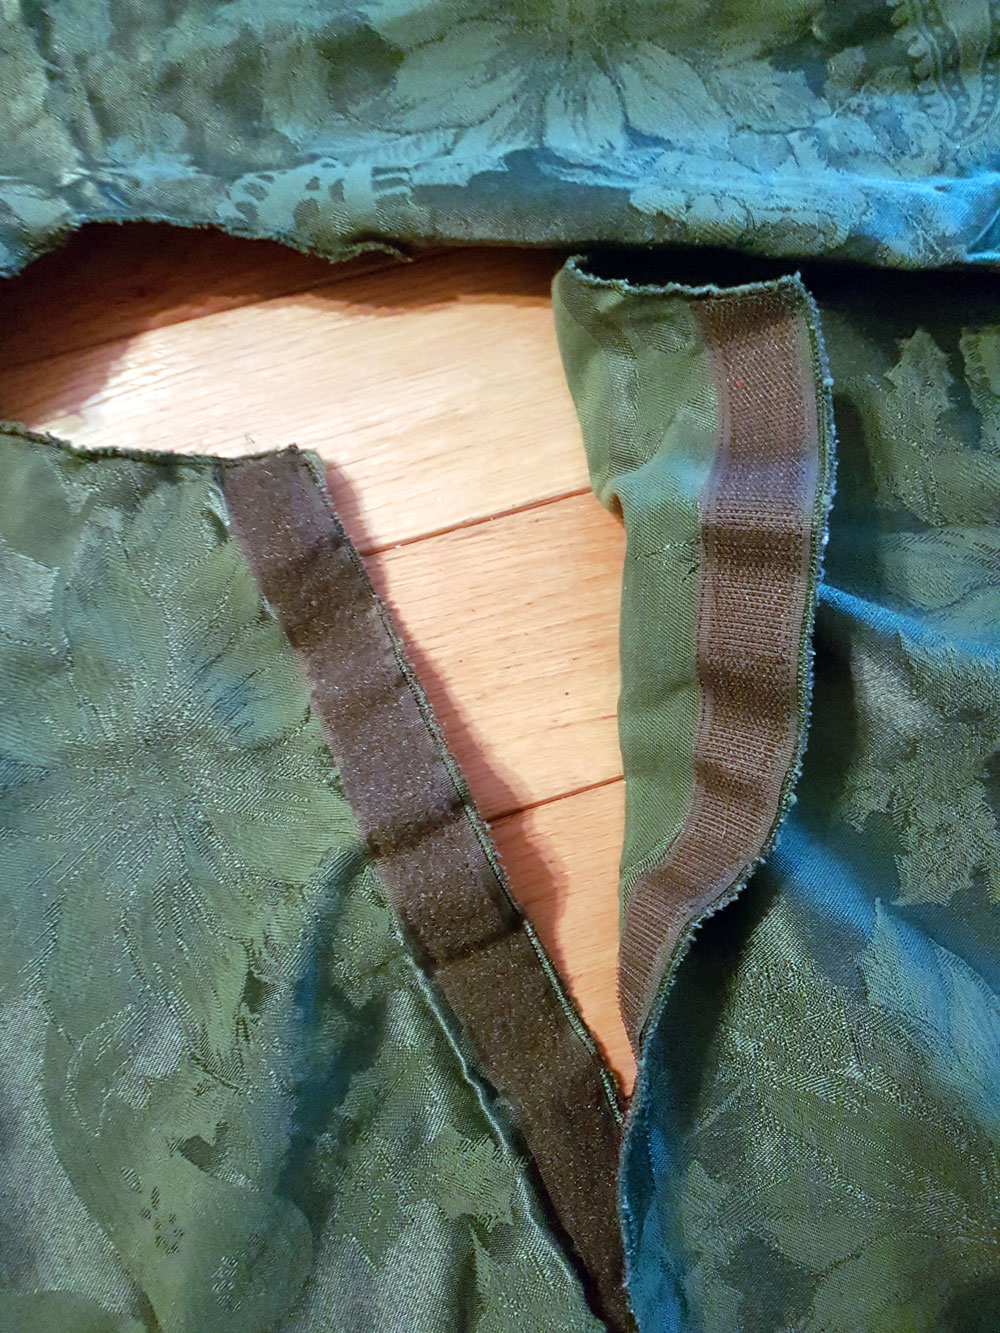
Sew a zigzag stitch around the edge of the trunk cutout and the slit to prevent your fabric from fraying.
Attach velcro along either side of the slit.
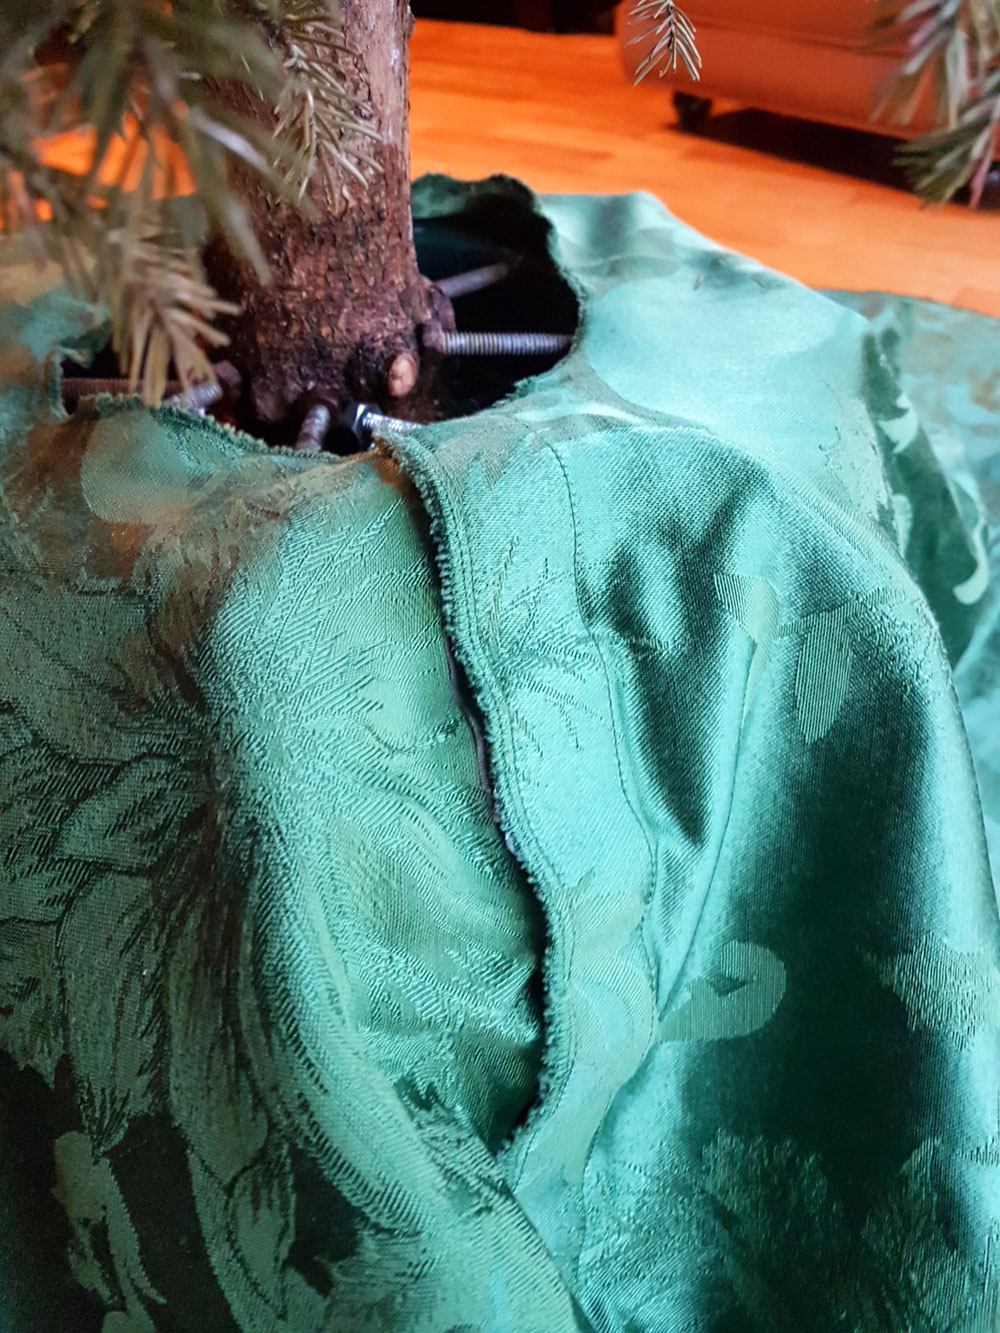
Drape your tablecloth around the bottom of the tree. Use the velcro to close the skirt. Put the velcro at the back of the tree so it isn’t visible.
And voila. Your Christmas tree now has a beautiful cape.
Does your Christmas tree have a cape? How do you style the bottom of your tree? Have you ever used a tablecloth for something other than a table? How many presents are under your tree so far?
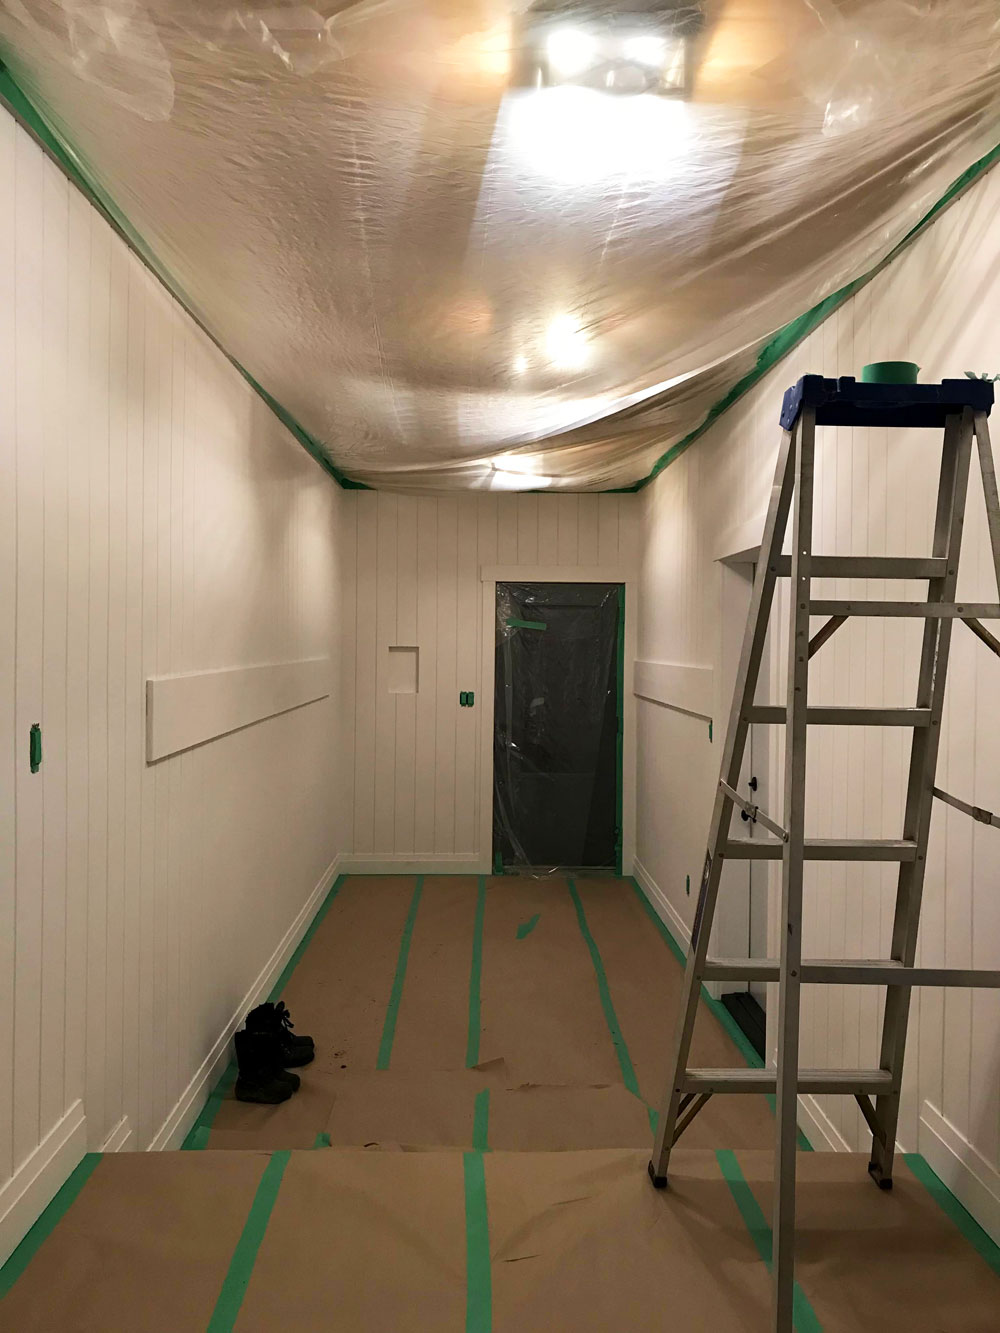
The mudroom is painted. The mudroom is painted. The mudroom is painted. Yay! Yay! Yay!
(And we even have some hooks.)
The spray painting was a bit of a saga, but not because of the spraying. The first sprayer I rented ended up being double booked (and I was the odd woman out). After a quick scramble I found another sprayer to rent, but when I got it home, it didn’t work (turned out to be a clogged hose). Third time’s the charm, and I finally had a working sprayer by lunch on spray day.
The spraying itself was pretty easy. I was not a pro by any means, but the paint went on fairly evenly and covered very well.
I decided to do all of the trim the same colour as the panelling (Abalone from Benjamin Moore at 75%). It’s a change from the rest of our house where the trim is painted white, but I like the seamless single colour in the mudroom. Plus, I don’t think white in a mudroom is the best choice for the way we live.
I was able to get two coats on in one day. Each coat took just a half hour. Then I let the paint dry overnight and took off all the masking the next day. When I was able to get a good look at the room, I was proud. The finish is not perfect, but I’m going to call it great. For the V-groove panelling and all the edges we had with the trim and hookboards, spraying was definitely easy.
Here are some lessons I learned from my first time spray painting:
Spraying uses lots of paint. The mudroom is not a big room (140 square feet), but I went through two full gallons.
PPE is critical. The paint aerosolizes. Any time I took off my mask or glasses, I could feel the particles stinging my eyes and throat. Don’t skimp on your protection (a hat and gloves are also helpful).
Have a brush just in case. You can gently brush out drips or “spits” without messing up your finish too much.
Mask, mask, mask. Cover anything that you don’t want painted. For us that meant the entire floor, the entire ceiling, the exterior door, the garage door knob and deadbolt, the archway to the kitchen, plugs, switches and the floor thermostat. Check your masking to make sure it remains in place throughout painting.
Keep the sprayer outside. Switching buckets and setting up the sprayer resulted in some splatters and drips around the machine by the end of the day. I put the sprayer in the garage on a sheet of plastic and pulled the hose inside, which meant that most of the mess stayed in the garage.
The paint feels like a big milestone. I sprayed the whole room by myself and it turned out well. Yay me! It’s also the last item on my mudroom to-do list. Now I can move on to fun stuff like decor and storage. In fact, we’re already using those hooks and have moved in some of our coats.
Have you ever spray painted a room before? Do you have any tips to share? Do you have any DIY sagas to share?