Basement TV area before and after

This reveal has been a loooooong time coming. The seventh post I ever wrote for this blog was “Basement reno begins” –that was more than five years ago. A few weeks after writing that post I shared a to-do list, the plans and then celebrated when we finished demo. Five years ago this week, we had fixed the wiring, reframed the exterior walls and received new spray foam insulation.

Now, I’m finally ready to share with you the TV area. You’ve seen snippets of this along the way, and we’ve been using this room for the past four and a half years. But there were a few missing elements that have finally come together, so I’m ready to show it off.

Let’s take a walk down memory lane first, shall we?

This is what we saw the first time we visited the house. A gross cluttered basement with a random dude sitting in a chair (just kidding, that’s our real estate agent taking a break with one of the books that was left behind). Please note the ceiling fixture that was installed as a wall sconce (there’s a matching one just out of the picture on the right) and the giant woodstove.

TV area before

Somehow, we saw past all of this and bought the place. After several trips to the dump, we ended up with a cleared, if not clean slate. This angle shows you the half wall leading into the laundry room (which we removed) and the doorway to Matt’s office (which we moved).

Basement before

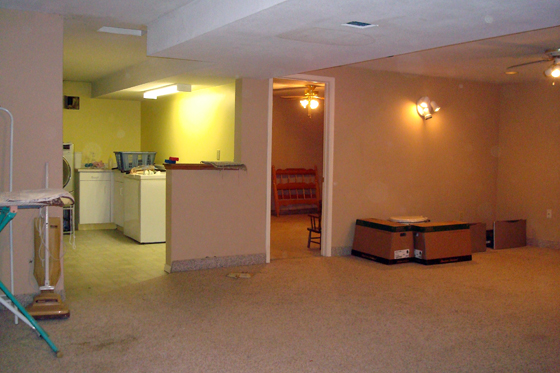
On the other side of the room, we have the woodstove, the matching pair to the ceiling sconce and you can get a glimpse of the ceiling fan, which was recessed into the ceiling so that it didn’t decapitate anyone. In my caption on this photo originally, I wrote “Picture a large, comfy sectional couch where the woodstove is and a big TV on the wall opposite the staircase.”

The main room before

Uh-huh. It’s a good thing I had a clear vision. We needed something to get us through the next six plus months of work.

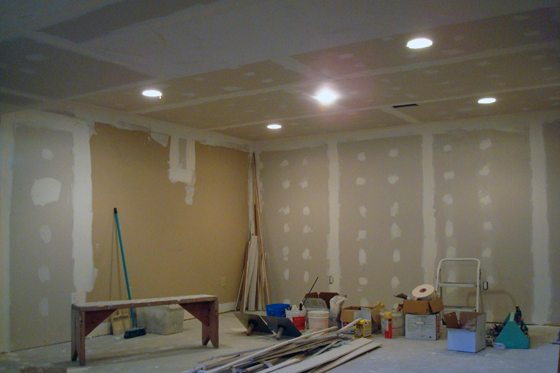
We started demo. Byebye half wall. Hello new doorway. Byebye exterior drywall. Why are you still there ceiling sconces?

Basement demo in progress

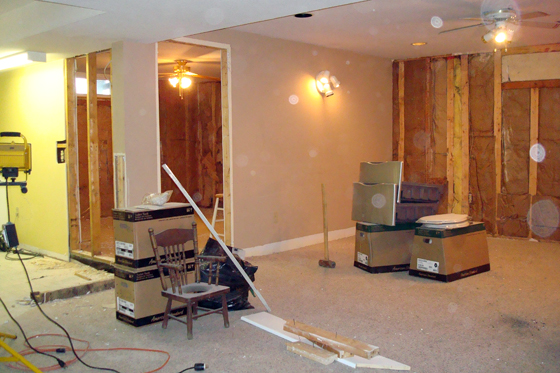
Then we reframed the walls so that they were deep enough for more insulation, removed the ceiling drywall so that we could fix bad wiring and finally got rid of those ceiling sconces. I’m still proud that I was able to replace the ceiling fan with a fifth potlight and put them all on the same switch. Me! I did that.

The partially gutted basement

We hauled the woodstove up the stairs with a rope tied to the back of my Dad’s truck, our mason patched the hole from the chimney, and we left a little message on the concrete.

Matt + Julia 2012

With spray foam insulation complete, we started to approach the putting it back together stage. What followed were six months of drywall. So much drywall.
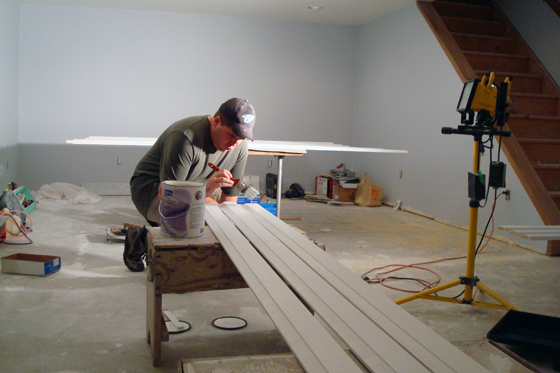
Installing drywall in the basement

Then finally paint.

Trim and carpet. (The crush to get the trim installed before the carpet arrived was tight).

Painting trim

Our new couch arrived just before Christmas 2012, and the basement was habitable.

Decor-Rest sectional couch with chaise

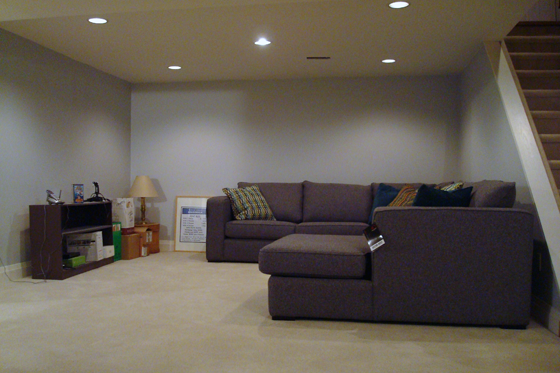
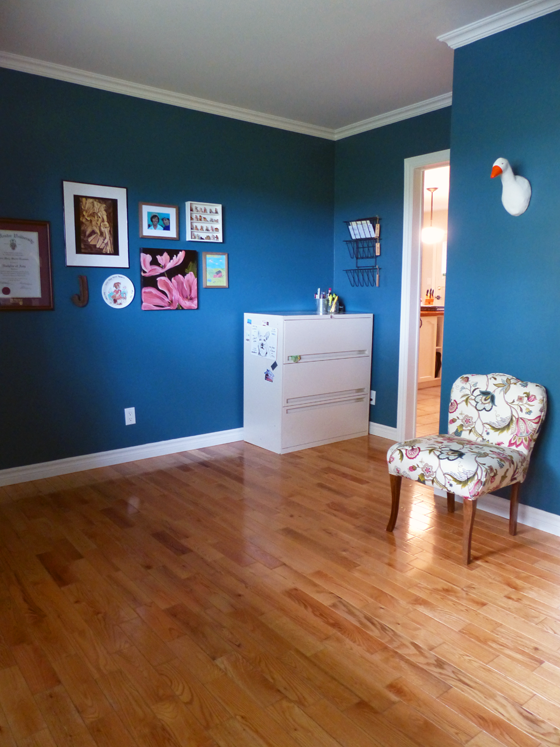
We’ve made tweaks (obviously) since then. Want to see what it looks like now?

Basement TV area

I have another post coming up that goes into all of the details on the finished space. But until then, here are a couple more before and afters for you.

Basement before

Basement TV area after

The main room before

Basement TV area after

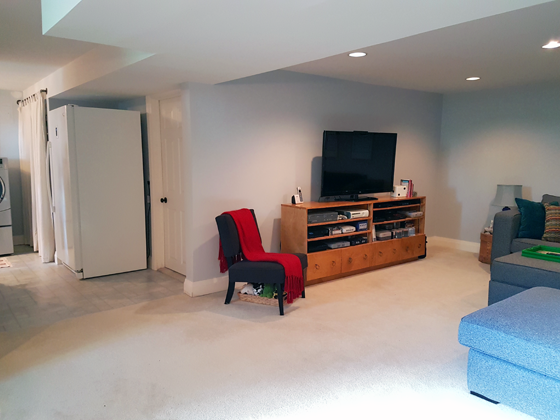
This is by far our most significant renovation. I love that we saw the potential of the space, stuck with it through all of the hard work and created a hangout area that works perfectly for us. The fact that we did almost all of it by ourselves makes me very proud.

China cabinet makeover for craft room storage

China cabinet makeover

All the time I was thinking of making over my office, one element was a constant. I wanted to use a china cabinet as the main storage piece in the room.

I liked the idea of drawers, cupboards and shelves to give me a variety of storage options. I also liked the idea of using as much vertical space as possible.

More than a year ago, I found the perfect cabinet–or almost perfect.

It had drawers. It had cupboards. It had shelves. It was the exact width that I wanted, but it wasn’t quite tall enough. The shelves couldn’t even hold a magazine.

I thought I could probably rebuild the upper hutch. And fortunately I was right.

Vintage china cabinet

The cabinet was well-constructed–each shelf connected into the side supports with a tongue and pocket screws–but it came apart fairly easily. I cut off the tongues so that I could reattach them to the new side pieces that I bought. I was even able to reuse the pocket holes (but didn’t fill them because they’re under the shelves where I can’t see them most of the time). I bought new boards for the sides and one for an extra shelf–gotta get that vertical storage.

Pocket holes

Along the way, I did away with the two little drawers from the upper section. I really wanted to keep them, but I would have had to build two more drawers to get the look I wanted. Building drawers was more than I wanted to tackle. So I went with two shelves that were close together and planned to find some baskets that could work kind of like the drawers would have.

The base didn’t require any rebuild. I had thought about changing the feet, but then decided, again, that it was more than I need to do.

The base did get some special attention though. I stripped the top and stained it a darker colour (Minwax Provincial). The rest of the cabinet got my go-to Cloud White in Benjamin Moore’s Advance formula.

You may remember from when I first shared the makeover plans for this cabinet that I wasn’t sure what to do with the cabinet pulls. They’re wood and recessed into the doors and drawers. I gave them a light sanding and then gooped them up with some of the Provincial stain. It worked. The dark pulls against the white cabinet look okay to me.

Wood cabinet hardware

The white paint blends the new wood that I added with the old wood of the original cabinet. The worst of the scratches on the top are camouflaged by the dark stain.

Scratches on the refinished china cabinet top

The one wrinkle that I wish I had planned a little farther in advance is the baskets. It took me awhile to find the colour and weave I envisioned in the size I needed. And it turns out there’s just the slightest variation in the size of the baskets that I bought. I thought they were a pair, but one is just slightly taller than the other–as in it fits a wee bit tight on the shelf (see it below on the right?).

If I’d given myself an extra half inch on the shelf, or measured the baskets more carefully, it would have been a non-issue. Overall, though, this is a minor inconvenience in what is an otherwise successful transformation.

Storage baskets in the china cabinet

The best things about the china cabinet are how much it holds and how it helps to keep everything organized. The shelves easily hold magazines, and, confession, I even have a junk drawer for when I gave up on sorting so many things.

One last time. Here’s the before.

Vintage china cabinet

And here’s the after.

China cabinet makeover

I love this transformation.

Colourful creative office

Office after

My office. A space that’s completely my own. The last bedroom in our house. It’s done. And I’m so happy with how it turned out.

While I’ve used the word “office” to describe this room, it’s really a sewing, crafting, creative space.

It’s filled with the things that I like to do. The things I like the most and that mean the most to me (Bill!). I love that I now have an organized room that I enjoy being in.

Favourite things in the office

This wall used to be filled with boxes that had been packed since we moved in five years ago. Now, the thrifted china cabinet holds sewing and knitting supplies, magazines and memorabilia–and keeps them all organized.

China cabinet storage in the office

Sewing pattersn and knitting needles

Knitting and sewing supplies

Growing up, I never won a trophy. When we were dating, I mentioned this to Matt. One fall, after I ran my first 10K, Matt presented me with a huge trophy. It meant so much to me that he did that. However, the trophy was truly huge. I took it apart and then put it back together in a slightly smaller configuration, and it fits easily on the shelves.

Running trophy

Reconfiguring the closet was also hugely helpful to keep everything organized. Hanging up my big pieces of fabric makes it easy to see what I have and ensures that I’m more likely to use them.

Fabric stash hanging in the closet

When it came to art, I wanted to display some of my favourite things–like this collection of vintage hats. My Mom taught me how to sew. She learned from her mother–the original owner of most of these hats. In fact, my great-grandmother made one of the hats that is hanging on the wall.

I love the idea of a time where people regularly dressed up to go out, and hats were part of the outfits. I don’t live in that world, but I can still enjoy these hats by having them on display.

Vintage hats hung on the wall

The gallery wall is another showcase of my favourite things.

Gallery wall

The same grandma that taught my Mom to sew also had a collection of Red Rose Tea figurines. Often when we were leaving her home after visiting, she would give us a figurine to take home. A few years ago, I decided to collect a full set of the nursery rhyme statues. Between gifts and flea markets, I got every one. However, I’ve never had a place to display them. Now I do–along with a fun photo of my Mom and I modeling some of the hats.

Red Rose Tea figurines

Another small collection that is finally on display is my thimble collection. Matt’s parents travel a fair amount, and my MIL buys a china thimble for me pretty much everywhere they go. I made a really small shelf to go above my sewing machine, and it holds all of the thimbles perfectly.

A magnetic strip from Lee Valley, painted the same colour as the wall, holds sewing instructions where I can easily see them as I’m working.

Thimble collection

While I’m not an official participant in the One Room Challenge, which concludes this week, it definitely helped motivate me to finish off this room. I love that every item on my to-do list is crossed off.

You can check out all of the official ORC participants at Calling it Home.

Feminine blue and floral office

There are so many little details that make this room work really well for me. And I love the beauty and the sentimentality that I was able to incorporate as well. While the ORC motivated me to finish the office, the room itself is now motivating me to keep crafting. I’ve returned to some projects that have been hanging around for a little while and had a super productive sewing month where I’ve churned out a dress, jacket and several pillows. I’m excited by what else this room is going to inspire.

Thanks for following along on the makeover. Do you have a crafty creative space at your house? What helps motivate you to finish projects–whether big like a room makeover or smaller crafts? Do you have a favourite collection on display?

Snoring, storing and decoring in the office

Baxter dozing

My sidekick and I made some more progress in the office this weekend. To be truthful, my sidekick snored and snuggled his dinosaur. I made the progress.

Beyond making the office pretty, I want to make it useful, organized and tidy. Usually when it comes to storage, I make due with whatever freebies I can find–cardboard cartons, shoe boxes, containers destined for the recycling bin.

While sometimes they work, sometimes they don’t. So for the office, I bought proper storage containers. Thanks to all of the sorting and tossing I’ve done, I didn’t need too many.

From a big cardboard box full of old school papers, I now have one–much smaller–plastic bin.

Plastic storage box

Six smaller containers hold all of my fabric remnants and fit perfectly into one of the cupboards in the china cabinet.

Plastic storage boxes

On the pretty side of the office makeover, I worked on the gallery wall. I’m actually not a huge fan of gallery walls. But I when I thought about everything that I wanted to display in the office, I realized that the best arrangement was to put them all together.

I am not a patient person, so I tried just laying it out on the floor and translating that to the wall. But it was hard to visualize. I traced each item onto paper and then taped them to the wall. I’m glad I took the time to map it out. It helped to finalize the layout–and realize that the initial placement was much too high.

Planning the gallery wall

Once I settled on the arrangement, I started hammering nails into the wall right away. But then I had to exercise some patience again. It was hard to get the pictures exactly where I wanted just by guessing where to place the nail. I took a minute to run downstairs and grab a paint stick and a screw. I don’t know why it took me so long to make this little tool. It made hanging the pictures so easy.

Paintstick picture hanger

I’m excited to show you the final gallery wall and the rest of the office next week when the One Room Challenge concludes. You can check out all of the official participants at Calling It Home.

Do you have a gallery wall in your home? How do you handle storage? Who else has a lazy sidekick?

Tiptoeing into the vegetable garden

Raspberry canes

I’ve been avoiding the vegetable garden. Not out of a lack of enthusiasm. I want to be in the garden. But I’m trying to be strategic about where I spend my time right now. I want to finish the office and I want to give the flowerbeds some attention. The garden has to wait.

I’ve set May as my start date for any serious work in the vegetable garden. I say serious because I can’t deprive myself avoid it entirely.

There are a few things that needed to happen sooner.

First is unwrapping the grapes. I had covered our new vines in burlap last year hoping it would help them survive the winter. Now that the temperatures are warmer and the sun is shining, I wanted them to have the benefit of the nice weather. I’m still not entirely sure how many vines survived the winter, but I feel like at least a few are alive.

Uncovering grapes that have been wrapped in burlap

I planted a rhubarb plant that I stole from my parents’ garden. Rhubarb has been on my list for a few years, so it’s exciting to have our own plant finally. This plant seems quite happy. Transplanting early in the season is working very well for me this year. The ground is wet, temperatures are mild, sun is shining. I’ve been moving a number of plants around and they all seem to be thriving.

Rhubarb early in spring

Matt and I cut up our seed potatoes. We planted our potatoes the first of May last year, and it worked out great, so we’re trying to get them ready. The cool thing about our potatoes this year is that except for one new variety our seed potatoes are all potatoes that we grew ourselves last year. We have Russian Blues, red and Kennebecs. The Kennebecs were our favourite last year and lived up to Karen’s hype. This year we’re adding Basin Gold, which are a big baking potato. Matt had bought these at the grocery store and they happened to sprout before we ate them, so into the garden they go.

I’m not sure where I read about this chitting technique, but this has worked for us the past few years. We cut the potatoes so that each chunk has about one eye. Then we let them dry out for a few weeks so that the potatoes don’t rot when we put them in the ground. I know people say these white stringy sprouts are not desirable, but they worked well for us last year and our plants seemed to grow faster.

Methinks we’re going to have lotsa potatoes.

Seed potatoes

The other exciting garden development–and one which I’ve done nothing for–is asparagus. It’s alive! Our scraggly little plants that we started from seed last year have begat a few slender stalks. Spindly might be a better term. A step up from scraggly, but not quite slender yet. Size does not matter in this case. The fact that they’re alive is a win.

Asparagus

We’re just a few days away from May, so my self-imposed hiatus will be coming to an end shortly. Then it’s full speed ahead on the vegetable garden. I’m excited with what’s to come next.

What gardening have you been doing? Do you have any transplant or potato growing techniques?

Walking down memory lane via the office

Sorting bills

Oooh, you’re in for a special blog post today. The next step in my office makeover was… wait for it… paperwork and filing. You can’t stand the excitement, right?

Paperwork may not be the most photogenic or interesting topic for a blog post. But it’s a fact of life, or at least a fact of my life.

I actually have some great systems to manage paper in my office. I’ve set these up over the last few years and they work pretty well for me. So even though I’m making over the office, I’m not making over absolutely everything.

This mail organizer is my main tool. As soon as the walls were painted, I reinstalled this right away. I only file paperwork a few times a year (all of our bills except for our credit cards are set up for automatic debits), so the piles of mail and bills grow and get messy. The organizer isn’t always tidy, but it avoids the piles.

Mail organizer

Receipts live in a box in a drawer until I reconcile them with my statements.

Receipts

You know we keep a pretty close eye on our finances. This reconciliation is one of the ways I do that.

Once everything is sorted, the papers go into our filing cabinet. The filing cabinet may not be the prettiest piece of furniture, but it’s very functional for us. I’ve seen some cool filing cabinet makeovers with paint, hardware and even fabric, so that may be something to consider for the future.

In the meantime, appreciate the nearly empty mail organizer.

Filing cabinet and mail sorter

The other paperwork I tackled was a huge box full of old schoolwork. As in from kindergarten through to university. Most of it ended up on the burn pile, but I kept a few things like report cards, class photos, my award-winning science project, a couple of memorable stories and this prophetic drawing.

Farm drawing

Even for the things I didn’t keep, it was fun to look back. I could see how my teacher’s comments on my grade 12 English essays made me a better writer–she was a tough marker, but completely right. In the kindergarten folder, I found this mimeographed matching sheet.

First test

On the back in my Mom’s hand-writing, it said “Julia’s first school test.” Awww.

First test

Now that I have returned from memory lane, I’m looking ahead again on what’s left for the office. Here’s where I’m at:

  • Buy and install light fixture
  • Unpack remaining boxes and organize china cabinet
  • Style china cabinet shelves
  • Sort and file paperwork
  • Install gallery wall #1
  • Install gallery wall #2
  • Reupholster seat of wooden chair

We’re down to two weeks to go in this mini One Room Challenge. Remember you can check out the official ORC participants at Calling it Home.

How do you organize mail, bills, receipts and paperwork at your house? Have you gone paperless yet? Has anyone else kept old schoolwork?

Mini One Room Challenge update #1

Vine flushmount light fixture

There are three weeks left in the official One Room Challenge. And three weeks left in my personal mini-ORC, also known as mission finish the office.

Already the motivation of the ORC is working. I had a very productive weekend, and I’m excited to see the finishing touches for the office coming together.

Here’s the to-do list update:

  • Buy and install light fixture
  • Unpack remaining boxes and organize china cabinet
  • Style china cabinet shelves
  • Sort and file paperwork
  • Install gallery wall #1
  • Install gallery wall #2
  • Reupholster seat of wooden chair

As you can see from the photo above, I have a proper light fixture now. I’ve envisioned this light fixture in the office for a long time. I second guessed myself for a moment when I finally bought it, but now that it’s installed it’s perfect. I love the dark metal and the vines and the crystals.

It’s kind of fun and a bit of a different experience to decorate a room completely for myself.

Something that’s also entirely for me is the gallery wall you see behind the light fixture. I’ll share more about that in a couple of weeks when I post the final the reveal.

Another personal favourite is the Brissac Jewel fabric by P Kaufmann that I used on my bulletin board and slipper chair. It’s making another appearance, this time on a wooden chair that past owners left at the farm.

Upholstering this chair hadn’t been part of the original plan for the office, but I couldn’t let this chair go (I have a thing for chairs). Covering a slip seat is a whole lot easier than upholstering the slipper chair. Pulling all of the staples out of the old upholstery probably took longer than adding the new fabric.

The dark wood and the bright fresh fabric look so nice against the white desk and turquoise walls.

Sewing desk

A major perk of the ORC is it ensures I complete all of the little details of a makeover. Details like paint touch-ups (which were also part of my weekend) and upholstering this chair.

It’s those little details that make a room come together. I’m thankful to finally be at that point with the office. Just a little more to go. We’re getting there.

So are all of the other bloggers that are participating officially in the ORC. Even though I’m not linking up, I encourage you to check out the other makeovers at Calling It Home. There will be new updates every Wednesday and Thursday until May 10.

Have you ever decorated a room just for you?

Makeover motivation from a mini One Room Challenge

It’s that time again. The One Room Challenge is taking over the blogosphere. It started last week and runs until May 10. More than 200 bloggers, 200 rooms and 200 inspiring makeovers.

I’m looking forward to all of the beautiful content arriving in my feedly over the next four weeks.

Once again this year, I’m not participating in the One Room Challenge. I’ve loved participating in the past and especially loved the results of our laundry room and master bedroom. But this time around, I don’t have a room ready for the six week timeline.

However, I do have a room mid-makeover. My office.

I’m thinking I can use the One Room Challenge and all of the activity of my fellow bloggers to motivate me to Finally. Finish. This. Room.

Office mid-makeover

So this is it. I’m setting a deadline, people. May 10. The office will be done.

Here’s my original to-do list, and where we’re at:

  • Scrape ceiling – Finished over the Christmas break–oh so long ago.
  • Paint ceiling, trim and walls – Finished over the Christmas break.
  • Add new shelf to closet – Finished and already filled.
  • Redo china cabinet and desk – Finished and partially filled.
  • Reupholster slipper chair – Finished and it’s oh so pretty.
  • Reupholster ironing board – Finished thanks to a lucky thrifting score.
  • Unpack all of my boxes and decorate – Started.

That last item is where I’ve been a bit stuck. I had so many boxes, which had been packed for at least five years–some of them longer. Also, decorating is kind of a big thing.

I know myself, and I know I’ll do better if I can break it down into smaller pieces.

So here’s the new to-do list of the remaining items:

  • Buy and install light fixture – I somehow forgot that I need a new light for this room since I removed and trashed the boob light that was here originally.
  • Unpack remaining boxes and organize china cabinet
  • Style china cabinet shelves
  • Sort and file paperwork
  • Install gallery wall #1
  • Install gallery wall #2
  • Reupholster seat of wooden chair

Totally doable, right? It’s mini compared to the full room makeovers other people are tackling through the ORC.

As slow as work has been on the office, it has been ongoing, even though I haven’t shared many updates. This weekend I made some progress on a few little shelves that will be part of the gallery walls.

Painting little shelves

I’m going to start sharing regular updates here to help myself stay on track. I’m not going to be sharing my makeover through the official ORC linkups on Calling It Home, though, because mine is so mini. I do encourage you to visit Calling It Home and checking out all of the projects for yourself.

And stay tuned here. Soon enough–with a little motivation from the ORC–I’ll be able to reveal the finished office. Four weeks to go.

Are you following any ORC makeovers? Official ones? Are you doing any makeovers yourself? How do you find motivation to finish off a makeover?

New upholstery for a vintage slipper chair

Slipper chair upholstered in Brissac Jewel by P Kaufmann Fabric

When my Mom was cleaning out my grandmother’s house, I asked if I could have the slipper chair. When my Mom showed up with a pink skirted chair, I was surprised. I actually didn’t remember ever having seen this chair before. The “slipper” chair I had in mind was a parson’s chair that had sat in my grandmother’s front hall. I ended up with that chair too–in fact it turned out to be one of a pair and I got them both in addition to the little pink slipper chair.

Yes, I have a thing for chairs.

I stripped off the pink cover and the old padding way back when we were still living at our first house. And the poor chair has sat naked in the pool room since we moved here to the farm. (I still had the pink cover balled up in a plastic bag. I slipped it back on the chair for a photo op. However, with no stuffing and an extreme number of wrinkles, the chair, which was already pretty sad, looks really, really sad.)

Reupholstering a slipper chair

I’ve always envisioned the slipper chair being part of my office, so now that that makeover is underway, it was finally time to give the slipper chair a new life.

This was a totally start from scratch scenario. I had the wood frame of the chair and that was it.

Wood frame of a slipper chair

This was also a totally make it up as I go scenario. I am not experienced in upholstery and am–like many people–a bit intimidated by it.

So I just dove in. I stained the legs to a dark brown. I covered the seat with some foam, and then put more foam on the back. I covered it all with batting, mashing it around the corners. I stapled, stapled and stapled.

Reupholstering a slipper chair

Then I covered it all with an old sheet, stapling the heck out of every fold.

Reupholstering a slipper chair

Then things got serious. I pulled out my bolt of Brissac Jewel fabric that I’ve had for longer than I’ve had the chair. There was lots of laying things out, turning them around, laying them out again, putting them back to the exact way they were before. And then doing it all over again. Once I finally figured out how to place the fabric, I then spent a lot of time stuffing material around the legs and trying to get the folds just right–or right enough.

Reupholstering a slipper chair

Reupholstering a slipper chair

I made my own piping and used flexible metal tack strip (plygrip) for the first time (this video was very helpful).

Reupholstering a slipper chair

I built my grip strength using my vintage manual staple gun–seriously, I’m almost ready for American Ninja Warrior. My fingertips are still tender. If I take on more upholstery, I would invest in an air powered staple gun. However, a project like this can be done with very basic tools–and very basic skills.

I covered up the messy underside with another piece of the sheet (although the packing crate that was used for the seat is pretty cool–I wonder what went to Montreal via Halifax).

Stamped wood on the underside of the vintage slipper chair

Underside of the slipper chair

My grandmother grew up in her family’s furniture store and reupholstered furniture regularly. She made the pink slip cover that was on the slipper chair originally. All I could think as I was working on this chair was that she would definitely have something to say about my technique if she was around. And I wish she was around to tell me how to do it right.

Right or wrong, though, it turned out pretty well. I can see the few flaws, but overall, I’m really proud.

Slipper chair upholstered in Brissac Jewel by P Kaufmann Fabric

Slipper chair upholstered in Brissac Jewel by P Kaufmann Fabric

Slipper chair upholstered in Brissac Jewel by P Kaufmann Fabric

Slipper chair upholstered in Brissac Jewel by P Kaufmann Fabric

I think my grandmother would be too.

Vegetable garden plans

Garden in winter at sunrise

We are officially in the month of spring. That means spring break–and that’s just what I’m going to be doing next week. I’m going to be taking a bit of time to hang out at the farm and hang out with my family. It’s going to be a week off from the blog as well. I’ll be back after the break.

The month of spring also means that garden season is dawning–even here in Canada. The green in the photo above is the winter rye I planted back in the fall. I did not expect it to be this green at this time of year, but it’s a very encouraging way to start the year.

I already talked about my plan to add blackberries and some more grapes this year. The order went in to the nursery at the start of the week.

So now I’m thinking about the rest of the garden.

As a refresher, we have a roughly 2,500 square foot garden. It is round, so our strategy is to divide it into quadrants. Raised beds run around the perimeter.

After a lot of work over the last few years to finish the fence, build the raised beds, build trellises, run a waterlineconstruct and hang the gate–and clear the garden in the first place–I’m looking forward to being able to focus on plants and soil this year.

I have a few themes that are guiding my plans.

Space planning

Last year I said we were going to use the whole garden. But I lied.

We only used three quarters of it. And the third quarter was filled with watermelons and weeds that we let run wild, so that was pretty much a cheat.

Watermelon vines growing in the garden

I realized as the summer progressed, that all of our plants could have used a little more elbow room.

We have a huge garden. There’s absolutely no need to cram things in. So this year, the plan is to give our plants lots of space and use the whole garden.

The easiest way to do that is to designate specific quadrants for specific crops. Specifically, tomatoes and potatoes will each get their own quarters.

Garden plan 2017

Crop rotation

The tomato and potato placement leads to my other priority for this year, crop rotation. Different plants draw different nutrients from the soil. Rotation is important to ensure the soil has a chance to recover.

From what I’ve read, potatoes and tomatoes are not the best of friends–as in you shouldn’t plant tomatoes where you grew potatoes the year before (and vice versa). My plan is to plant them in opposite quadrants so that we can rotate them (literally) around the garden each year and have a gap year between when potatoes and tomatoes grow in the same spot. (Does that make sense?)

Harvesting red potatoes

I’ve moved plants around each year but not considered rotation in a thoughtful, strategic, multi-year way.

To make the rotation work, the potatoes will grow in the same spot this year that they were in last year.

A few other things are staying in same place, more out of laziness than any strategy. The squash trellis was a success last year, and I want to use it again. However, it’s a bit of a monster (16 feet long by about 7 feet tall and about six feet wide). The prospect of moving it is daunting. The best place for the sunflowers is the south side where the sun is the strongest. I don’t think one year of repeats for the squash and the sunflowers will be too tragic.

Sunflowers on the weathered wood fence

Weed control

Oh weeds. Between 2,500 square feet of soil and my day job, I do not believe it’s possible for me to keep up with weeding the garden. Or at least I’m not willing to put in the time required.

So plan B. Mulch. Deep, deep mulch.

Straw mulch in the vegetable garden

I think I should be able to buy (or receive) some old bales of straw from the farmer who does our fields. Old bales that are already on their way to compost would be perfect.

The mulch will (hopefully) not only keep down the weeds, but as it composts it will add nutrients back into the soil.

Plant choice

The big lesson you hear from a lot of gardeners is grow what you eat. If you ask Matt, he’ll say potatoes (the Kennebecs were awesome), peppers (I’d appreciate some red bell peppers and Matt’s particularly interested in jalapenos) and onions.

For me, the fun of gardening is still trying unusual and new things. That means probably planting a row of our purple potatoes again (we have some of our Russian Blues left that we should be able to use as seed potatoes). Trying some different tomatoes (probably not our giant Sicilian Saucers again). And experimenting with eggplant, broccoli or cauliflower for something completely new.

Sicilian Saucer tomatoes

Oh and less zucchini. Again. We downsized to only a half a dozen plants last year and that was still way too many.

I’m excited for warm weather, longer days and the return of the vegetable garden. Until that arrives, I’m excited for a little pre-season vacation. I’ll be back in a week.

Do you have any garden plans yet this year? Any tips for things to grow? How about rotation or weed control ideas?