How to mix and match throw pillows

How to mix and match throw pillows

Throw pillows are a great way to add personality to a space. You can easily change them out for the season or your mood. However, mixing fabrics is a skill. It takes practice and sometimes some trial and error.

Join me in a little demonstration.

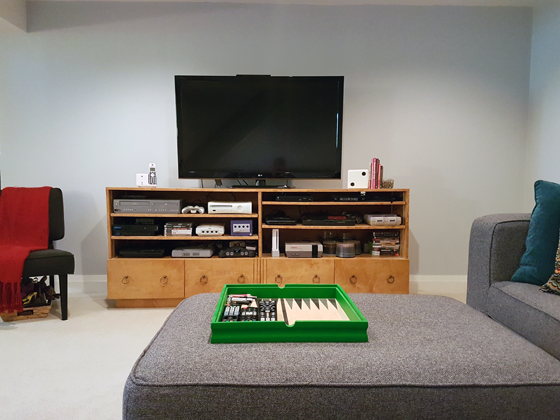
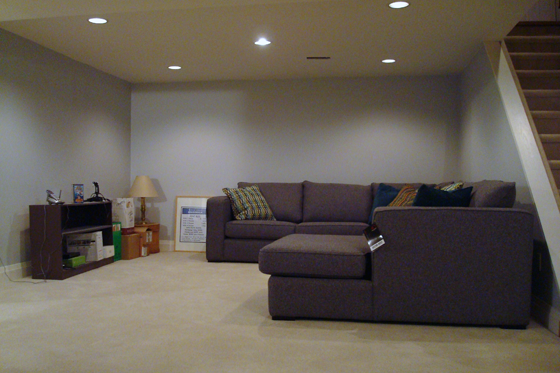
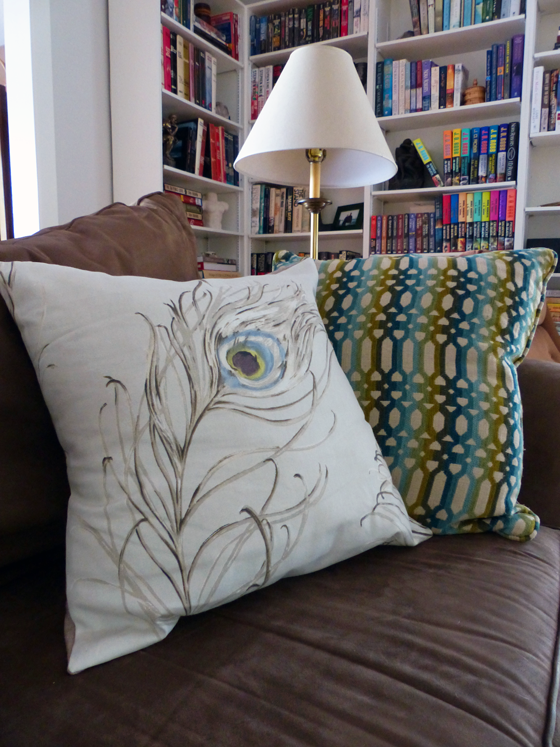
These are the pillows I chose when we first bought our beloved basement couch. It came with six pillows, and I selected three different fabrics. I wanted colour, pattern and something not too serious. However, it turned out they didn’t all play together as nicely as I wanted.

Observe.

How to mix and match throw pillows

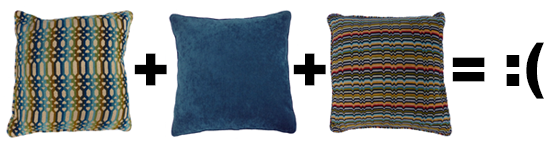
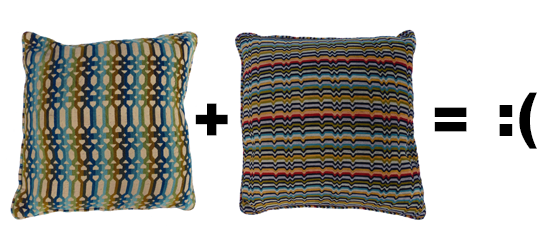
On their own, the patterned pillows each work with the turquoise velvet, but they do not work with each other, despite sharing several colours.

How to mix and match throw pillows

However, let’s look at another equation.

How to mix and match throw pillows

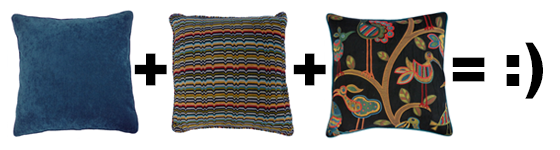
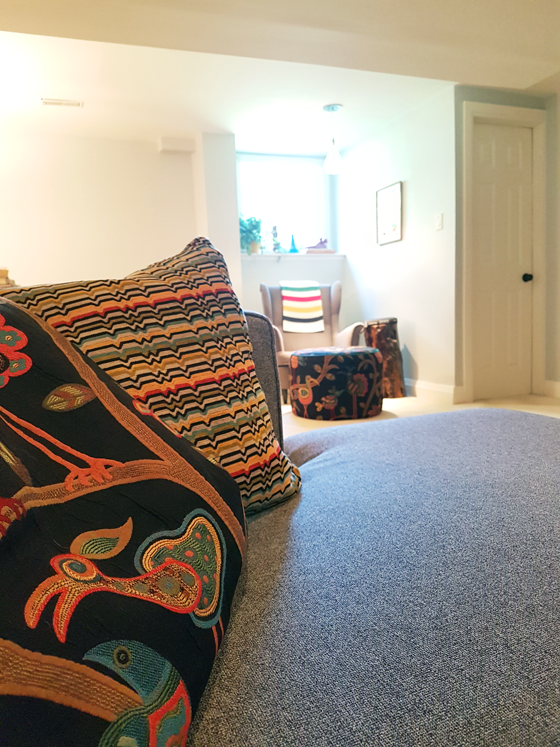
Remember back when I made our big round ottoman? How I searched for the perfect fabric, and the one that ended up working best with the striped pillows was the bird fabric that I already had in my stash? I still love this fabric, and since I ended up buying more to supplement my stash, I still had a good amount of yardage. More than enough to make two pillows.

These ended up being the most professional pillows I’ve ever made. They have zipper closures, piping and even extra liners to help contain the feathers, which always seem to work their way out through the covers. I love them so much.

How to mix and match throw pillows

But what about the poor rejected blue-green geometric? Here’s another equation for you.

How to mix and match throw pillows

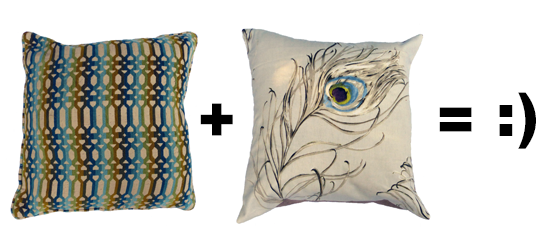
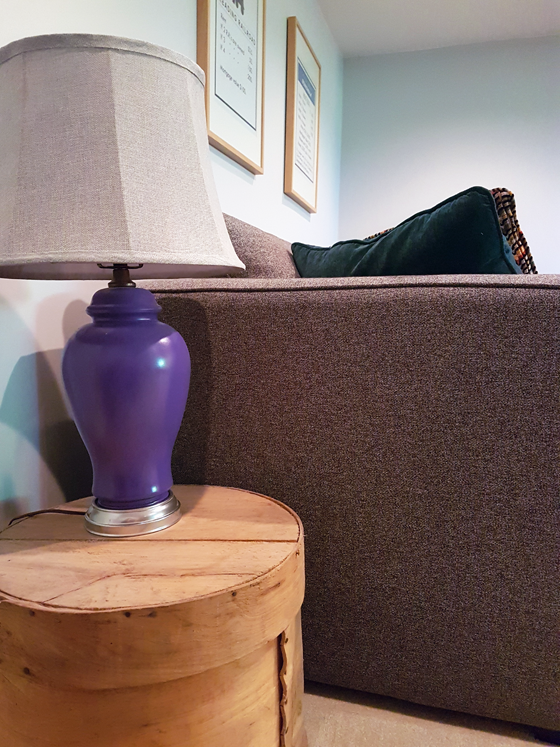
The feather is another fabric that I’ve had in my stash for years. I had always planned to use it to make cushions for the couch upstairs, and I finally got around to it. The blue and green bring a bit of summer into the living room.

How to mix and match throw pillows

I love the serendipity of two stash fabrics being perfect mix for pillows that we already had. Along the way, I’ve learned a few lessons about mixing fabrics.

  1. Let’s start with defining our fabrics. For the purpose of this demonstration, I’m going to use the labels “solid” (pretty self-explanatory), “geometric” (could be a stripe or another more linear pattern–the colourful stripe and the blue-green links both fall into this category for me) and “floral” (self-explanatory, but I’ll extend this to include fabrics like my birds or the feather).
  2. Don’t mix like patterns. By this I mean geometric with geometric or floral with floral. Unless the scale is dramatically different similar patterns will compete with each other like my pillows did. This exercise has taught me that the best bet is to mix different types of fabrics, like a geometric with a floral.
  3. Pick fabrics that share similar colours. This is probably the easiest way to mix. Colours don’t have to match exactly (the turquoise piping on the bird pillow isn’t the same as the turquoise velvet, but they still play well together).
  4. When mixing patterns, start with your most dominant pattern first. This is probably my biggest takeaway. My mistake in the family room was using the turquoise velvet as the base. It’s easy to match cushions to a solid. It’s harder to match the bossy stripe. But once I put that at the centre of the equation, I was able to make the mix work.

Pillows are some of the easiest items to sew–and there are also plenty of options to buy. They can add a finishing touch to a room or completely change the feel of a space. I like being able to freshen up the living room for the summer season, and I’m also very glad to have found the right mix for the family room.

Do you enjoy mixing and matching pillows? Do you sew your own or purchase? Do you change your decor with the season? What are your tips for finding a mix that works?

Two tiny shelves

When I was working on my office, I knew I wanted to find a way to display two collections. One was my Red Rose Tea figurines and the second was china thimbles my MIL has brought back from various trips she’s taken.

The thing about both of these collections is that they’re small. I had the shelves of the china cabinet where I could tuck in a few thimbles or figures, but they’d be lost amongst the bigger items on display. I also didn’t want them on a tabletop where they took up space that could be a work surface.

I decided to do two small shelves.

First was a small floating shelf for the thimbles. This shelf was so small and the thimbles are so light that I knew it wouldn’t need much support and I could screw it right to the wall.

China thimbles displayed on a small floating shelf

I cut a piece of 1×2 to the length I wanted and then drilled two holes through the face of it. The holes served two purposes. The first was to make sure the shelf didn’t split when I screwed it to the wall. The second was to recess the heads of the screws. I made the holes slightly bigger on the front so that the screws would go into the shelf by about a quarter of an inch.

I painted the shelf the same colour as the wall and then screwed it into place. Then I filled the holes with woodfiller and painted over them. The shelf blends into the wall very well, so that it (almost) looks like the thimbles are floating.

The second shelf is ingenious, but I can’t take credit for it. I found the idea on The DIY Mommy. This shelf started its life as a cutlery tray. I lopped off the one segment that ran perpendicular to the others on my Dad’s tablesaw. Then I painted it white, and simply screwed it to the wall. It is exactly the right size for my collection of nursery rhyme tea figurines.

Red Rose Tea figurines displayed on a cutlery tray made into a shelf

I love having different things hanging on the wall, rather than the usual pictures and paintings. These two collections have a lot of meaning for me. Memories of the tea figurines that lived in my grandmother’s china cabinet, appreciation for my mother-in-law thinking of me and my love of sewing when she’s traveling.

Do you have any small collections? How do you display “smalls”? Have you built any tiny shelves?

A late start, but progress, in the vegetable garden

Vegetable garden at the beginning of June

Living in Canada, our growing season starts a little later than some other places. However, I’m feeling really late on the vegetable garden. You’ll notice I haven’t shared an update on the garden since my last one when I said I was trying to stay away from the garden. Unfortunately, I’ve been fairly successful at staying away, and I’m quite behind on the vegetable garden.

Everything starts with weeding. I got the raised beds around the perimeter and one of the quadrants completely weeded last weekend. Another of the quadrants still has our winter rye cover crop, so I’ll just keep mowing it. That means there’s roughly half the garden to go.

Winter rye cover crop in spring

As I’m weeding, I’m planting because if I wait until the garden is weed-free we won’t grow anything.

I put in our potatoes a few weeks ago. So long ago that I need to go back and weed them again and then hill up the plants. Between the rows I’ve laid down some black rubber to try and smother the weeds.

Potato plants

I planted four new grapevines.

New Lakemont grapevines

All of the eight vines I planted last year are alive. I’m not sure I can take credit for this, but I’m still proud to see them growing. We now have four Somerset (red), four Sovereign Coronation (blue) and four Lakemonts (green). All seedless table grapes.

Two-year-old grape vines

I also ordered five blackberry bushes to add this year. We have a thriving row of red raspberries that I got from my parents last year (they’re that bushy mass in the background of the photo below).

I could easily do two rows of raspberries–I’ve thrown out hundreds of canes as I’ve weeded the garden–but variety is the spice of life, so I’m trying these Prime Ark Freedom blackberries. The canes seem pretty healthy, even though they mostly look like sticks for now.

Blackberry canes

While I was picking up my grapes and blackberries I noticed blueberry bushes for $4 each. Regularly these cost $12-$16. I’m usually a fairly plannful gardener and don’t buy things on a whim, but $4 is too good of a deal, so four blueberry bushes came home with me. Two are Jersey and two are Brunswick.

Blueberry bush

I love the way the outer raised beds are shaping up. They are going to be home to perennials (mostly fruits and a few herbs). There is our asparagus (still small, but thriving).

Asparagus gone to seed

Then there’s our dozen grapes, followed by our rhubarb. I’ve left room for us to add more rhubarb plants when this one is ready to split.

Rhubarb plant

Coming around the garden we go into the blueberries. There are also lavender, sage, thyme and chives. I may plop some basil, dill and rosemary in here, even though they’re not perennials.

Sage plant with buds on it

We have some sprouts in the house, but they’re still pretty small–our theme of starting everything late this gardening season applies to everything. I want them to hurry up and grow because they really could go outside. But the garden isn’t quite ready for them, so I don’t mind them taking their time.

I still have plans to get some old hay bales from our farmer so that we can put a deep mulch on the garden. Hopefully that will mean I don’t spend all of gardening season weeding.

For now, even though I’m behind, I am very pleased with how things are looking. This is our third year with our garden and our second with it officially laid out with raised beds and trellises. It’s really taking shape.

How is your garden growing? Are you ahead or behind or on schedule? Have you added any new plants this year? Do you have any tips for growing blueberries?

Terrible, terrible ticks

Tick on Baxter's leg

Ticks have been awful this spring.

We’ve removed more than 20 ticks from Baxter, ourselves and various surfaces in the house. Matt has expanded and extended pathways all around the farm so that we can avoid the long grass of the fields. We’ve made tick checks part of our regular routine every time we come into the house.

Container of ticks

I try not to worry about them too much. I know some ticks can carry dangerous illnesses, but we’re diligent checking ourselves and the dog regularly and pulling off any we find. (I wrote an article for ThatMutt.com about techniques for protecting Baxter from ticks.) As much as the quantity of ticks we’ve faced this spring is an anomaly, I feel like ticks are part of living on the farm.

However poor Matt is losing his mind. He’s mowed so much grass this spring–determinedly riding Wiley around on tick killing missions.

The one upside of this plague is that adding birds to our family has moved up our list. Hens, particularly guinea hens, eat ticks. Birds have always been on our someday list, but Matt has put them on the “we need to kill these ticks now” list. When my husband makes a decision, things happen fairly quickly.

Tick held in tweezers

After that statement, you might expect to see a picture of a cute fluffball chick or a feathered hen here. We’re not that impetuous. First we will build the coop and then we will get our birds. But I think we may have found our summer project.

Any coop building tips to share? Or any tick fighting strategies? Do you have ticks at your house? What pests are you battling this spring?

June 1

The house on June 1, 2017

I’m feeling a bit sentimental after five years on the farm. We have a special place, and I really treasure being here.

The house and the property have evolved since we arrived here five years ago. Looking back to April 2012, we’d added the flagpole to the turnaround, but the rest of the property–especially the turnaround–were still a disaster.

The house five years ago

In our second year, I started taking a photo each June 1. Everything is green and growing. It’s a nice time of year to showcase the farm.

In June 2014, we were still establishing the gardens, but things were looking much tidier than when we first started.

The house on June 1, 2014

This spring, we’re still making progress, and I’m so proud of what we’re building.

The exterior of the house itself has not changed as much as the interior or the rest of the property, but it will… someday. (And yes, I know our little maple tree is tilted.)

The house on June 1, 2017

I think it will be fun to look back at these June 1 photos in another 5, 25 or even more years and think about all of the memories we’ve made here.

Five years on the farm

How do you mark progress at your house? What time of year does your home look its best?

Real life in Illinois

Unfortunately, nothing seems to be going well right now for Sarah in Illinois. But philosophically, she says, “That is life!” She is here today with a chicken, fruit tree and garden update.

I’d love to start this post with a tale of how I walk out into my back yard, with my dog at my side. We walk to the chicken coop where we lovingly pet the chickens, gather more eggs than we could eat, then walk over to the garden. We pick multitudes of strawberries, sugar snap peas, rhubarb and gaze at the full garden of healthy, thriving plants that will soon provide healthy vegetables to all of our meals.

Unfortunately, this is real life. And life doesn’t care about your plans.

This post will be full of things that have gone wrong. But I promise, I am keeping a positive outlook.

Chickens

If you follow me on Instagram, you already know what I am going to write here. One of my chickens died. I don’t know what happened.

Last weekend our neighbor texted Steve and said that she had some type of predator that has been getting in her barn, and it killed two of her young kittens. So Steve went to help her, and the plan was to set a live trap and hopefully catch the culprit.

The next evening I went to close up my chickens and I found the Rhode Island Red dead in the corner of the coop. The other three chickens are perfectly fine.

I inspected the coop and run and found no point of entry. There was no blood and no damage to the body of the chicken. So even though I have been on alert with my neighbor having an issue, I really don’t feel a predator killed my chicken. I think it must have had some problem that I was not aware of. But believe me when I say, I am keeping a much closer eye on the coop.

Fruit Trees

I posted a few weeks back that we had planted two cherry trees. I had ordered them through a seed and plant catalog, and they came bare root. If you have seen a small bare root tree, it basically looks like a stick.

I had confidence that with all the rain (more on that below) I would see some sort of life in our two “sticks,” but after about 4 weeks they showed no sign of life, no leaf, no bud. In fact one was very brittle and Steve was easily able to break the top off.

One day we were at our local “buy everything in one stop” store and there was a 4-foot cherry tree with healthy leaves and even a couple cherries hanging from it.

We decided it was time to give up on our “sticks” and purchase trees that were about 4 years further along in the growing process.

While we were there I told Steve that we should go ahead and pick up a peach tree. They looked healthy and peaches are Steve’s favorite fruit. He looked them all over, made sure the leaves looked healthy, made sure the trunk was straight and we made our purchase. When we got home, we dug a hole and when we lifted the tree to set it in, we saw the tag hanging off of it: Apple Tree ‘Pink Lady.’

We got a good laugh out of how both of us could inspect this tree so closely, look at the leaves that were obviously not peach tree leaves and still bring home an apple tree.

The next day we went back up and picked up two peach trees. We checked and double checked the tags this time.

Garden

In my last post, I talked about how much rain we had.

In 6 days we measured 9.7 inches of rain in our rain gauge. Since then I haven’t kept as close record, but I know for certain we have had at least another 3 inches. I looked online and our average rainfall for the month of May is 4 inches. We have had over three times our normal rainfall.

As I write this, the forecast is calling for 80% chance of thunderstorms tonight and 50% chance tomorrow. So the fact that I have ANYTHING growing in the garden is close to a miracle.

I have had to replant potatoes, but thankfully the second crop has broken ground and is much more likely to make it.

We also replanted cucumbers and sugar snap peas, and they also look much better.

Remember last year when I overdid it on the radishes? We we took a much better approach this year, and my crop is a lot more manageable.

However, our tomatoes and green peppers are showing signs of stress from the excess rain. The leaves are starting to yellow. We planted 2 green peppers on little mounds hoping that would help, but I am still not sure about them.

As you can see, our garden is struggling a little bit. But it is still early and I have high hopes that it will come around. Looking closely at my pictures, you can see I have some weeding to do.

As soon as it is possible we still need to plant green beans, squash, cabbage, watermelons and sunflowers. I will plant pumpkins sometime in early July for an October harvest.

That looks so, so soggy, Sarah. You’ve had some tough breaks. I love that you can still laugh about apple-peach trees and look ahead to a successful harvest.

Fun and games in the family room

Basement TV area

Way back when we started looking for our perfect farm, one of the things we wanted was a useable basement. Many farms come with old farmhouses which don’t typically come with great basements. Usually, there are rubble and stone foundations, shallow ceiling height, dirt floors and moisture.

One of the things that made this farm a winner was that it had a very, very useable basement. You saw the transformation on Friday of how we renovated the TV area. Today I’m delving into the details of how we decorated it.

It all started with these posters. These are Matt’s two favourite Monopoly properties. When I saw them on Lindsay’s blog, I knew I had to make them for him.

Monopoly posters

Theme is a bad word when it comes to decor, but we have a loose fun and games theme happening here in the basement. On the TV stand I made a die to serve as a bookend and on the ottoman we have a backgammon board tray.

I like these little pops of fun.

Dice bookend

Backgammon board tray

The other pop we have in the basement is colour. The base is neutral–the walls, carpet, couch, chair. The red throw, the green tray, the purple lamp and, of course, our pretty pillows all add personality.

The lamp sits on top of a wood cheese drum that came from Matt’s grandpa’s house. It’s too low to be used as a proper end table, but it’s the perfect height to give a bit of a glow when we’re sitting downstairs. And it’s the little touch of rustic that I’ve decided every room at the farm needs.

Purple lamp on a wood drum

I love these pillows. The stripe is bossy, a little bit retro and a perfect match to the bird fabric that  I used on our DIY ottoman (Crazy Ol Bird Midnight by Swavelle/Mill Creek). I love this bird fabric so much that I bought a lot of it, and I had plenty to make two pillows for the couch. (The stripe and the turquoise velvet pillows came with the couch).

Colourful pillows

The sectional is so comfortable. I love the chaise, I love that we have room for a huge number of people, I love that everyone can sit with their feet up. The ottoman also serves another purpose. The top hinges open to give us lots of storage.

Basement TV area after

The other half of the TV area holds–what else–the TV. My Dad and I made the TV cabinet five years ago when we were first putting the basement together. And it’s awesome.

TV cabinet with multiple video game systems

The goal with the TV cabinet was to hold all of Matt’s video game systems. He’s never been able to have them all hooked up at once, but here he finally does. There’s everything from old Nintendo and Sega to new Playstation and XBOX. The drawers hold games, controllers, cables and other accessories.

Video game TV cabinet

Beside the TV stand is the Austin chair that I won from Blogpodium. The boxy shape and grey fabric work perfectly with the rest of the TV area.

Chair with red throw

Baxter’s toys live in a basket under Austin–the basement is fun for everyone.

Dog toys

Our big renovation gave us a space. All of the little decorative details make the space. It’s personal and fun and perfect for us.

Basement TV area after

What’s your must-have for a fun family room? How do you feel about decorating themes? How do you mix neutrals and colour? Do you have a video gamer at your house? What are your favourite Monopoly properties?

Basement TV area before and after

This reveal has been a loooooong time coming. The seventh post I ever wrote for this blog was “Basement reno begins” –that was more than five years ago. A few weeks after writing that post I shared a to-do list, the plans and then celebrated when we finished demo. Five years ago this week, we had fixed the wiring, reframed the exterior walls and received new spray foam insulation.

Now, I’m finally ready to share with you the TV area. You’ve seen snippets of this along the way, and we’ve been using this room for the past four and a half years. But there were a few missing elements that have finally come together, so I’m ready to show it off.

Let’s take a walk down memory lane first, shall we?

This is what we saw the first time we visited the house. A gross cluttered basement with a random dude sitting in a chair (just kidding, that’s our real estate agent taking a break with one of the books that was left behind). Please note the ceiling fixture that was installed as a wall sconce (there’s a matching one just out of the picture on the right) and the giant woodstove.

TV area before

Somehow, we saw past all of this and bought the place. After several trips to the dump, we ended up with a cleared, if not clean slate. This angle shows you the half wall leading into the laundry room (which we removed) and the doorway to Matt’s office (which we moved).

Basement before

On the other side of the room, we have the woodstove, the matching pair to the ceiling sconce and you can get a glimpse of the ceiling fan, which was recessed into the ceiling so that it didn’t decapitate anyone. In my caption on this photo originally, I wrote “Picture a large, comfy sectional couch where the woodstove is and a big TV on the wall opposite the staircase.”

The main room before

Uh-huh. It’s a good thing I had a clear vision. We needed something to get us through the next six plus months of work.

We started demo. Byebye half wall. Hello new doorway. Byebye exterior drywall. Why are you still there ceiling sconces?

Basement demo in progress

Then we reframed the walls so that they were deep enough for more insulation, removed the ceiling drywall so that we could fix bad wiring and finally got rid of those ceiling sconces. I’m still proud that I was able to replace the ceiling fan with a fifth potlight and put them all on the same switch. Me! I did that.

The partially gutted basement

We hauled the woodstove up the stairs with a rope tied to the back of my Dad’s truck, our mason patched the hole from the chimney, and we left a little message on the concrete.

Matt + Julia 2012

With spray foam insulation complete, we started to approach the putting it back together stage. What followed were six months of drywall. So much drywall.

Installing drywall in the basement

Then finally paint.

Trim and carpet. (The crush to get the trim installed before the carpet arrived was tight).

Painting trim

Our new couch arrived just before Christmas 2012, and the basement was habitable.

Decor-Rest sectional couch with chaise

We’ve made tweaks (obviously) since then. Want to see what it looks like now?

Basement TV area

I have another post coming up that goes into all of the details on the finished space. But until then, here are a couple more before and afters for you.

Basement before

Basement TV area after

The main room before

Basement TV area after

This is by far our most significant renovation. I love that we saw the potential of the space, stuck with it through all of the hard work and created a hangout area that works perfectly for us. The fact that we did almost all of it by ourselves makes me very proud.

Robot vacuum pros and cons

Matt and Baxter watching the Neato botvac

My vacuum sagas are well-documented on this blog. There was the debate about whether we should get a Dyson. Then we answered that question when we went with Sebo. Most recently, I realized that no matter what kind of vacuum we have, I don’t want to push it around, so I started musing about robot vacuums.

Well, we have entered a new chapter in vacuum-dom. The robot era. That’s right. We took the plunge and bought a robot vacuum.

It’s been magical.

I don’t think our floors have ever been this clean.

The other weekend, we started the vacuum and then went out to cut the grass. We did two chores at once. On Friday, as Bax and I headed out for the day, I turned on the vacuum. I wasn’t even home, and my house was being cleaned. Magic.

When I’m home, I have so many things that I want to do/feel like I have to do that I wish I could be in two places at once. Now I basically can be.

We purchased the Neato Botvac D80–and yes, we purchased it. This is not a sponsored post. My sister has this vacuum and she loves it. She had done a lot of research to figure out which vacuum to go with and I trust her judgment, so I didn’t launch my own investigation.

Obviously, Neato is a hit, but I thought it might be helpful to delve a bit more into what works and, let’s be honest here, what doesn’t. Because as wonderful as Neato is, he does have a few shortcomings.

Likes

Horseshoe shape. I feel like this allows him to get into corners and get close to furniture. At the same time, his round back end allows him to escape if he’s in too tight of a space.

His strength. Neato is a strong little guy. We have thresholds at the doorway to each bedroom, and he bumps up and over them with no issue. The first time we put him to work, he climbed up onto the track of the patio door in the kitchen. Bumps and uneven floors are no problem.

Personality. This may seem silly, but Neato has been programmed as a “being.” He says, “Please clean my brush” rather than just “please clean brush.” I like that he has some personality and is not just a machine. (And this obviously fits in with the other furniture and equipment in our house that also has names, exhibit A, Wiley the tractor).


Neato D80 display screen

Easy to work. Neato has two buttons. That’s it. Push the Home button and he goes to work. Push the spot clean button and he does the four-foot square area in front of him. The display screen tells us what he’s doing (it’s a bit small, so the type may be hard to read for some people). The filter pulls out easily for cleaning, as do the brushes.

He works on multiple floor surfaces. Upstairs we have wood floors with the occasional rug. Downstairs we have mostly carpet, with vinyl sheet flooring in the laundry room and tile in Matt’s bathroom. Neato cleans each of them equally well and transitions between wood and rugs without effort.

He does a good job. Neato is persistent and goes under furniture, around chairs and into all of the nooks and crannies that he can fit into. These are areas where I will half-heartedly swipe the vacuum–if I bother at all.

Shortcomings

Neato is not speedy. He moves relatively cautiously and takes a little while to work the perimeter of the room before doing the centre. Since I’m not doing it, I don’t mind. He can take as long as he wants.

Neato needs a break. Even fully charged, Neato can’t finish either the basement or the whole first floor in one shot. Whether upstairs or down, he needs a break just over halfway through. He goes back to his base, recharges, and then goes back to where he left off. (Isn’t that so neat?) Again, this extends the cleaning time slightly.

Small dirt bin. Neato is not a big dude. The dirt bin has to be emptied after every cleaning session (not the half session I mentioned above). In fact, the first time he vacuumed the basement, the dirt bin was overflowing with dog hair (don’t judge me). Now that we’re vacuuming more frequently, the floors aren’t as dirty. But I still don’t think we could do two rounds without emptying the bin. However, there are no bags to deal with. It’s easy to pop out the bin, open the filter, dump the dust and hair, and close everything back up.

Dirt bin on the Neato botvac

I don’t understand him. Neato’s programming is pretty impressive. I don’t know how he does what he does. But his progress or his thinking is computer, not human. At the end of vacuuming, he says, I’m going back to my base–and then he heads in the opposite direction from his base. He shortly turns around and goes in the right direction, but the algorithm or whatever it is that drives him doesn’t make sense to me. Again, I can let this go, because whatever he’s doing is working for him.

You have to tidy up. Before setting Neato loose, Matt and I do a quick run around the house to pick up anything that might be on the floor, like shoes or dog toys or cords. If I’m vacuuming myself, I do this as I go, just tossing things out of my way. Neato takes a little more planning or preparation.

Neato has gotten stuck. Before getting a robot vacuum, one of the complaints I heard was that they get stuck. Neato hasn’t gotten stuck yet under furniture, but he has gotten stuck a few times on cords and once on the laundry room rug. I’ve now coiled up cords so that he can cruise under them, or tucked them under furniture, so that they don’t interfere with Neato. The laundry room rug gets rolled up and set on top of the dryer until Neato is done.

He doesn’t do stairs or walls. My sister laughed at me the first time she came over after we got Neato because the floors upstairs and down were pristine and the stairs were a mess. Likewise, those pesky cobwebs that form in the corners of the ceiling aren’t on Neato’s radar at all. So I still have to drag out Sebo to handle a few other areas.

Price. Neato is not cheap. After investing as much as we did in Sebo, I was very reluctant to spend just as much on a second vacuum.

Neato D80 vacuum

In the end, Neato has one benefit that outweighs everything. I don’t have to do the vacuuming anymore. That is a massive, magical win.

Who handles vacuuming at your house? Have you considered getting a robot vacuum? Does anyone else struggle with staying on top of the vacuuming? Or do you enjoy vacuuming?

China cabinet makeover for craft room storage

China cabinet makeover

All the time I was thinking of making over my office, one element was a constant. I wanted to use a china cabinet as the main storage piece in the room.

I liked the idea of drawers, cupboards and shelves to give me a variety of storage options. I also liked the idea of using as much vertical space as possible.

More than a year ago, I found the perfect cabinet–or almost perfect.

It had drawers. It had cupboards. It had shelves. It was the exact width that I wanted, but it wasn’t quite tall enough. The shelves couldn’t even hold a magazine.

I thought I could probably rebuild the upper hutch. And fortunately I was right.

Vintage china cabinet

The cabinet was well-constructed–each shelf connected into the side supports with a tongue and pocket screws–but it came apart fairly easily. I cut off the tongues so that I could reattach them to the new side pieces that I bought. I was even able to reuse the pocket holes (but didn’t fill them because they’re under the shelves where I can’t see them most of the time). I bought new boards for the sides and one for an extra shelf–gotta get that vertical storage.

Pocket holes

Along the way, I did away with the two little drawers from the upper section. I really wanted to keep them, but I would have had to build two more drawers to get the look I wanted. Building drawers was more than I wanted to tackle. So I went with two shelves that were close together and planned to find some baskets that could work kind of like the drawers would have.

The base didn’t require any rebuild. I had thought about changing the feet, but then decided, again, that it was more than I need to do.

The base did get some special attention though. I stripped the top and stained it a darker colour (Minwax Provincial). The rest of the cabinet got my go-to Cloud White in Benjamin Moore’s Advance formula.

You may remember from when I first shared the makeover plans for this cabinet that I wasn’t sure what to do with the cabinet pulls. They’re wood and recessed into the doors and drawers. I gave them a light sanding and then gooped them up with some of the Provincial stain. It worked. The dark pulls against the white cabinet look okay to me.

Wood cabinet hardware

The white paint blends the new wood that I added with the old wood of the original cabinet. The worst of the scratches on the top are camouflaged by the dark stain.

Scratches on the refinished china cabinet top

The one wrinkle that I wish I had planned a little farther in advance is the baskets. It took me awhile to find the colour and weave I envisioned in the size I needed. And it turns out there’s just the slightest variation in the size of the baskets that I bought. I thought they were a pair, but one is just slightly taller than the other–as in it fits a wee bit tight on the shelf (see it below on the right?).

If I’d given myself an extra half inch on the shelf, or measured the baskets more carefully, it would have been a non-issue. Overall, though, this is a minor inconvenience in what is an otherwise successful transformation.

Storage baskets in the china cabinet

The best things about the china cabinet are how much it holds and how it helps to keep everything organized. The shelves easily hold magazines, and, confession, I even have a junk drawer for when I gave up on sorting so many things.

One last time. Here’s the before.

Vintage china cabinet

And here’s the after.

China cabinet makeover

I love this transformation.